


一、源码搭建
kafka源码编译,版本信息如下
| 环境 | 版本 |
|---|---|
| kafka | 0.10.1.0 |
| scala | 2.11 |
| gradle | 3.1 |
修改源码 build.gradle 文件添加:
ScalaCompileOptions.metaClass.daemonServer = true
ScalaCompileOptions.metaClass.fork = true
ScalaCompileOptions.metaClass.useAnt = false
ScalaCompileOptions.metaClass.useCompileDaemon = false
添加 maven 仓库地址
repositories {
    maven {
      url 'https://maven.aliyun.com/nexus/content/groups/public/'
    }
    maven {
      url 'https://maven.aliyun.com/nexus/content/repositories/jcenter'
    }
    mavenCentral()
    jcenter()
}
开始编译为 idea 项目
gradle idea
二、Producer 创建流程
本节从一个生产者 demo 开始入手,从上帝视角大体浏览一下生产者都有哪些核心组件以及消息是如何被发送出去的。并在之后的章节对每一个核心组件和流程进行详细剖析。下面是一个生产者 demo
import org.apache.kafka.clients.producer.*;
import org.apache.kafka.common.serialization.StringSerializer;

import java.util.Properties;

public class Test {
    public static void main(String[] args) {
        Properties properties = new Properties();
        properties.setProperty(ProducerConfig.BOOTSTRAP_SERVERS_CONFIG, "127.0.0.1:9092");
        properties.setProperty(ProducerConfig.KEY_SERIALIZER_CLASS_CONFIG, StringSerializer.class.getName());
        properties.setProperty(ProducerConfig.VALUE_SERIALIZER_CLASS_CONFIG, StringSerializer.class.getName());

        KafkaProducer<String, String> producer = new KafkaProducer<>(properties);

        for (int i = 0; i < 10; i++) {
            producer.send(new ProducerRecord<>("test", "111"), (metadata, exception) -> System.out.println("回调"));
        }

        producer.close();
    }
}
从创建一个 KafkaProducer 开始,看一下生产者在初始化的时候都做了什么。如果构建了源码 kafka 生产者源码在 clients 模块下(kafka客户端源码为java,服务端源码为scala)
在阅读 KafkaProducer 构造方法之前,先看一段类注释
A Kafka client that publishes records to the Kafka cluster.
The producer is thread safe and sharing a single producer instance across threads will generally be faster than having multiple instances.
注释告诉我们 KafkaProducer 是线程安全的,线程共享的效率要高于多实例。因此可以预测 KafkaProducer 源码一定有对线程安全做处理的代码。
找到最一般性的构造方法
private KafkaProducer(ProducerConfig config, Serializer<K> keySerializer, Serializer<V> valueSerializer){}
这部分代码可以分为两个部分:配置解析、组件初始化
2.1 核心配置解析
这里将涉及配置解析的代码单独提取出来如下:
private KafkaProducer(ProducerConfig config, Serializer<K> keySerializer, Serializer<V> valueSerializer){
  try {
    log.trace("Starting the Kafka producer");
    Map<String, Object> userProvidedConfigs = config.originals();
    this.producerConfig = config;
    this.time = new SystemTime();
    // TODO  在一个 jvm,如果有多个生产者,client-id
    clientId = config.getString(ProducerConfig.CLIENT_ID_CONFIG);// client.id,客户端id
    if (clientId.length() <= 0)
      clientId = "producer-" + PRODUCER_CLIENT_ID_SEQUENCE.getAndIncrement();
    // TODO  ============== 监控指标,可以不用管 ================>>>
    Map<String, String> metricTags = new LinkedHashMap<String, String>();
    metricTags.put("client-id", clientId);
    MetricConfig metricConfig = new MetricConfig().samples(config.getInt(ProducerConfig.METRICS_NUM_SAMPLES_CONFIG))
      .timeWindow(config.getLong(ProducerConfig.METRICS_SAMPLE_WINDOW_MS_CONFIG), TimeUnit.MILLISECONDS)
      .tags(metricTags);
    List<MetricsReporter> reporters = config.getConfiguredInstances(ProducerConfig.METRIC_REPORTER_CLASSES_CONFIG,
                                                                    MetricsReporter.class);
    reporters.add(new JmxReporter(JMX_PREFIX));
    // 监控的指标
    this.metrics = new Metrics(metricConfig, reporters, time);
    // TODO  <<<==============================
    // TODO 核心组件1:分区器,用于决定消息被路由到topic的哪个分区
    this.partitioner = config.getConfiguredInstance(ProducerConfig.PARTITIONER_CLASS_CONFIG, Partitioner.class);
    // 重试间隔 100ms
    long retryBackoffMs = config.getLong(ProducerConfig.RETRY_BACKOFF_MS_CONFIG);
    // 生产者最大发送的字节数,注意是一次的request的batch的size,不是一个消息size,默认 1m
    this.maxRequestSize = config.getInt(ProducerConfig.MAX_REQUEST_SIZE_CONFIG);
    // buffer memory 大小,默认 32m
    // 缓冲区满会阻塞 max.block.ms 时间,默认 60 s
    this.totalMemorySize = config.getLong(ProducerConfig.BUFFER_MEMORY_CONFIG);
    // 压缩
    this.compressionType = CompressionType.forName(config.getString(ProducerConfig.COMPRESSION_TYPE_CONFIG));
    /* check for user defined settings.
     * If the BLOCK_ON_BUFFER_FULL is set to true,we do not honor METADATA_FETCH_TIMEOUT_CONFIG.
     * This should be removed with release 0.9 when the deprecated configs are removed.
     */
    if (userProvidedConfigs.containsKey(ProducerConfig.BLOCK_ON_BUFFER_FULL_CONFIG)) {
      log.warn(ProducerConfig.BLOCK_ON_BUFFER_FULL_CONFIG + " config is deprecated and will be removed soon. " +
               "Please use " + ProducerConfig.MAX_BLOCK_MS_CONFIG);
      boolean blockOnBufferFull = config.getBoolean(ProducerConfig.BLOCK_ON_BUFFER_FULL_CONFIG);
      if (blockOnBufferFull) {
        this.maxBlockTimeMs = Long.MAX_VALUE;
      } else if (userProvidedConfigs.containsKey(ProducerConfig.METADATA_FETCH_TIMEOUT_CONFIG)) {
        log.warn(ProducerConfig.METADATA_FETCH_TIMEOUT_CONFIG + " config is deprecated and will be removed soon. " +
                 "Please use " + ProducerConfig.MAX_BLOCK_MS_CONFIG);
        this.maxBlockTimeMs = config.getLong(ProducerConfig.METADATA_FETCH_TIMEOUT_CONFIG);
      } else {
        this.maxBlockTimeMs = config.getLong(ProducerConfig.MAX_BLOCK_MS_CONFIG);
      }
    } else if (userProvidedConfigs.containsKey(ProducerConfig.METADATA_FETCH_TIMEOUT_CONFIG)) {
      log.warn(ProducerConfig.METADATA_FETCH_TIMEOUT_CONFIG + " config is deprecated and will be removed soon. " +
               "Please use " + ProducerConfig.MAX_BLOCK_MS_CONFIG);
      this.maxBlockTimeMs = config.getLong(ProducerConfig.METADATA_FETCH_TIMEOUT_CONFIG);
    } else {
      this.maxBlockTimeMs = config.getLong(ProducerConfig.MAX_BLOCK_MS_CONFIG);
    }

    /* check for user defined settings.
     * If the TIME_OUT config is set use that for request timeout.
     * This should be removed with release 0.9
     */
    if (userProvidedConfigs.containsKey(ProducerConfig.TIMEOUT_CONFIG)) {
      log.warn(ProducerConfig.TIMEOUT_CONFIG + " config is deprecated and will be removed soon. Please use " +
               ProducerConfig.REQUEST_TIMEOUT_MS_CONFIG);
      this.requestTimeoutMs = config.getInt(ProducerConfig.TIMEOUT_CONFIG);
    } else {
      // 请求超时时间,默认30s
      this.requestTimeoutMs = config.getInt(ProducerConfig.REQUEST_TIMEOUT_MS_CONFIG);
    }
    // bootstrap.servers
    List<InetSocketAddress> addresses = ClientUtils.parseAndValidateAddresses(config.getList(ProducerConfig.BOOTSTRAP_SERVERS_CONFIG));

    // 序列化器
    if (keySerializer == null) {
      this.keySerializer = config.getConfiguredInstance(ProducerConfig.KEY_SERIALIZER_CLASS_CONFIG,
                                                        Serializer.class);
      this.keySerializer.configure(config.originals(), true);
    } else {
      config.ignore(ProducerConfig.KEY_SERIALIZER_CLASS_CONFIG);
      this.keySerializer = keySerializer;
    }
    if (valueSerializer == null) {
      this.valueSerializer = config.getConfiguredInstance(ProducerConfig.VALUE_SERIALIZER_CLASS_CONFIG,
                                                          Serializer.class);
      this.valueSerializer.configure(config.originals(), false);
    } else {
      config.ignore(ProducerConfig.VALUE_SERIALIZER_CLASS_CONFIG);
      this.valueSerializer = valueSerializer;
    }

    // load interceptors and make sure they get clientId
    userProvidedConfigs.put(ProducerConfig.CLIENT_ID_CONFIG, clientId);
    List<ProducerInterceptor<K, V>> interceptorList = (List) (new ProducerConfig(userProvidedConfigs)).getConfiguredInstances(ProducerConfig.INTERCEPTOR_CLASSES_CONFIG,
                                                                                                                              ProducerInterceptor.class);
    // 拦截器
    this.interceptors = interceptorList.isEmpty() ? null : new ProducerInterceptors<>(interceptorList);

    config.logUnused();
    AppInfoParser.registerAppInfo(JMX_PREFIX, clientId);
    log.debug("Kafka producer started");
  } catch (Throwable t) {
    // call close methods if internal objects are already constructed
    // this is to prevent resource leak. see KAFKA-2121
    close(0, TimeUnit.MILLISECONDS, true);
    // now propagate the exception
    throw new KafkaException("Failed to construct kafka producer", t);
  }
}
第一个有意思的点体现在线程安全上,kafka 为每个生产者都分配一个 client-id(如果配置文件没有指定的话),通过 AtomicInteger 的 getAndIncrement 方式获取到自增的 id 并拼接上 producer-,该参数主要用于监控场景作为指标的标识,之后会尝试获取一个核心参数整理如下:
retry.backoff.ms:消息发送失败的重试间隔,默认值 100ms
metadata.max.age.ms:元数据更新时间,默认是 5min,注意这个配置只是客户端定时去同步元数据(topic、partition、replica、leader、follow、isr等),但并不是说一定是定时同步,大胆猜测一下当生产者发送消息时发现待发送的topic元数据没有缓存此时一定会去拉取一次且一定是阻塞模式;当 broker 发生变化触发元数据改变也会去拉取一次
max.request.size:一次请求最大的数据量,默认值 1M;提前剧透一下,这里的数据量限制不是说单挑消息的大小,而是一次请求,kafka在发送消息时会将多条消息打包成一个 RecordBatch,且一个分区生成一个 RecordBatch,因分区大概率是在不同的 broker 中,因此 kafka 会将若干个 RecordBatch 按照 broker 打包成一个 request,这里的数据量是对 request 的限制
buffer.memory:缓冲区大小,默认值 32M;提前剧透一下,生产者对消息有打包的过程,在没有达到打包条件时生产者会将消息缓存在缓冲区中,当缓存的数据量超过该值生产者会阻塞,直到达到阻塞时间的最大值
compression.type:压缩,默认值 none
max.block.ms:最大阻塞时间,默认值 60s。这里的时间从调用 send 方法开始一直到消息被发送的时间,包括上述说的缓冲区满产生的阻塞,以及元数据拉取时的阻塞都是包含在内,可以理解为一次完整的消息发送包含的时间
batch.size:批次大小,默认值 16K;就是上面说的 RecordBatch 的大小,这个参数非常重要在源码有多处体现,对效率有极大的影响
linger.ms:两次发送的时间间隔,默认值 0;两次发送没有间隔即来一条发送一条,这个参数主要防止当消息过小迟迟达不到 batch.size 的打包条件,导致数据延迟;因此这个配置在生产上建议配置,默认值导致生产者没有打包的行动极大地影响吞吐量,但又不能过大,过大会影响数据的时效性。通常的参考标准时根据 batch.size 估算数据量达到一个 batch 的时间
connections.max.idle.ms:连接最大空闲时间,默认值 9min;为了减轻客户端服务端的压力,对于长时间不活跃的连接会根据 lru 算法进行关闭
max.in.flight.requests.per.connection:每个连接允许没有响应的最大请求数,默认值 5;消息发送成功后得到响应前的请求会被放置在内部的 in-flight 数组中,当得到响应后(无论是成功还是失败)会被从这里移除,特别是当消息发送失败后进行重试,因为不知道服务端什么时候接收成功,当该值大于 1 时会存在消息乱序的情况(即使topic只有一个分区)。
reconnect.backoff.ms:连接重试间隔,默认值 5ms
认为比较重要的参数都做了必要的说明,到这里生产者核心的参数就解析完了,后续的各个组件初始化都是借助这些参数进行。
2.2 核心组件初始化
2.2.1 MetaData
元数据,在构造方法中有两行代码的体现
this.metadata = new Metadata(retryBackoffMs, config.getLong(ProducerConfig.METADATA_MAX_AGE_CONFIG));
// TODO 核心行为:初始化的时候拉取元数据,第一次只是初始化,并不会拉取数据
this.metadata.update(Cluster.bootstrap(addresses), time.milliseconds());
在创建元数据组件时传入重试次数和拉取的时间间隔,它的逻辑在 metadata.max.age.ms 已经提到过了,后续会有一个更新的动作,从代码逻辑来看只是做了一个简单的初始化并没有在创建的时候就拉取集群元数据,这里可以思考一下如果是你你会在什么时间什么条件下开始拉取、怎么拉取(同步还是异步)、拉取多少(全量拉取还是按需拉取)
public synchronized void update(Cluster cluster, long now) {
  // TODO  Kafka生产者初始化的时候会不会去拉取元数据?
  // 初始化只是初始化了集群元数据,第一次 cluster 主题分区都是空的集合
  this.needUpdate = false;
  this.lastRefreshMs = now;
  this.lastSuccessfulRefreshMs = now;
  this.version += 1;

  for (Listener listener: listeners)
    listener.onMetadataUpdate(cluster);

  // Do this after notifying listeners as subscribed topics' list can be changed by listeners
  this.cluster = this.needMetadataForAllTopics ? getClusterForCurrentTopics(cluster) : cluster;

  notifyAll();
  log.debug("Updated cluster metadata version {} to {}", this.version, this.cluster);
}
上面解释可以出一个面试题:Kafka生产者初始化的时候会不会去拉取元数据?
2.2.2 RecordAccumulator
内存缓冲区,这里包含对大多数生产者的核心代码如:消息如何被添加到缓冲区,数据如何被打包,内存如何复用等。但初始化并不是很难
// 核心参数 RecordAccumulator 负责消息复杂的缓冲机制
// batch.size 同一个分区的数据会被打包成一个batch,一个broker上多个分区对应的多个batch会被打包成一个request
// batch.size 太小会降低吞吐量,设置为0则一条消息发送一次
// batch.size 太大会在本地缓存大量数据
// 默认 16 k
// TODO  核心组件3:缓冲区
this.accumulator = new RecordAccumulator(config.getInt(ProducerConfig.BATCH_SIZE_CONFIG),
                                         // 缓冲区大小,默认 32m
                                         this.totalMemorySize,
                                         // 压缩
                                         this.compressionType,
                                         // 两次 request 间隔,如果消息非常小,很久都没有积累到 batch.size,如果到了 linger 时间就直接发送出去
                                         // 默认 0 ms
                                         config.getLong(ProducerConfig.LINGER_MS_CONFIG),
                                         retryBackoffMs,
                                         metrics,
                                         time);
2.2.3 NetworkClient
网络客户端,生产者和服务端交互的组件负责所有的网络请求包括:数据的发送、消息的响应等。提前剧透一下这个组件使用存 Java NIO 编写,可以称为工业级 NIO 模板对于网络编程有很好的参考价值。因此看这部分源码之前请务必理解 Java NIO 的知识,需要达到可以实现简单 C/S 通信模型
// 网络通信组件,它是构建 SocketChannel 的组件同时封装了加密,如:SSL
ChannelBuilder channelBuilder = ClientUtils.createChannelBuilder(config.values());
// TODO 核心组件4:网络通信客户端
NetworkClient client = new NetworkClient(
  // 每个broker连接最大空闲时间 默认 9 分钟,超时连接会被回收
  new Selector(config.getLong(ProducerConfig.CONNECTIONS_MAX_IDLE_MS_CONFIG), this.metrics, time, "producer", channelBuilder),
  this.metadata,
  clientId,
  // 每个broker最多接收五个没有响应的request,会存在消息乱序的问题
  config.getInt(ProducerConfig.MAX_IN_FLIGHT_REQUESTS_PER_CONNECTION),
  // 重试连接时间间隔5毫秒
  config.getLong(ProducerConfig.RECONNECT_BACKOFF_MS_CONFIG),
  // socket 发送缓冲区大小,默认 128k
  config.getInt(ProducerConfig.SEND_BUFFER_CONFIG),
  // socket 接收缓冲区大小,默认 32k
  config.getInt(ProducerConfig.RECEIVE_BUFFER_CONFIG),
  this.requestTimeoutMs, time);
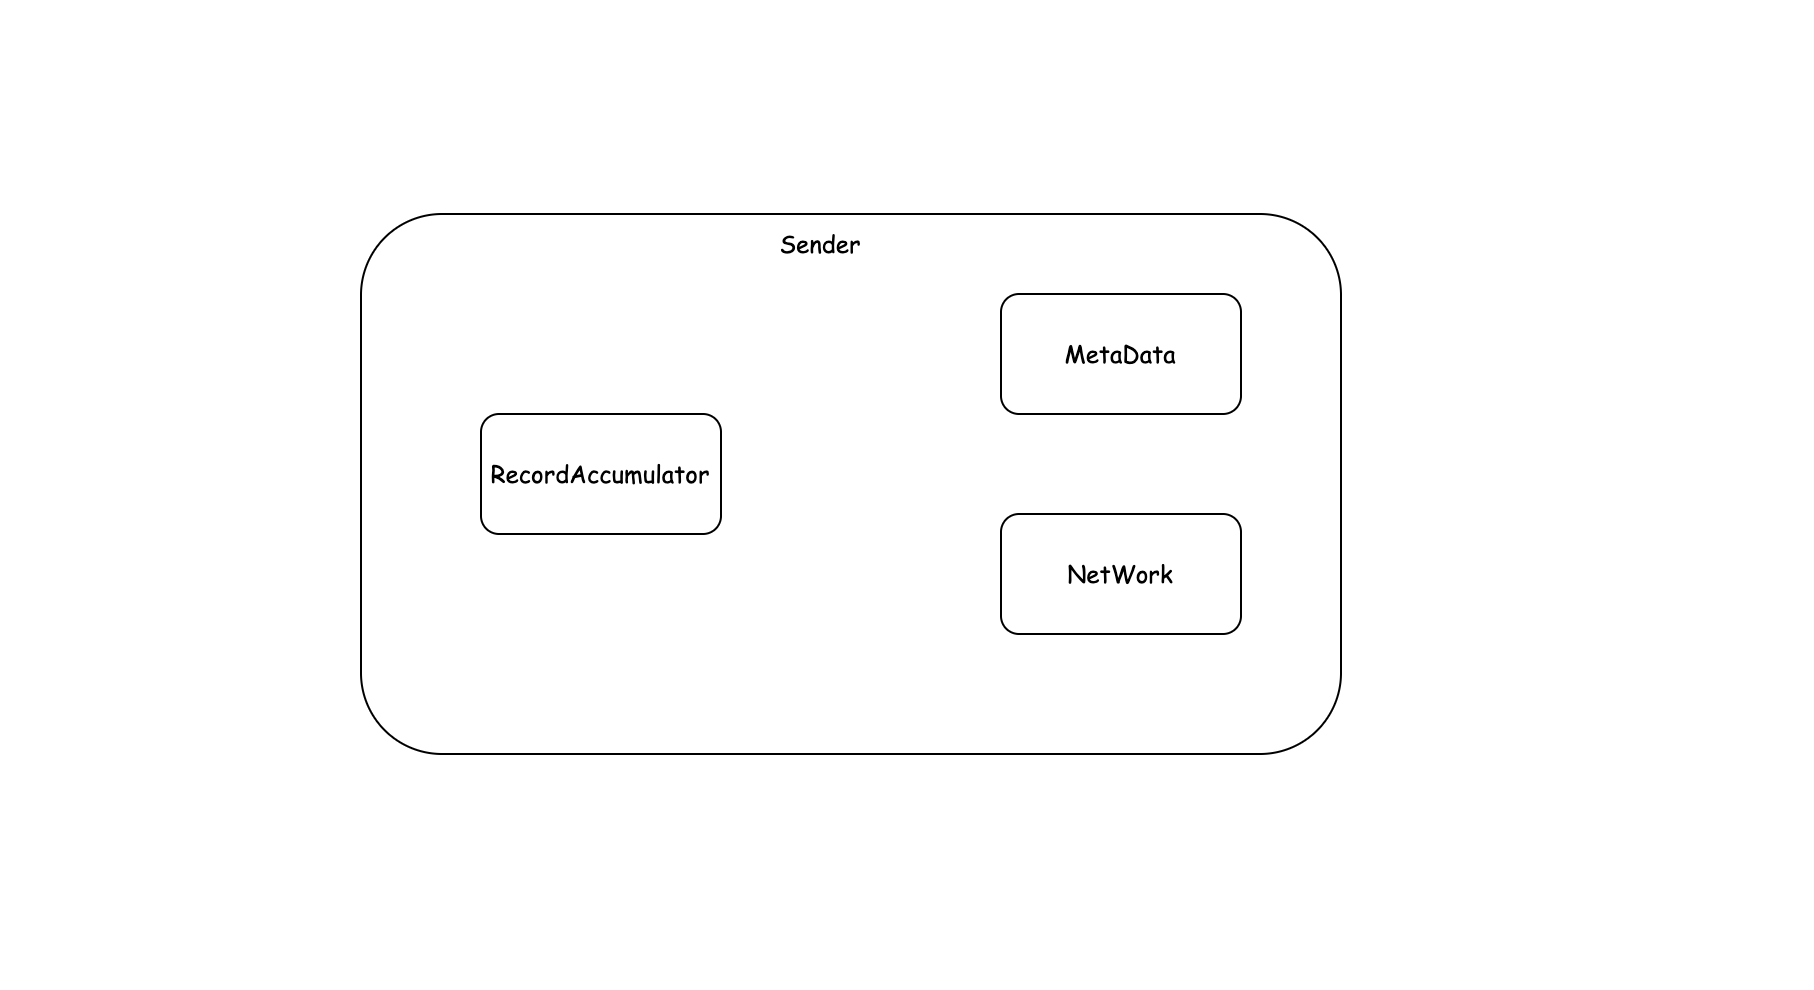
2.2.4 Sender
生产者唯一的线程(主线程除外)
// TODO 核心组件5:sender 线程,从缓冲区获取数据发送到broker
this.sender = new Sender(client,
                         this.metadata,
                         this.accumulator,
                         config.getInt(ProducerConfig.MAX_IN_FLIGHT_REQUESTS_PER_CONNECTION) == 1,
                         // 一次请求消息最大值,默认 1m
                         config.getInt(ProducerConfig.MAX_REQUEST_SIZE_CONFIG),
                         // ack 默认 1,只要 leader 写入成功
                         (short) parseAcks(config.getString(ProducerConfig.ACKS_CONFIG)),
                         // request 重试次数,默认0
                         config.getInt(ProducerConfig.RETRIES_CONFIG),
                         this.metrics,
                         new SystemTime(),
                         clientId,
                         // 请求超时时间 30s
                         this.requestTimeoutMs);
可以看出 Sender 封装了上述提到的所有组件同时实现了 Runnable 接口。因此它的 run 方法将是我们研究生产者与服务端交互的入口。
同时关于如何封装 Runnable 和启动线程,kafka 的做法值得我们去借鉴(copy)
String ioThreadName = "kafka-producer-network-thread" + (clientId.length() > 0 ? " | " + clientId : "");
this.ioThread = new KafkaThread(ioThreadName, this.sender, true);
// 启动 sender 线程
this.ioThread.start();


public class KafkaThread extends Thread {

    private final Logger log = LoggerFactory.getLogger(getClass());

    public KafkaThread(final String name, Runnable runnable, boolean daemon) {
        super(runnable, name);
        setDaemon(daemon);
        setUncaughtExceptionHandler(new Thread.UncaughtExceptionHandler() {
            public void uncaughtException(Thread t, Throwable e) {
                log.error("Uncaught exception in " + name + ": ", e);
            }
        });
    }
}
可以看出 kafka 封装线程类的思路是:通过继承 Thread 类,将必要的参数封装在自定义的类中并将核心参数通过 super 传给父类,最后调用 start 方法启动 Sender。可以预测 Sender 的 run 方法一定是一个不断轮训的逻辑
还有一个无关紧要的组件如:分区器、拦截器;可以自己看一下并不是很难,因为这两个都是可以自定义相对而言没有那么神秘
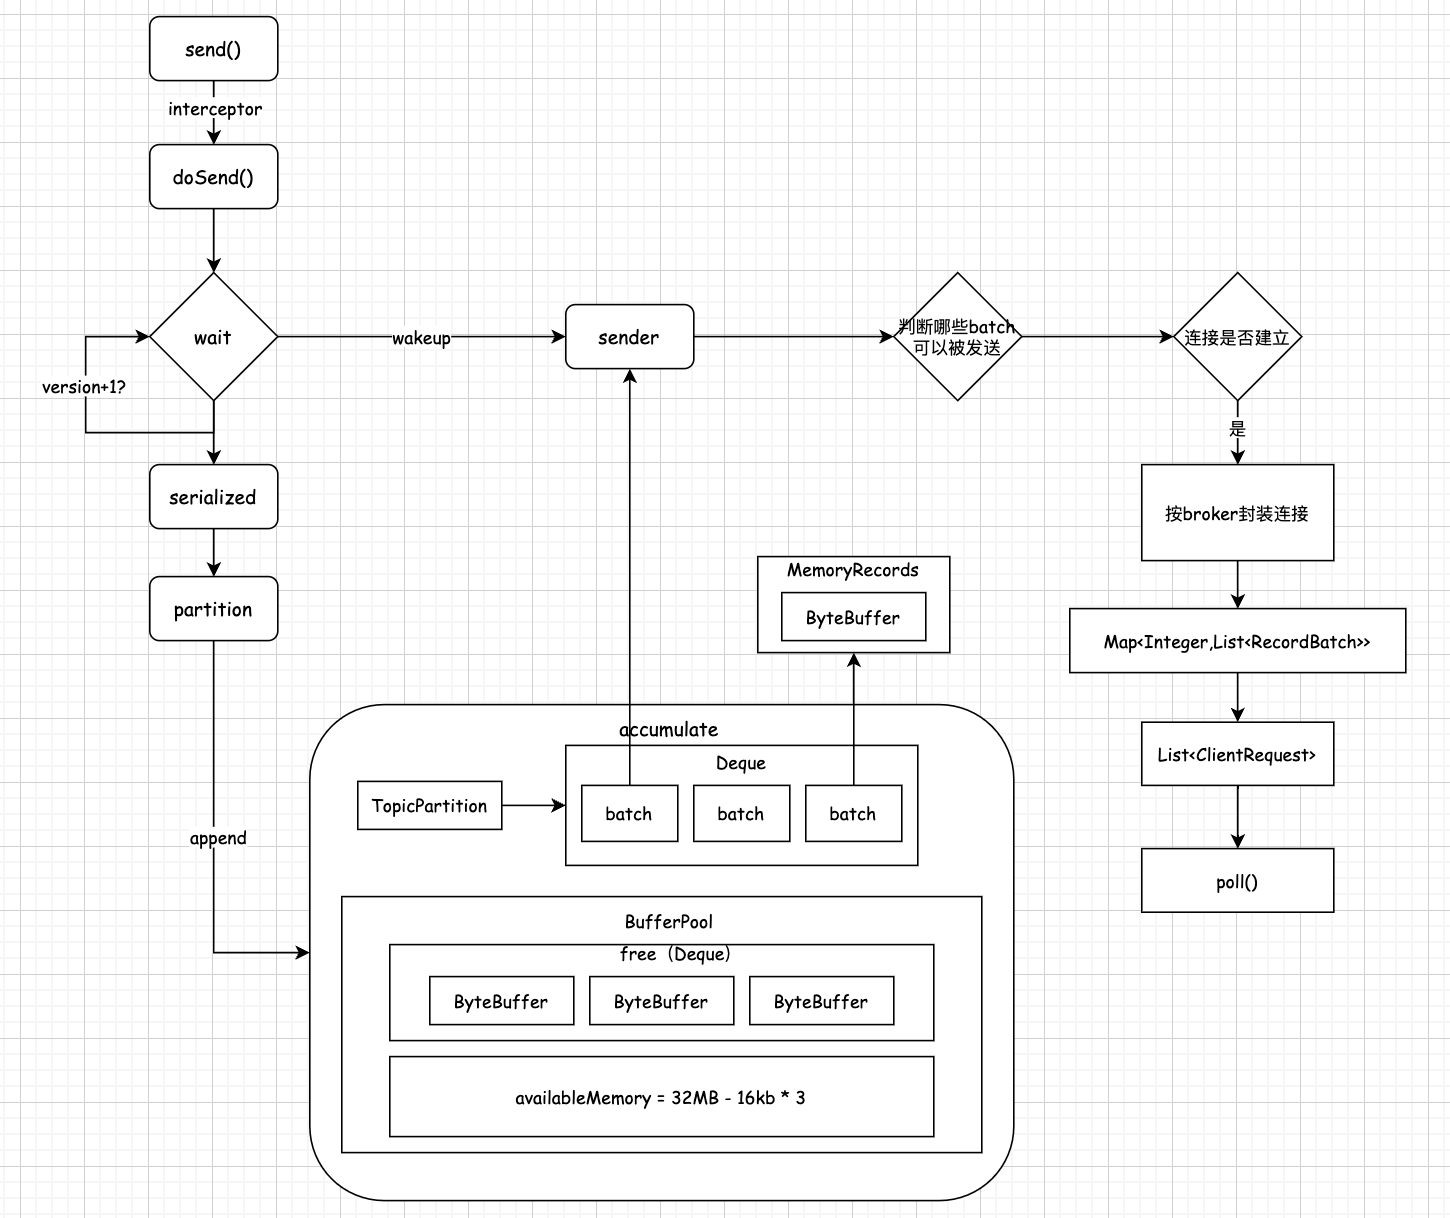
下面通过一个图画一下上述的组件,后续的核心逻辑都会基于此图进行(先大致这么布局,后续会根据执行逻辑进行调整,这里主要去体现组件的封装关系)
三、Metadata
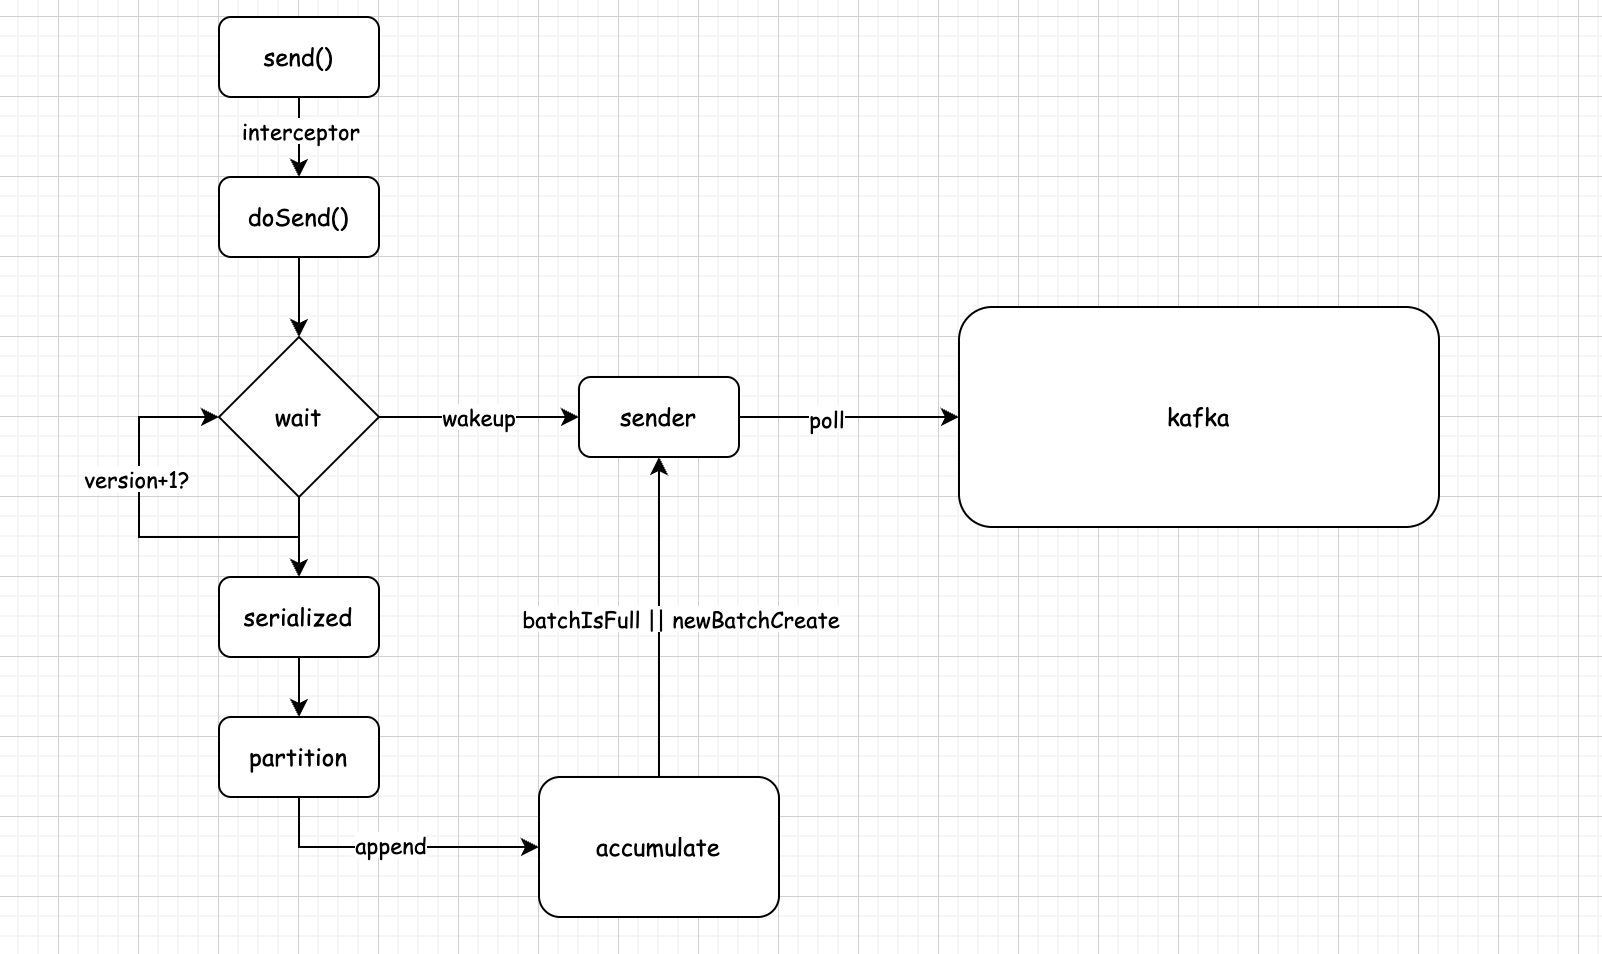
了解了 KafkaProducer 的初始化过程后接下来就是从 send 方法开始,阅读一下消息的发送过程;本节重点在过程中体会元数据的变化,涉及消息的发送、网络活动将在下面章节涉及
3.1 从 send 开始
@Override
public Future<RecordMetadata> send(ProducerRecord<K, V> record, Callback callback) {
  // intercept the record, which can be potentially modified; this method does not throw exceptions
  // 回调自定义的拦截器
  ProducerRecord<K, V> interceptedRecord = this.interceptors == null ? record : this.interceptors.onSend(record);
  return doSend(interceptedRecord, callback);
}
首先消息会走自定义的拦截器,对原始消息做进一步的包装,核心逻辑在 doSend() 中
// TODO  maxBlockTimeMs 这个参数决定一次 send() 在这个时间长度内必须返回,比如遇到网络波动、缓冲区满等
long waitedOnMetadataMs = waitOnMetadata(record.topic(), this.maxBlockTimeMs);
这一行代码是元数据的重点,首先获取到当前消息的 topic,并且传入 maxBlockTimeMs,这个时间就是上面提到的最大的阻塞时间;仅从这两个参数可以生产者拉取元数据是按需拉取的(不然就不需要传这个topic信息),接下来重点分析 waitOnMetadata。
private long waitOnMetadata(String topic, long maxWaitMs) throws InterruptedException {
  // add topic to metadata topic list if it is not there already.
  if (!this.metadata.containsTopic(topic))
    // TODO  本地还没有该 topic 元数据缓存加入集合中
    this.metadata.add(topic);

  if (metadata.fetch().partitionsForTopic(topic) != null)
    return 0;

  long begin = time.milliseconds();
  long remainingWaitMs = maxWaitMs;
  while (metadata.fetch().partitionsForTopic(topic) == null) {
    log.trace("Requesting metadata update for topic {}.", topic);
    int version = metadata.requestUpdate();
    // TODO  唤醒 sender 线程,异步拉取元数据
    sender.wakeup();
    // TODO  同步等待,当元数据更新后 version + 1,判断 version 是否改变即可,同时最多等待 remainingWaitMs
    metadata.awaitUpdate(version, remainingWaitMs);
    long elapsed = time.milliseconds() - begin;
    if (elapsed >= maxWaitMs)
      throw new TimeoutException("Failed to update metadata after " + maxWaitMs + " ms.");
    if (metadata.fetch().unauthorizedTopics().contains(topic))
      throw new TopicAuthorizationException(topic);
    remainingWaitMs = maxWaitMs - elapsed;
  }
  // TODO  返回剩余可以阻塞的时间
  return time.milliseconds() - begin;
}
第一步:判断 topic 有没有被缓存,如果没有被缓存则加入到 metadata 这个属性集合中,表示我需要去拉取这个 topic 的元数据
第二步:fetch() 其实就是返回 Cluster 对象,可以得知第一次发送消息 Cluster 一定是空的(生产者初始化的时候只是对其里面的各种集合赋初值),这里有个细节:如果在这里下一次发现这个 topic 已经在 Cluster 缓存了直接返回 0,表示此时获取元数据没有耗时,不占用最大的阻塞时间
第三步:获取当前时间作为开始时间,之后开启一个 while 循环直到当前的 topic 信息被获取到 partitionsForTopic 返回当前 topic 的分区信息退出循环。这里我们先只关注这个时间参数的变化。
long elapsed = time.milliseconds() - begin;
if (elapsed >= maxWaitMs)
  throw new TimeoutException("Failed to update metadata after " + maxWaitMs + " ms.");
if (metadata.fetch().unauthorizedTopics().contains(topic))
  throw new TopicAuthorizationException(topic);
remainingWaitMs = maxWaitMs - elapsed;
elapsed 表明上面三行代码的耗时,如果大于 maxWaitMs 表明上面的操作已经超时了此时直接报错(很合理);如果发现拉取到的 topic 元数据没有权限也会抛出异常,最后 maxWaitMs - elapsed 表明当前的一次循环后还剩多久,直到成功获取到元数据后退出循环再次 time.milliseconds() - begin 返回,即:本次元数据获取总共耗时多久,返回还可以阻塞的最大时间。因此真正元数据的获取是在我们忽略的三行代码中。
第四步:调用 requestUpdate,本质是将 needUpdate 置为 true(似乎在告诉某个人说我需要更新元数据了)同时返回当前的版本信息;之后调用 sender.wakeup() 唤醒 sender 线程。因此生产者的元数据本质上是 Sender 来进行拉取的(因为只有 Sender 内部封装了用于网络请求的 NetWork 组件),当唤醒 sender 线程后调用 awaitUpdate 方法等待元数据的更新。awaitUpdate 源码如下:
public synchronized void awaitUpdate(final int lastVersion, final long maxWaitMs) throws InterruptedException {
  if (maxWaitMs < 0) {
    throw new IllegalArgumentException("Max time to wait for metadata updates should not be < 0 milli seconds");
  }
  long begin = System.currentTimeMillis();
  long remainingWaitMs = maxWaitMs;
  while (this.version <= lastVersion) {
    if (remainingWaitMs != 0)
      // TODO  等待 sender 拉取元数据,sender 完成拉取一定会去唤醒
      wait(remainingWaitMs);
    long elapsed = System.currentTimeMillis() - begin;
    if (elapsed >= maxWaitMs)
      throw new TimeoutException("Failed to update metadata after " + maxWaitMs + " ms.");
    remainingWaitMs = maxWaitMs - elapsed;
  }
}
第五步:可以猜测当 sender 拉取完元数据后一定将 version 加一;awaitUpdate 逻辑和上面几乎一样,通过 while 循环不断的判断 version 是否增加,并等待最大的可用阻塞时间即 wait(remainingWaitMs),之后的超时判断是一样的逻辑。同时可以断定当 Sender 更新完元数据后一定会去唤醒它。
因此,生产者元数据更新的逻辑是:同步阻塞,异步更新,按需更新元数据。
注:这里两个部分都是用到 while,皆在解决多线程的问题,因为更新元数据阻塞被唤醒时不一定是因为拉取到当前topic想要的(可能是其他topic的元数据),因此需要不断的 while 判断是不是自己的元数据,有点 CAS 的味道
到这里似乎元数据就已经结束了,因为如果要继续追元数据的更新则就需要从 Sender 的 run 开始了(只有它一个线程),同时这部分涉及到客户端与服务端的交互(客户端发送拉取元数据请求,服务端返回元数据信息)本质上和消息的发送在网络交互上没有什么区别,因此 sender 是如何拉取元数据放在后面专门的网络交互章节(涉及到大量工业级 NIO 处理)。
假设现在元数据已经更新好了,即阻塞的 waitOnMetadata 方法执行完了返回 waitedOnMetadataMs,这个值就是留给我们后续操作的时间(最大阻塞时间-拉取元数据等待的时间)
之后的操作有
序列化 key 和 value 这部分不是重点
byte[] serializedKey;
try {
  serializedKey = keySerializer.serialize(record.topic(), record.key());
} catch (ClassCastException cce) {
  throw new SerializationException("Can't convert key of class " + record.key().getClass().getName() +
                                   " to class " + producerConfig.getClass(ProducerConfig.KEY_SERIALIZER_CLASS_CONFIG).getName() +
                                   " specified in key.serializer");
}
// 序列化 value
byte[] serializedValue;
try {
  serializedValue = valueSerializer.serialize(record.topic(), record.value());
} catch (ClassCastException cce) {
  throw new SerializationException("Can't convert value of class " + record.value().getClass().getName() +
                                   " to class " + producerConfig.getClass(ProducerConfig.VALUE_SERIALIZER_CLASS_CONFIG).getName() +
                                   " specified in value.serializer");
}
计算分区,后面可以独立出来一小节讲一下默认分区器在没有指定分区是如何实现 RoundRobin 算法
int partition = partition(record, serializedKey, serializedValue, metadata.fetch());
最后就是将消息放入缓冲区,当缓冲区 batch 满或者创建了新的 batch 再次唤醒 sender。这里剧透一下唤醒 sender 的目的是让 sender 将满足条件的 batch 发送出去,本质上和元数据的逻辑没有区别。
// TODO 将消息添加到内存缓冲区 buffer memory 中
RecordAccumulator.RecordAppendResult result = accumulator.append(tp, timestamp, serializedKey, serializedValue, interceptCallback, remainingWaitMs);
// batch 满了或者 新的batch在创建 唤醒 sender
if (result.batchIsFull || result.newBatchCreated) {
  log.trace("Waking up the sender since topic {} partition {} is either full or getting a new batch", record.topic(), partition);
  this.sender.wakeup();
}
因此该部分的流程图如下:
3.2 元数据的数据结构
上面一直说元数据感觉这个东西很高大上、很抽象,但所谓的元数据就是一组 java 集合,即源码为 Cluster 类属性如下
private final boolean isBootstrapConfigured;
private final List<Node> nodes; // 一个broker节点
private final Set<String> unauthorizedTopics;// 没有授权的topic
private final Map<TopicPartition, PartitionInfo> partitionsByTopicPartition;// topic 分区信息
private final Map<String, List<PartitionInfo>> partitionsByTopic;// 每个 topic 有哪些分区
private final Map<String, List<PartitionInfo>> availablePartitionsByTopic; // 每个 topic 有哪些可用的分区
private final Map<Integer, List<PartitionInfo>> partitionsByNode; // 每个 broker 放了哪些分区
private final Map<Integer, Node> nodesById; // broker-id
同时 PartitionInfo 封装了 topic、leader、partition号、replicas、isr
public class PartitionInfo {

  private final String topic;
  private final int partition;
  private final Node leader;
  private final Node[] replicas;
  private final Node[] inSyncReplicas;

  public PartitionInfo(String topic, int partition, Node leader, Node[] replicas, Node[] inSyncReplicas) {
    this.topic = topic;
    this.partition = partition;
    this.leader = leader;
    this.replicas = replicas;
    this.inSyncReplicas = inSyncReplicas;
  }
  // 省略 getter/setter
}
该部分值得参考的点在于缓存的存储设计。
3.3 默认分区器如何实现 round-robin
当我们在构建 ProducerRecord 没有指定分区也没有指定 key 时生产者为了避免数据倾斜采用 round-robin 算法将消息竟可能分散到多个分区中,下面我们看一下默认分区器 DefaultPartitioner 的逻辑
首先看到的是内部的一个属性和一个方法
private final AtomicInteger counter = new AtomicInteger(new Random().nextInt());
private static int toPositive(int number) {
  return number & 0x7fffffff;
}
一个线程安全的 Integer 和一个最高效的取绝对值方法(这个位运算背下来可以装X)
而核心的分区逻辑就是实现的 partition 方法
public int partition(String topic, Object key, byte[] keyBytes, Object value, byte[] valueBytes, Cluster cluster) {
  List<PartitionInfo> partitions = cluster.partitionsForTopic(topic);
  // 获取所有分区数量
  int numPartitions = partitions.size();
  if (keyBytes == null) {
    // 原子类递增
    int nextValue = counter.getAndIncrement();
    // 获取可用分区
    List<PartitionInfo> availablePartitions = cluster.availablePartitionsForTopic(topic);
    if (availablePartitions.size() > 0) {
      // 有可用分区时,对获取到的递增int算一个正整数(如果本身就是正整数就返回本身),与可用分区数取模
      int part = DefaultPartitioner.toPositive(nextValue) % availablePartitions.size();
      // 返回
      return availablePartitions.get(part).partition();
    } else {
      // no partitions are available, give a non-available partition
      return DefaultPartitioner.toPositive(nextValue) % numPartitions;
    }
  } else {
    // hash the keyBytes to choose a partition
    // 计算指定key的hash值与分区数取模
    return DefaultPartitioner.toPositive(Utils.murmur2(keyBytes)) % numPartitions;
  }
}
首先获取当前 topic 缓存的元数据(能走到这里元数据一定缓存了)即:当前 topic 的分区信息;随后获取到 topic 的分区个数之后就会分 key 存不存的情况。
情况一:key 不存在,走 round-robin 算法
注意到原子类整型的初始值是一个随机值,因为如果是一个固定值假如每次只发一条数据后就重启,那么算法就失去了轮训的意义。之后自增一判断有没有可用的分区,对获取到的原子类整型取绝对值(随机值可能是负数)与可用分区取模来获取分区数。随后当有更多的消息走到分区器都会自增一从而达到轮训的效果;当没有可用的分区这里就与所有的分区数取模,猜测这里是期望在真正发送的时候该分区可能使用。
情况二:key 存在,key 的 hash 与分区取模
这类情况就是对 key 去 hash 后取正数与分区数取模。
四、RecordAccumulate
4.1 消息放入 accumulate 前做了什么
上节说到消息已经知道发送到 topic 的哪个分区,在发送到 accumulate 前还有一处代码需要我们关注一下
int serializedSize = Records.LOG_OVERHEAD + Record.recordSize(serializedKey, serializedValue);
// 检查本次消息是否超出请求大小,以及内存缓冲
ensureValidRecordSize(serializedSize);
即:kafka 的消息格式,当前版本的源码是 0.10.1.0 处于消息格式 V1 阶段
public static final int CRC_OFFSET = 0;
public static final int CRC_LENGTH = 4;
public static final int MAGIC_OFFSET = CRC_OFFSET + CRC_LENGTH;
public static final int MAGIC_LENGTH = 1;
public static final int ATTRIBUTES_OFFSET = MAGIC_OFFSET + MAGIC_LENGTH;
public static final int ATTRIBUTE_LENGTH = 1;
public static final int TIMESTAMP_OFFSET = ATTRIBUTES_OFFSET + ATTRIBUTE_LENGTH;
public static final int TIMESTAMP_LENGTH = 8;
public static final int KEY_SIZE_OFFSET_V0 = ATTRIBUTES_OFFSET + ATTRIBUTE_LENGTH;
public static final int KEY_SIZE_OFFSET_V1 = TIMESTAMP_OFFSET + TIMESTAMP_LENGTH;
public static final int KEY_SIZE_LENGTH = 4;
public static final int KEY_OFFSET_V0 = KEY_SIZE_OFFSET_V0 + KEY_SIZE_LENGTH;
public static final int KEY_OFFSET_V1 = KEY_SIZE_OFFSET_V1 + KEY_SIZE_LENGTH;
public static final int VALUE_SIZE_LENGTH = 4;

public static int recordSize(byte[] key, byte[] value) {
  return recordSize(key == null ? 0 : key.length, value == null ? 0 : value.length);
}

public static int recordSize(int keySize, int valueSize) {
  return CRC_LENGTH + MAGIC_LENGTH + ATTRIBUTE_LENGTH + TIMESTAMP_LENGTH + KEY_SIZE_LENGTH + keySize + VALUE_SIZE_LENGTH + valueSize;
}
因此当前版本的消息格式如下:
- crc:校验码,确保消息在传输过程中不会被篡改;4byte
- magic:消息的版本,V0 存 0,V1 存 1;1byte
- attribute:属性字段,当前版本只存储压缩类型;1byte
- timestamp:消息时间戳,V1 版本才有;8byte
- key length:存储 key 的字节数;4byte
- key:具体消息具体计算,如果是 null 长度为 0,否则为字节数组长度
- value length:存储 value 的字节数;4byte
- value:具体消息具体计算,如果是 null 长度为 0,否则为字节数组长度
注:V0 版本的消息格式没有 timestamp 字段,因此按时间删除消息存在bug(按照segment的修改时间,但是linux部分操作会改变这个时间),因此 V1 版本加入时间字段修复了这个bug;但 V1 版本的消息仍存在缺陷,例如无论 key 或者 value 是否有值都会用 4byte 存储它们的长度,在 V2 版本的消息格式通过可变长度来解决。感兴趣的可以研究一下 0.11.0.0 之后的源码
因此 V1 版本的消息格式如下:

同时消息的具体写入在 Record 的 write 中
public static void write(Compressor compressor, long crc, byte attributes, long timestamp, byte[] key, byte[] value, int valueOffset, int valueSize) {
  // write crc
  compressor.putInt((int) (crc & 0xffffffffL));
  // write magic value
  compressor.putByte(CURRENT_MAGIC_VALUE);
  // write attributes
  compressor.putByte(attributes);
  // write timestamp
  compressor.putLong(timestamp);
  // write the key
  if (key == null) {
    compressor.putInt(-1);
  } else {
    compressor.putInt(key.length);
    compressor.put(key, 0, key.length);
  }
  // write the value
  if (value == null) {
    compressor.putInt(-1);
  } else {
    int size = valueSize >= 0 ? valueSize : (value.length - valueOffset);
    compressor.putInt(size);
    compressor.put(value, valueOffset, size);
  }
}
4.2 accumulate 数据结构
在消息放入 accumulate 之前我们再来看一下 RecordAccumulate 的数据结构,这些前置知识将有助于理解后面的操作。从组件的初始化开始
// TODO  核心组件3:缓冲区
this.accumulator = new RecordAccumulator(config.getInt(ProducerConfig.BATCH_SIZE_CONFIG),
                                         // 缓冲区大小,默认 32m
                                         this.totalMemorySize,
                                         // 压缩
                                         this.compressionType,
                                         // 两次 request 间隔,如果消息非常小,很久都没有积累到 batch.size,如果到了 linger 时间就直接发送出去
                                         // 默认 0 ms
                                         config.getLong(ProducerConfig.LINGER_MS_CONFIG),
                                         retryBackoffMs,
                                         metrics,
                                         time);
public RecordAccumulator(int batchSize,
                         long totalSize,
                         CompressionType compression,
                         long lingerMs,
                         long retryBackoffMs,
                         Metrics metrics,
                         Time time) {
  this.drainIndex = 0;
  this.closed = false;
  this.flushesInProgress = new AtomicInteger(0);
  this.appendsInProgress = new AtomicInteger(0);
  this.batchSize = batchSize;
  this.compression = compression;
  this.lingerMs = lingerMs;
  this.retryBackoffMs = retryBackoffMs;
  this.batches = new CopyOnWriteMap<>();
  String metricGrpName = "producer-metrics";
  this.free = new BufferPool(totalSize, batchSize, metrics, time, metricGrpName);
  this.incomplete = new IncompleteRecordBatches();
  this.muted = new HashSet<>();
  this.time = time;
  registerMetrics(metrics, metricGrpName);
}
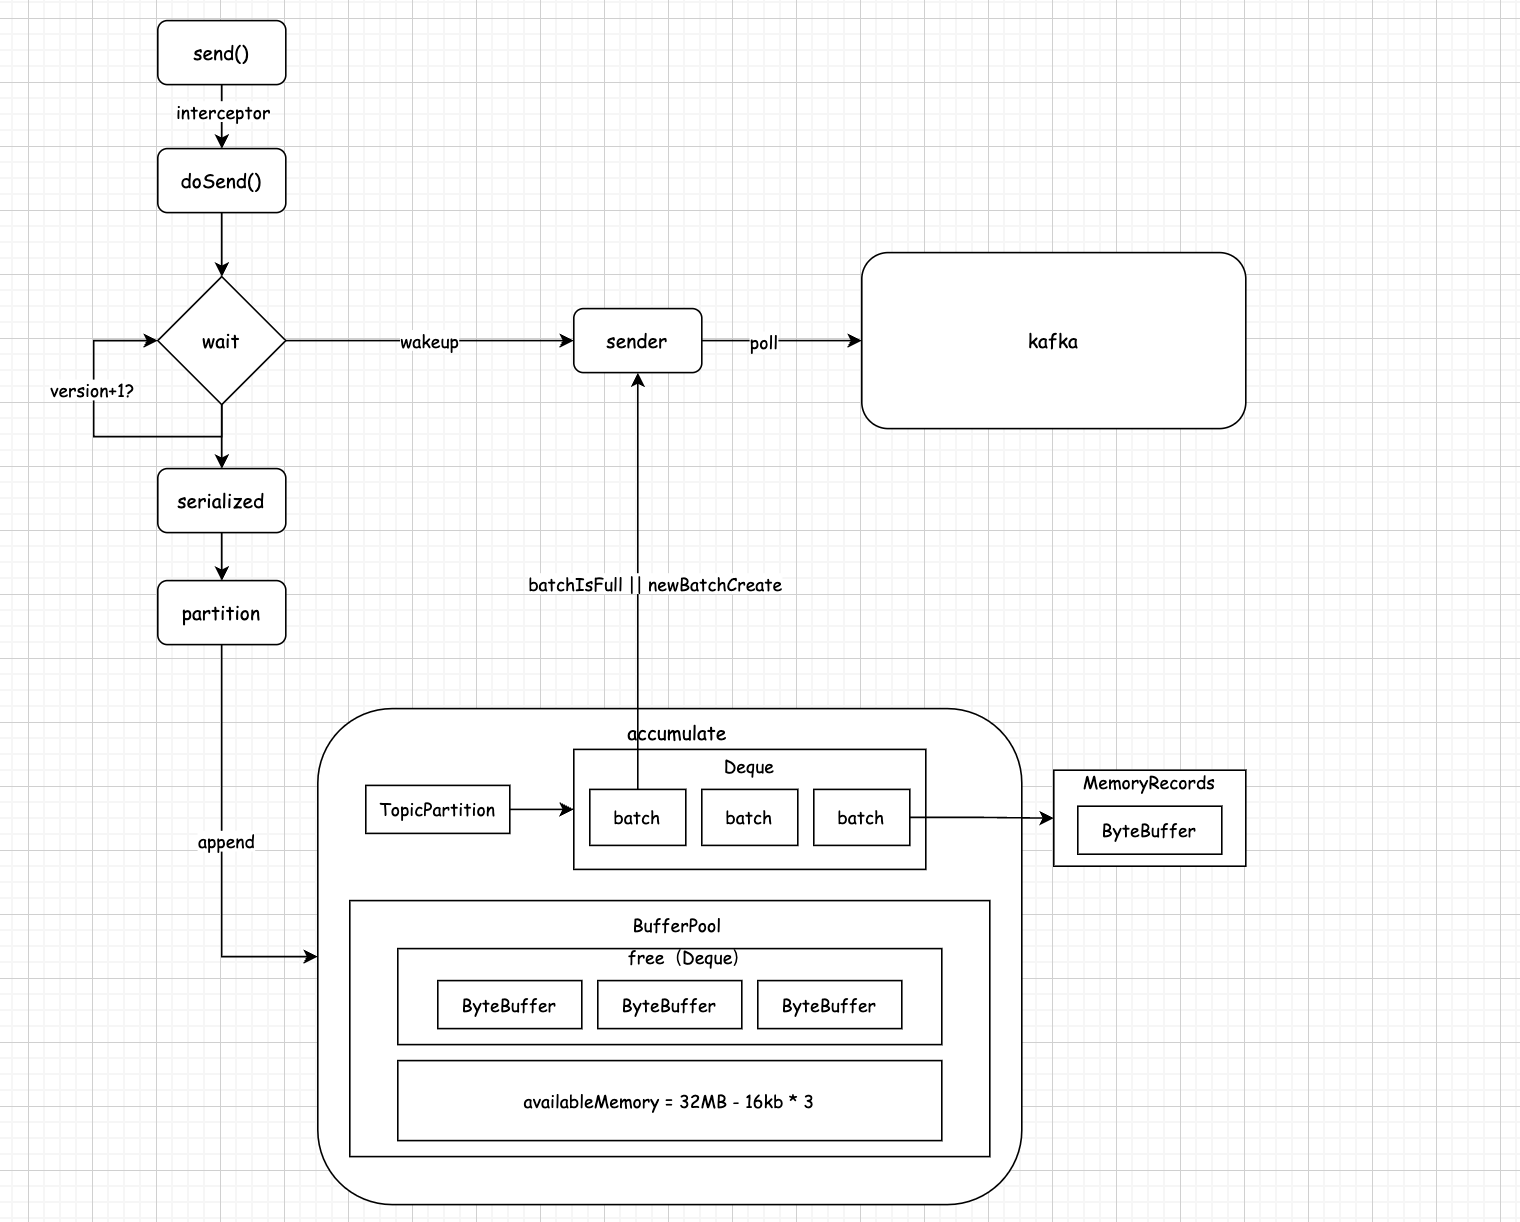
对于传入的 batchSize、totalSize、lingerMs、retryBackoffMs 需要对变量名混个眼熟分别对应:批次大小、内存缓冲区容量、批次发送间隔时间、重试间隔时间;本节不需要关注后面的两个时间(时间与网络请求有关),最最最重要的是 batches 和 free,其中 batches 初始化了一个 CopyOnWriteMap 其属性定义如下
private final ConcurrentMap<TopicPartition, Deque<RecordBatch>> batches;
可以看出 batches 是一个线程安全的 Map,观察它的两个泛型可以推断:生产者缓存消息是按照 topic 的分区来缓存的,一个分区一个 Deque,这个 Deque 的主要优势在于操作头尾元素比较友好,因为生产者在构建新的批次数据一定是放在所有数据的尾部遵循 FIFO,而消息的发送则是去头部元素,失败重试也是要将消息放回头部优先下一次发送。同时对于线程安全的 Map 生产者实现了自己的 Map 即 CopyOnWriteMap;我们知道写时复制在解决读多写少的并发场景有很好的体验(写数据的时候会复制一个副本,基于副本进行修改然后通过加锁进行原件的替换),而这种场景恰好符合生产者的场景。只有在新的 topic 分区加入才会触发写操作。
下一个核心属性 free 属性定义如下
private final BufferPool free;

public BufferPool(long memory, int poolableSize, Metrics metrics, Time time, String metricGrpName) {
  // poolableSize 就是 batchSize
  this.poolableSize = poolableSize;
  this.lock = new ReentrantLock();
  // 进行内存空间复用
  this.free = new ArrayDeque<ByteBuffer>();
  this.waiters = new ArrayDeque<Condition>();
  this.totalMemory = memory;
  this.availableMemory = memory;
  this.metrics = metrics;
  this.time = time;
  this.waitTime = this.metrics.sensor("bufferpool-wait-time");
  MetricName metricName = metrics.metricName("bufferpool-wait-ratio",
                                             metricGrpName,
                                             "The fraction of time an appender waits for space allocation.");
  this.waitTime.add(metricName, new Rate(TimeUnit.NANOSECONDS));
}
这是生产者内存复用的核心组件,而 accumulate 的内存上限 32MB 就是 BufferPool 的容量,更底层就是 this.free = new ArrayDeque<ByteBuffer>() 中所有 ByteBuffer 的容量和(这里的 ByteBuffer 就是 NIO 里的)
4.3 第一次发送消息
4.3.1 分区队列的安全创建
从 append() 开始探究消息如何被放入 batch 中
// TODO 将消息添加到内存缓冲区 buffer memory 中
RecordAccumulator.RecordAppendResult result = accumulator.append(tp, timestamp, serializedKey, serializedValue, interceptCallback, remainingWaitMs);
这个方法几乎每一行都是重点,当然方法第一行除外🤕
// 生产者是线程安全的,在这里体现,需要追踪线程调用
appendsInProgress.incrementAndGet();
之后进入核心的 try 逻辑中
// todo 从内存缓冲区获取一个分区对应的队列
Deque<RecordBatch> dq = getOrCreateDeque(tp);
从方法名看出根据 topicPartition 创建(不存在)或者获取(存在)一个 Deque,其逻辑如下:
private Deque<RecordBatch> getOrCreateDeque(TopicPartition tp) {
  Deque<RecordBatch> d = this.batches.get(tp);
  if (d != null)
    return d;
  d = new ArrayDeque<>();
  Deque<RecordBatch> previous = this.batches.putIfAbsent(tp, d);
  if (previous == null)
    return d;
  else
    return previous;
}
当我们第一次运行时,this.batches.get(tp) 则返回 null,之后的逻辑就是创建一个 Deque 后放入 CopyOnWriteMap 中;而这一步骤就是仅有的写操作,需要看一下生产者是如何保证线程安全的,即:putIfAbsent 方法
@Override
public synchronized V putIfAbsent(K k, V v) {
  if (!containsKey(k))
    return put(k, v);
  else
    return get(k);
}
先判断此时的 key 是否存在,因为到这一步之前都是没有加锁的,可能有其他线程先一步创建因此如何已存在则直接返回,不存在则对 v 做 put 操作
@Override
public synchronized V put(K k, V v) {
  Map<K, V> copy = new HashMap<K, V>(this.map);
  V prev = copy.put(k, v);
  this.map = Collections.unmodifiableMap(copy);
  return prev;
}
这里的 put 操作则体现写时复制的思想,创建一个副本将数据添加进去后通过加锁的方式替换原集合。
CopyOnWriteMap 就分析到这里,作为 kafka 自己实现的一个线程安全 map 还是值得我们花时间去好好研究的(早日 copy)
4.3.2 加锁第一次尝试
当 getOrCreateDeque 结束我们获取到一个空的 Deque 集合,之后开始尝试第一次将数据写入其中
synchronized (dq) {
  if (closed)
    throw new IllegalStateException("Cannot send after the producer is closed.");
  // 尝试将数据写入 deque。如果是第一次创建则 deque 是空的
  RecordAppendResult appendResult = tryAppend(timestamp, key, value, callback, dq);
  if (appendResult != null)
    return appendResult;
}
对 deque 加锁。通过 tryAppend 将数据写入这个 deque,看一下具体的操作
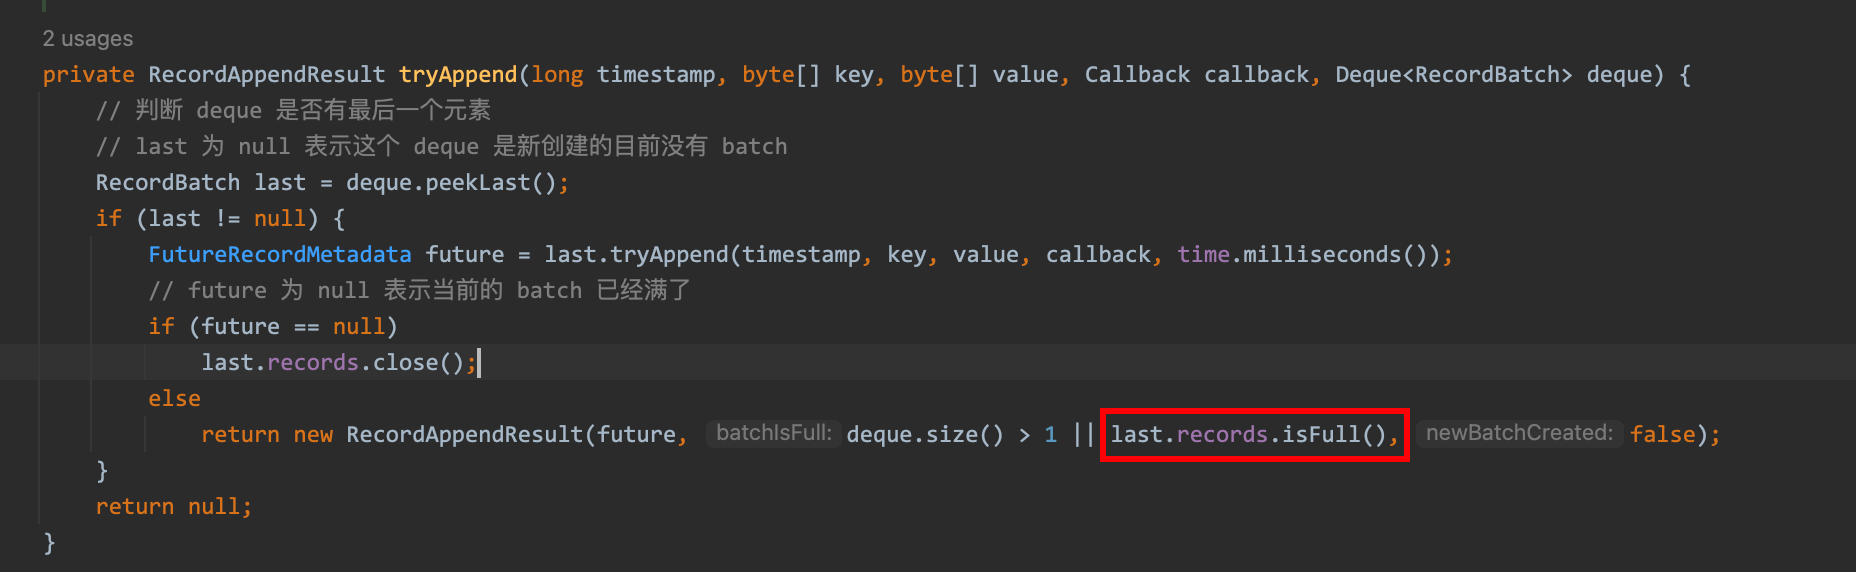
private RecordAppendResult tryAppend(long timestamp, byte[] key, byte[] value, Callback callback, Deque<RecordBatch> deque) {
  // 判断 deque 是否有最后一个元素
  // last 为 null 表示这个 deque 是新创建的目前没有 batch
  RecordBatch last = deque.peekLast();
  if (last != null) {
    FutureRecordMetadata future = last.tryAppend(timestamp, key, value, callback, time.milliseconds());
    // future 为 null 表示当前的 batch 已经满了
    if (future == null)
      last.records.close();
    else
      return new RecordAppendResult(future, deque.size() > 1 || last.records.isFull(), false);
  }
  return null;
}
上面说过消息是以 batch 的形式被打包的,同时 deque 存储的也是 batch(RecordBatch);因此对于一个消息来说就需要把消息追加到一个 RecordBatch(batch已经存在)或者创建一个 RecordBatch(batch不存在),因此 tryAppend 的逻辑也是这样,对于第一次发送消息来说 deque.peekLast() 一定是空的那么这个方法就直接结束了(该部分剩下的代码我们在第二次发送消息再来解释),同时上面的同步代码块也就结束了。
接下来就需要对当前的分区创建 RecordBatch 同时也就意味着涉及到内存的申请
4.3.3 如何申请内存
int size = Math.max(this.batchSize, Records.LOG_OVERHEAD + Record.recordSize(key, value));
// TODO  这行代码可能存在多个线程都拿到了 16k 的 bytebuffer
ByteBuffer buffer = free.allocate(size, maxTimeToBlock);
计算消息大小与 batchSize 比较取最大值后尝试申请内存,注意:内存申请的方法没有加锁,也就意味着多个线程都可以去申请内存。下面来重点分析生产者是如何管理内存的(第一个精华所在),因此设计的太完美就一块一块的解释
第一步:判断内存够不够
if (size > this.totalMemory)
  throw new IllegalArgumentException("Attempt to allocate " + size
                                     + " bytes, but there is a hard limit of "
                                     + this.totalMemory
                                     + " on memory allocations.");
假如待申请的的内存大于总内存(不是可用内存)直接抛异常
第二步:判断能否复用
if (size == poolableSize && !this.free.isEmpty())
  return this.free.pollFirst();
判断需要申请的内存大小等不等于 poolableSize(就是 batchSize 的值) 并且我有可用的缓存 ByteBuffer,那么直接取队列的第一个返回。对于第一次消息的发送肯定是不满足第二个条件的(**想想什么情况下不满足第一个条件?**而且第一个条件更重要直接影响后续能否复用)
第三步:假设不能复用,判断可用内存
这时候就需要创建一个新的 ByteBuffer 了
int freeListSize = this.free.size() * this.poolableSize;
这里其实是在计算可以复用的内存空间(还是上面的问题,假如 freeListSize 不为 0 有可复用的内存为什么还要创建,答案在后面)
if (this.availableMemory + freeListSize >= size) {
  // we have enough unallocated or pooled memory to immediately
  // satisfy the request
  freeUp(size);
  this.availableMemory -= size;
  lock.unlock();
  return ByteBuffer.allocate(size);
}
可用内存 + 可复用内存 > 待分配的内存,表明我有足够的内存可以分配,同时第一次内存分配也是走这里;freeUp 的操作是试图先释放掉一部分的内存增加可用的内存(这种情况发生在运行了很久大部分内存都被占用了但是本次又不满足复用条件,虽然两者之和大于待分配的内存,但是可用的内存不足以分配,此时只能销毁掉缓存队列中的第一个来增加可用内存直到大于待分配)
private void freeUp(int size) {
  while (!this.free.isEmpty() && this.availableMemory < size)
    this.availableMemory += this.free.pollLast().capacity();
}
由此可以看出,内存复用真的真的很重要
当可用内存足够时减去当前待分配的内存后通过 ByteBuffer.allocate(size) 完成本次的内存分配
既然都讲到了这里那么上面的 else 也就在这里讲一下;在不断申请内存空间的情况下导致可用内存耗尽怎么办?
第四步:内存耗尽怎么办
答案是:阻塞,直到有其他分区完成消息发送后归还内存,首先这里基于 ReentrantLock 定义了 Condition 并放到集合最后一个(依然是 FIFO,等待时间长的优先获取释放的内存)
int accumulated = 0;
ByteBuffer buffer = null;
Condition moreMemory = this.lock.newCondition();
long remainingTimeToBlockNs = TimeUnit.MILLISECONDS.toNanos(maxTimeToBlockMs);
this.waiters.addLast(moreMemory);
之后进入一个漫长的等待内存释放的环节
while (accumulated < size) {
  long startWaitNs = time.nanoseconds();
  long timeNs;
  boolean waitingTimeElapsed;
  try {
    waitingTimeElapsed = !moreMemory.await(remainingTimeToBlockNs, TimeUnit.NANOSECONDS);
  } catch (InterruptedException e) {
    this.waiters.remove(moreMemory);
    throw e;
  } finally {
    long endWaitNs = time.nanoseconds();
    timeNs = Math.max(0L, endWaitNs - startWaitNs);
    this.waitTime.record(timeNs, time.milliseconds());
  }

  if (waitingTimeElapsed) {
    this.waiters.remove(moreMemory);
    throw new TimeoutException("Failed to allocate memory within the configured max blocking time " + maxTimeToBlockMs + " ms.");
  }

  remainingTimeToBlockNs -= timeNs;
  // check if we can satisfy this request from the free list,
  // otherwise allocate memory
  if (accumulated == 0 && size == this.poolableSize && !this.free.isEmpty()) {
    // just grab a buffer from the free list
    buffer = this.free.pollFirst();
    accumulated = size;
  } else {
    // we'll need to allocate memory, but we may only get
    // part of what we need on this iteration
    freeUp(size - accumulated);
    int got = (int) Math.min(size - accumulated, this.availableMemory);
    this.availableMemory -= got;
    accumulated += got;
  }
}
可以看出与多出的阻塞,当阻塞时间达到剩余可阻塞时间后直接抛超时异常,当 while 循环结束表示有可用的内存来分配了,此时则唤醒最先等待的线程来分配内存代码如下:
Condition removed = this.waiters.removeFirst();
if (removed != moreMemory)
  throw new IllegalStateException("Wrong condition: this shouldn't happen.");

// signal any additional waiters if there is more memory left
// over for them
if (this.availableMemory > 0 || !this.free.isEmpty()) {
  if (!this.waiters.isEmpty())
    this.waiters.peekFirst().signal();
}

// unlock and return the buffer
lock.unlock();
if (buffer == null)
  return ByteBuffer.allocate(size);
else
  return buffer;
至此内存申请逻辑就全部结束了,其逻辑如下:有可复用的内存直接复用,否则判断是否有可用内存,内存够创建新的 ByteBuffer 内存不够阻塞等待;要么超时要么运气好等到有可用内存后继续申请
4.3.4 加锁第二次尝试
当申请到内存后代码继续走发现再次加锁且逻辑和第一次加锁完全一样,因此这里为什么要进行 double-check?
因为内存申请是没有加锁的,可能存在同一个分区有多个线程都申请到了内存,但在第二次尝试的时候发现 RecordBatch 被创建了,因此只需要将消息追加到已存在的 RecordBatch 中即可;同时释放掉刚才申请的内存空间,因此与第一次加锁唯一的不同在于当 RecordAppendResult 不为空(消息追加成功)有释放内存空间的行动
if (appendResult != null) {
  // Somebody else found us a batch, return the one we waited for! Hopefully this doesn't happen often...
  free.deallocate(buffer);
  return appendResult;
}
借助 deallocate 回答一下内存复用的条件
public void deallocate(ByteBuffer buffer, int size) {
  lock.lock();
  try {
    if (size == this.poolableSize && size == buffer.capacity()) {
      buffer.clear();
      // TODO  并不是销毁这个buffer,而是加入buffer pool,进行复用
      this.free.add(buffer);
    } else {
      // TODO  如果超出了 16k 的buffer(消息大于batchSize)直接释放进行gc
      //  进一步说明消息最好小于batchSize,生产上要进行参数调整
      this.availableMemory += size;
    }
    Condition moreMem = this.waiters.peekFirst();
    if (moreMem != null)
      // TODO  唤醒可能因为内存缓冲区不足导致的阻塞线程
      moreMem.signal();
  } finally {
    lock.unlock();
  }
}
当归还的内存等于 poolableSize(就是 batchSize),第二个条件一定是满足的;调用 ByteBuffer 的 clear() 并将 ByteBuffer 添加到 free 中进行缓存,否则增加可用内存。如果走的是 else 则传入的 buffer 就是一个垃圾,随后会被 gc 掉。之后就会唤醒等待时间最长的线程(告诉它们我释放了部分内存你们可以尝试获取一下)。
因此结合上面内存的申请逻辑总结如何才能复用:单次消息大小 < batch.size 参数,即每次 batchSize 大小的内存同时规划这个大小的内存,只有这样才能进行内存的复用,同时打包的好处也可以提高吞吐量。因此线上一定要根据消息的大小合理设置 batch.size 的值让生产者有打包的行动。
MemoryRecords records = MemoryRecords.emptyRecords(buffer, compression, this.batchSize);
RecordBatch batch = new RecordBatch(tp, records, time.milliseconds());
FutureRecordMetadata future = Utils.notNull(batch.tryAppend(timestamp, key, value, callback, time.milliseconds()));

dq.addLast(batch);
incomplete.add(batch);
return new RecordAppendResult(future, dq.size() > 1 || batch.records.isFull(), true);
后续的操作就是创建新的 RecordBatch 将消息放入其中并将其加入 deque 中。需要注意返回值。第一次发送消息的返回值是
new RecordAppendResult(future, dq.size() > 1 || batch.records.isFull(), true);
可以计算出 batchIsFull = false;newBatchCreate = true
4.4 消息如何写入 batch
当 RecordBatch 被创建好需要将消息追加到其中,即调用 batch.tryAppend() 方法
public FutureRecordMetadata tryAppend(long timestamp, byte[] key, byte[] value, Callback callback, long now) {
  if (!this.records.hasRoomFor(key, value)) {
    return null;
  } else {
    // 将消息追加到 MemoryRecords 中
    long checksum = this.records.append(offsetCounter++, timestamp, key, value);
    this.maxRecordSize = Math.max(this.maxRecordSize, Record.recordSize(key, value));
    this.lastAppendTime = now;
    FutureRecordMetadata future = new FutureRecordMetadata(this.produceFuture, this.recordCount,
                                                           timestamp, checksum,
                                                           key == null ? -1 : key.length,
                                                           value == null ? -1 : value.length);
    if (callback != null)
      thunks.add(new Thunk(callback, future));
    this.recordCount++;
    return future;
  }
}
可以尝试追一下 append 的流程
public long append(long offset, long timestamp, byte[] key, byte[] value) {
  if (!writable)
    throw new IllegalStateException("Memory records is not writable");

  int size = Record.recordSize(key, value);
  compressor.putLong(offset);
  compressor.putInt(size);
  long crc = compressor.putRecord(timestamp, key, value);
  compressor.recordWritten(size + Records.LOG_OVERHEAD);
  return crc;
}
最后可以追到 4.1 所说的消息格式中的 write 中,同时需要留意一下下面这一行代码
if (callback != null)
  thunks.add(new Thunk(callback, future));
大胆推测一下,当消息发送成功同时服务端返回响应数据是一定会从 thunks 中取出来这里封装的回调函数(包括拦截器的回调函数)
4.5 batch 满了怎么办
当 RecordBatch 满了会发生什么?其实在 4.4 我忽略了一行代码的解释
if (!this.records.hasRoomFor(key, value)) {
  return null;
}
这行代码其实就是在判断当前的 batch 是否满了
public boolean hasRoomFor(byte[] key, byte[] value) {
  if (!this.writable)
    return false;

  return this.compressor.numRecordsWritten() == 0 ?
    this.initialCapacity >= Records.LOG_OVERHEAD + Record.recordSize(key, value) :
  this.writeLimit >= this.compressor.estimatedBytesWritten() + Records.LOG_OVERHEAD + Record.recordSize(key, value);
}

public boolean isFull() {
  return !this.writable || this.writeLimit <= this.compressor.estimatedBytesWritten();
}
与 isFull 逻辑唯一的区别在于 hasRoomFor 在判断 writeLimit 时加上了本次消息大小,因此此时消息还没有放进去,或者说判断一下本次消息还能不能被追加;如果在追加之前就满了则 appendResult == null 之后就会走上面所说的申请内存流程;如果是追加本次消息后满了,则会在调用 isFull 中被识别出
因此对于上述两种情况我们关注最终的返回值
情况一:当前 batch 已经没有足够空间添加本次消息,走创建 RecordBatch 申请内存的逻辑,返回值
new RecordAppendResult(future, dq.size() > 1 || batch.records.isFull(), true);
dq.size() > 1 = true
batch.records.isFull() = false
=> batchIsFull = true
情况二:追加本次消息后满了,返回值
new RecordAppendResult(future, deque.size() > 1 || last.records.isFull(), false);
deque.size() > 1 = false
last.records.isFull() = true
=> batchIsFull = true
到这里内存缓存区就解析完了,意味着 doSend 中的 append() 方法结束
// TODO 将消息添加到内存缓冲区 buffer memory 中
RecordAccumulator.RecordAppendResult result = accumulator.append(tp, timestamp, serializedKey, serializedValue, interceptCallback, remainingWaitMs);
// batch 满了或者 新的batch在创建 唤醒 sender
if (result.batchIsFull || result.newBatchCreated) {
  log.trace("Waking up the sender since topic {} partition {} is either full or getting a new batch", record.topic(), partition);
  this.sender.wakeup();
}
当 batch 满了之后就会去唤醒 sender 线程,下一节就来看看 sender 究竟在做什么(当然是将满的 batch 发送出去啦)。
至此,更新一下流程图
五、Sender & Network
将这两个组件放在一起,因此它们在实际工作中是紧密结合的,同时 Sender 内部也封装了 Network;可以说是 Sender 负责流程上的调度,具体的工作由 Network 来完成。
5.1 先了解一下 Sender 的运行流程
在 Producer 初始化中说过 Sender 实现了 Runnable 接口,同时是生产者中唯一的线程,因此一定是从它的 run 方法开始。
public void run() {
  log.debug("Starting Kafka producer I/O thread.");

  // main loop, runs until close is called
  while (running) {
    try {
      run(time.milliseconds());
    } catch (Exception e) {
      log.error("Uncaught error in kafka producer I/O thread: ", e);
    }
  }
  ...
}
不断地轮询内部 run 方法,这个内部的 run 方法就是我们研究的重点,所有的网络请求都在这里(其实是废话,就这么一个方法,肯定都在这里)
第一步:获取缓存的元数据
Cluster cluster = metadata.fetch();
第二步:检查有没有准备好的 batch
RecordAccumulator.ReadyCheckResult result = this.accumulator.ready(cluster, now);
第三步:判断准备好的batch还有没有元数据没有被缓存
if (result.unknownLeadersExist)
  this.metadata.requestUpdate();
第四步:移除没有准备好的节点
Iterator<Node> iter = result.readyNodes.iterator();
long notReadyTimeout = Long.MAX_VALUE;
while (iter.hasNext()) {
  Node node = iter.next();
  if (!this.client.ready(node, now)) {
    // 如果没有建立好连接,ready会进行一次初始化后返回false,该 node 会被从迭代器中移除等待下一次轮训
    iter.remove();
    // TODO  如果发现还没有与leader broker 建立连接,在这里建立长链接
    notReadyTimeout = Math.min(notReadyTimeout, this.client.connectionDelay(node, now));
  }
}
第五步:按照 broker 对 batch 进行分组
Map<Integer, List<RecordBatch>> batches = this.accumulator.drain(cluster,
                                                                 result.readyNodes,
                                                                 this.maxRequestSize,
                                                                 now);
第六步:处理过期的 batch
// 处理超时的batch
List<RecordBatch> expiredBatches = this.accumulator.abortExpiredBatches(this.requestTimeout, now);
第七步:将第五步的 batch 封装成 request
List<ClientRequest> requests = createProduceRequests(batches, now);
第八步:发送消息
for (ClientRequest request : requests)
  // TODO  发送消息
  client.send(request, now);
第九步:真正的发送消息,包括我们遗留的元数据更新问题
this.client.poll(pollTimeout, now);
更新流程图
下面将对每一步做详细分析
5.2 如何判定 batch 是否可以被发送
问题很多的小明就问了,在 4.5 不是说过只要 batch 满了就可以发了吗?满足
deque.size() > 1 || batch.records.isFull();
这确实是其中的一个条件,但还有两个隐形的条件
- 配置了 linger.ms
- 有 batch 发送失败,还没到重试的间隔
下面我们看一下 kafka 是如何判定 batch 是否可以被发送,方法入口
RecordAccumulator.ReadyCheckResult result = this.accumulator.ready(cluster, now);
首先观察返回值
return new ReadyCheckResult(readyNodes, nextReadyCheckDelayMs, unknownLeadersExist);
推测一下该方法应该是判断有哪些 broker 节点有可以被发送的 batch,即:这个方法是通过判断哪些满的的 batch 都对应哪些 broker 节点。
获取第一个条件:内存是否耗尽
// 内存耗尽,等待batch被释放
boolean exhausted = this.free.queued() > 0;
queued 本质是获取 BufferPool 中的 Condition 个数,如果大于 0(exhausted=true)表明此时有线程在等待内存的释放说明内存已耗尽
之后开始遍历所有的 Deque
for (Map.Entry<TopicPartition, Deque<RecordBatch>> entry : this.batches.entrySet()) {
  TopicPartition part = entry.getKey();
  Deque<RecordBatch> deque = entry.getValue();

  Node leader = cluster.leaderFor(part);
  if (leader == null) {
    // 未缓存 leader 元数据
    unknownLeadersExist = true;
  } else if (!readyNodes.contains(leader) && !muted.contains(part)) {
    // 到这里这个deque无法再被写入
    synchronized (deque) {
      // 取头
      RecordBatch batch = deque.peekFirst();
      if (batch != null) {
        // TODO  如何判断 batch 可以被发送
        // 请求重试(重试次数,上一次重试时间+重试间隔是否大于当前时间),一般来说 backingOff 为 false,没有重试
        boolean backingOff = batch.attempts > 0 && batch.lastAttemptMs + retryBackoffMs > nowMs;
        // 当前时间 - 上次发送时间,可以认为就是创建时间,从创建到现在等待了多长时间
        long waitedTimeMs = nowMs - batch.lastAttemptMs;
        // 最多还能等待多久,如果是重试阶段那就是重试间隔,不然就是linger.ms时间
        long timeToWaitMs = backingOff ? retryBackoffMs : lingerMs;
        long timeLeftMs = Math.max(timeToWaitMs - waitedTimeMs, 0);
        // batch 是否已满,如果deque不止一个batch那一定有一个满了,如果只有一个batch再判断一下这个是否满了
        boolean full = deque.size() > 1 || batch.records.isFull();
        // 已经等待的时间是否大于最多等待时间,如果 linger.ms 等于 0,那这里一定是 true
        boolean expired = waitedTimeMs >= timeToWaitMs;
        // 综合上述所有条件
        boolean sendable = full || expired || exhausted || closed || flushInProgress();
        if (sendable && !backingOff) {
          // 返回哪个可以发送 batch 的 partition leader 对应的 broker
          readyNodes.add(leader);
        } else {
          // Note that this results in a conservative estimate since an un-sendable partition may have
          // a leader that will later be found to have sendable data. However, this is good enough
          // since we'll just wake up and then sleep again for the remaining time.
          // todo 如果有多个 partition 里的 batch 不能发送,会取最小的等待时间
          nextReadyCheckDelayMs = Math.min(timeLeftMs, nextReadyCheckDelayMs);
        }
      }
    }
  }
}
首先判断一下当前的分区有没有元数据缓存,将还没有缓存的元数据存储起来,之后锁住当前的 deque 开始后续的判断
取出头部的元素(越前面的元素越有可能被发送)
RecordBatch batch = deque.peekFirst();
下面就开始对这个 batch 做是否可以被发送的判断
获取第二个条件:是否满足重试条件
// 请求重试(重试次数,上一次重试时间+重试间隔是否大于当前时间),一般来说 backingOff 为 false,没有重试
boolean backingOff = batch.attempts > 0 && batch.lastAttemptMs + retryBackoffMs > nowMs;
batch.attempts 代表重试的次数,后面在说到处理错误响应时会对该参数进行累加
batch.lastAttemptMs 代表上一次重试时间,同理在处理错误响应时会更新该参数
retryBackoffMs 代表重试间隔,配置项默认 100ms
nowMs 代表当前的时间
batch.lastAttemptMs + retryBackoffMs > nowMs 上一次重试的时间+重试间隔 > 当前时间表示还没到下一次重试的时间
获取第三个条件:batch 是否满
// batch 是否已满,如果deque不止一个batch那一定有一个满了,如果只有一个batch再判断一下这个是否满了
boolean full = deque.size() > 1 || batch.records.isFull();
这个在上面已经介绍过了
获取第四个条件:batch 是否超时
long waitedTimeMs = nowMs - batch.lastAttemptMs;
long timeToWaitMs = backingOff ? retryBackoffMs : lingerMs;
long timeLeftMs = Math.max(timeToWaitMs - waitedTimeMs, 0);
boolean expired = waitedTimeMs >= timeToWaitMs;
waitedTimeMs 可以理解为当前 batch 在 deque 等待了多久
timeToWaitMs 根据当前 batch 是否处于重试阶段决定返回重试间隔或者 linger.ms
boolean sendable = full || expired || exhausted || closed || flushInProgress();
if (sendable && !backingOff) {
  // 返回哪个可以发送 batch 的 partition leader 对应的 broker
  readyNodes.add(leader);
} else {
  // Note that this results in a conservative estimate since an un-sendable partition may have
  // a leader that will later be found to have sendable data. However, this is good enough
  // since we'll just wake up and then sleep again for the remaining time.
  // todo 如果有多个 partition 里的 batch 不能发送,会取最小的等待时间
  nextReadyCheckDelayMs = Math.min(timeLeftMs, nextReadyCheckDelayMs);
}
最终综合上述的所有条件判断是否满足条件,将满足条件的 batch 对应的分区的 leader 返回;否则返回上面计算的等待时间(下一次发送)。
注:若有多个分区当前不能发送,则等待时间选择最小的(很合理)
5.3 如何判断目标 broker 是否可以发消息
5.2 返回了哪些 broker 将会被发送消息,但此时并不知道生产者与目标 broker 是否建立连接,因此下一步则是检查网络连接(不仅仅是网络连接),可以细品一下这里的设计模式
Iterator<Node> iter = result.readyNodes.iterator();
long notReadyTimeout = Long.MAX_VALUE;
while (iter.hasNext()) {
  Node node = iter.next();
  if (!this.client.ready(node, now)) {
    // 如果没有建立好连接,ready会进行一次初始化后返回false,该 node 会被从迭代器中移除等待下一次轮训
    iter.remove();
    // TODO  如果发现还没有与leader broker 建立连接,在这里建立长链接
    notReadyTimeout = Math.min(notReadyTimeout, this.client.connectionDelay(node, now));
  }
}
这段代码的逻辑很简单,从上一步获取的结果中提取可以发送的 broker 信息,通过 ready 方法判断连接是否准备好。如果此时连接没有准备好则将该节点移除本次轮训不在不发送消息。下面重点解析一下 ready 方法
@Override
public boolean ready(Node node, long now) {
  if (node.isEmpty())
    throw new IllegalArgumentException("Cannot connect to empty node " + node);

  if (isReady(node, now))
    return true;

  if (connectionStates.canConnect(node.idString(), now))
    // if we are interested in sending to a node and we don't have a connection to it, initiate one
    initiateConnect(node, now);

  return false;
}
从方法名可以看出来检查点体现在两个方面:是否准备好和连接是否准备好
看一下 idReady 的方法
@Override
public boolean isReady(Node node, long now) {
  // if we need to update our metadata now declare all requests unready to make metadata requests first
  // priority
  return !metadataUpdater.isUpdateDue(now) && canSendRequest(node.idString());
}
准备好的第一层含义:元数据是否已经准备好了
准备好的第二层含义:能否发送请求
元数据是否准备好的逻辑很简单
@Override
public boolean isUpdateDue(long now) {
  return !this.metadataFetchInProgress && this.metadata.timeToNextUpdate(now) == 0;
}
metadataFetchInProgress 字面意思就是是否正在抓取元数据
timeToNextUpdate 表明下一次元数据的更新时间
个人认为重要的是第二层含义
private boolean canSendRequest(String node) {
  return connectionStates.isConnected(node) && selector.isChannelReady(node) && inFlightRequests.canSendMore(node);
}
是否以连接、channel 是否准备好以及能否可以发送更多。连接状态 kafka 使用状态机的模式,将连接过程分为三个状态定义为枚举类
public enum ConnectionState {
  DISCONNECTED, CONNECTING, CONNECTED
}
Channel 是否准备好底层走的就是 java nio 后面在详细说明
能否发送更多是更接近用户的选择
public boolean canSendMore(String node) {
  Deque<ClientRequest> queue = requests.get(node);
  // 上一次的请求是否完成,完成后继续判断是否大于maxInFlightRequestsPerConnection
  return queue == null || queue.isEmpty() ||
    (queue.peekFirst().request().completed() && queue.size() < this.maxInFlightRequestsPerConnection);
}
最开始说的 max.in.flight.requests.per.connection 配置就是在这里被使用,默认是 5 表明当前连接最多允许有五个请求没有接收到响应。至此“是否准备好”这层语义就解释到这里
下面则是判断是否与 broker 建立连接
if (connectionStates.canConnect(node.idString(), now))
  // if we are interested in sending to a node and we don't have a connection to it, initiate one
  initiateConnect(node, now);
这里判断是否已经连接依然用得是状态机,因此大胆推测当与 broker 建立连接后一定会修改这个状态,在每次状态改变时修改属性值。当连接没有准备好则调用 initiateConnect 初始化连接
5.4 深入底层网络通信的起点
当连接没有建立,看 initiateConnect 如何建立连接
private void initiateConnect(Node node, long now) {
  String nodeConnectionId = node.idString();
  try {
    log.debug("Initiating connection to node {} at {}:{}.", node.id(), node.host(), node.port());
    // 修改连接状态为 Connecting
    this.connectionStates.connecting(nodeConnectionId, now);
    selector.connect(nodeConnectionId,
                     new InetSocketAddress(node.host(), node.port()),
                     this.socketSendBuffer,
                     this.socketReceiveBuffer);
  } catch (IOException e) {
    /* attempt failed, we'll try again after the backoff */
    connectionStates.disconnected(nodeConnectionId, now);
    /* maybe the problem is our metadata, update it */
    metadataUpdater.requestUpdate();
    log.debug("Error connecting to node {} at {}:{}:", node.id(), node.host(), node.port(), e);
  }
}
可以看出来通过 selector 的 connect 建立连接,传入 nodeId、nodeIp、nodePort、socket参数,似乎已经接触到底层的网络。继续深入 connect 观其逻辑
@Override
public void connect(String id, InetSocketAddress address, int sendBufferSize, int receiveBufferSize) throws IOException {
  if (this.channels.containsKey(id))
    throw new IllegalStateException("There is already a connection for id " + id);

  SocketChannel socketChannel = SocketChannel.open();
  socketChannel.configureBlocking(false);
  Socket socket = socketChannel.socket();
  // 长链接
  socket.setKeepAlive(true);
  if (sendBufferSize != Selectable.USE_DEFAULT_BUFFER_SIZE)
    socket.setSendBufferSize(sendBufferSize);
  if (receiveBufferSize != Selectable.USE_DEFAULT_BUFFER_SIZE)
    socket.setReceiveBufferSize(receiveBufferSize);
  // false:会将小的数据包收集起来组装成大的数据包再一次性发送
  // true:关闭 Nagle 算法,因为 kafka 已经在 batch 层面做了批处理,不需要延迟打包
  socket.setTcpNoDelay(true);
  boolean connected;
  try {
    // 如何客户端服务端在本地,立马就返回 true,通常都是返回 false
    connected = socketChannel.connect(address);
  } catch (UnresolvedAddressException e) {
    socketChannel.close();
    throw new IOException("Can't resolve address: " + address, e);
  } catch (IOException e) {
    socketChannel.close();
    throw e;
  }
  SelectionKey key = socketChannel.register(nioSelector, SelectionKey.OP_CONNECT);
  KafkaChannel channel = channelBuilder.buildChannel(id, key, maxReceiveSize);
  key.attach(channel);
  this.channels.put(id, channel);

  if (connected) {
    // OP_CONNECT won't trigger for immediately connected channels
    log.debug("Immediately connected to node {}", channel.id());
    immediatelyConnectedKeys.add(key);
    key.interestOps(0);
  }
}
这块代码对于接触过 java 原生的 NIO 开发者来说那可是太熟悉了:获取一个 SocketChannel 并配置非阻塞模式 -> 获取 socket 配置网络参数 -> 通过 SocketChannel 连接到 ServerSocketChannel -> 注册 SocketChannel 到 select 上并关注 OP_CONNECT 事件 -> 将 KafkaChannel(自己封装的 Channel)作为附件(attch)绑定到 selectionkey 上 -> 缓存 KafkaChannel
惊讶的发现 kafka 的网络请求居然是使用原生的 Java NIO 编写的
5.5 回头看看 Network 的初始化并观察如何封装原生 NIO
从最开始的创建开始
// 网络通信组件
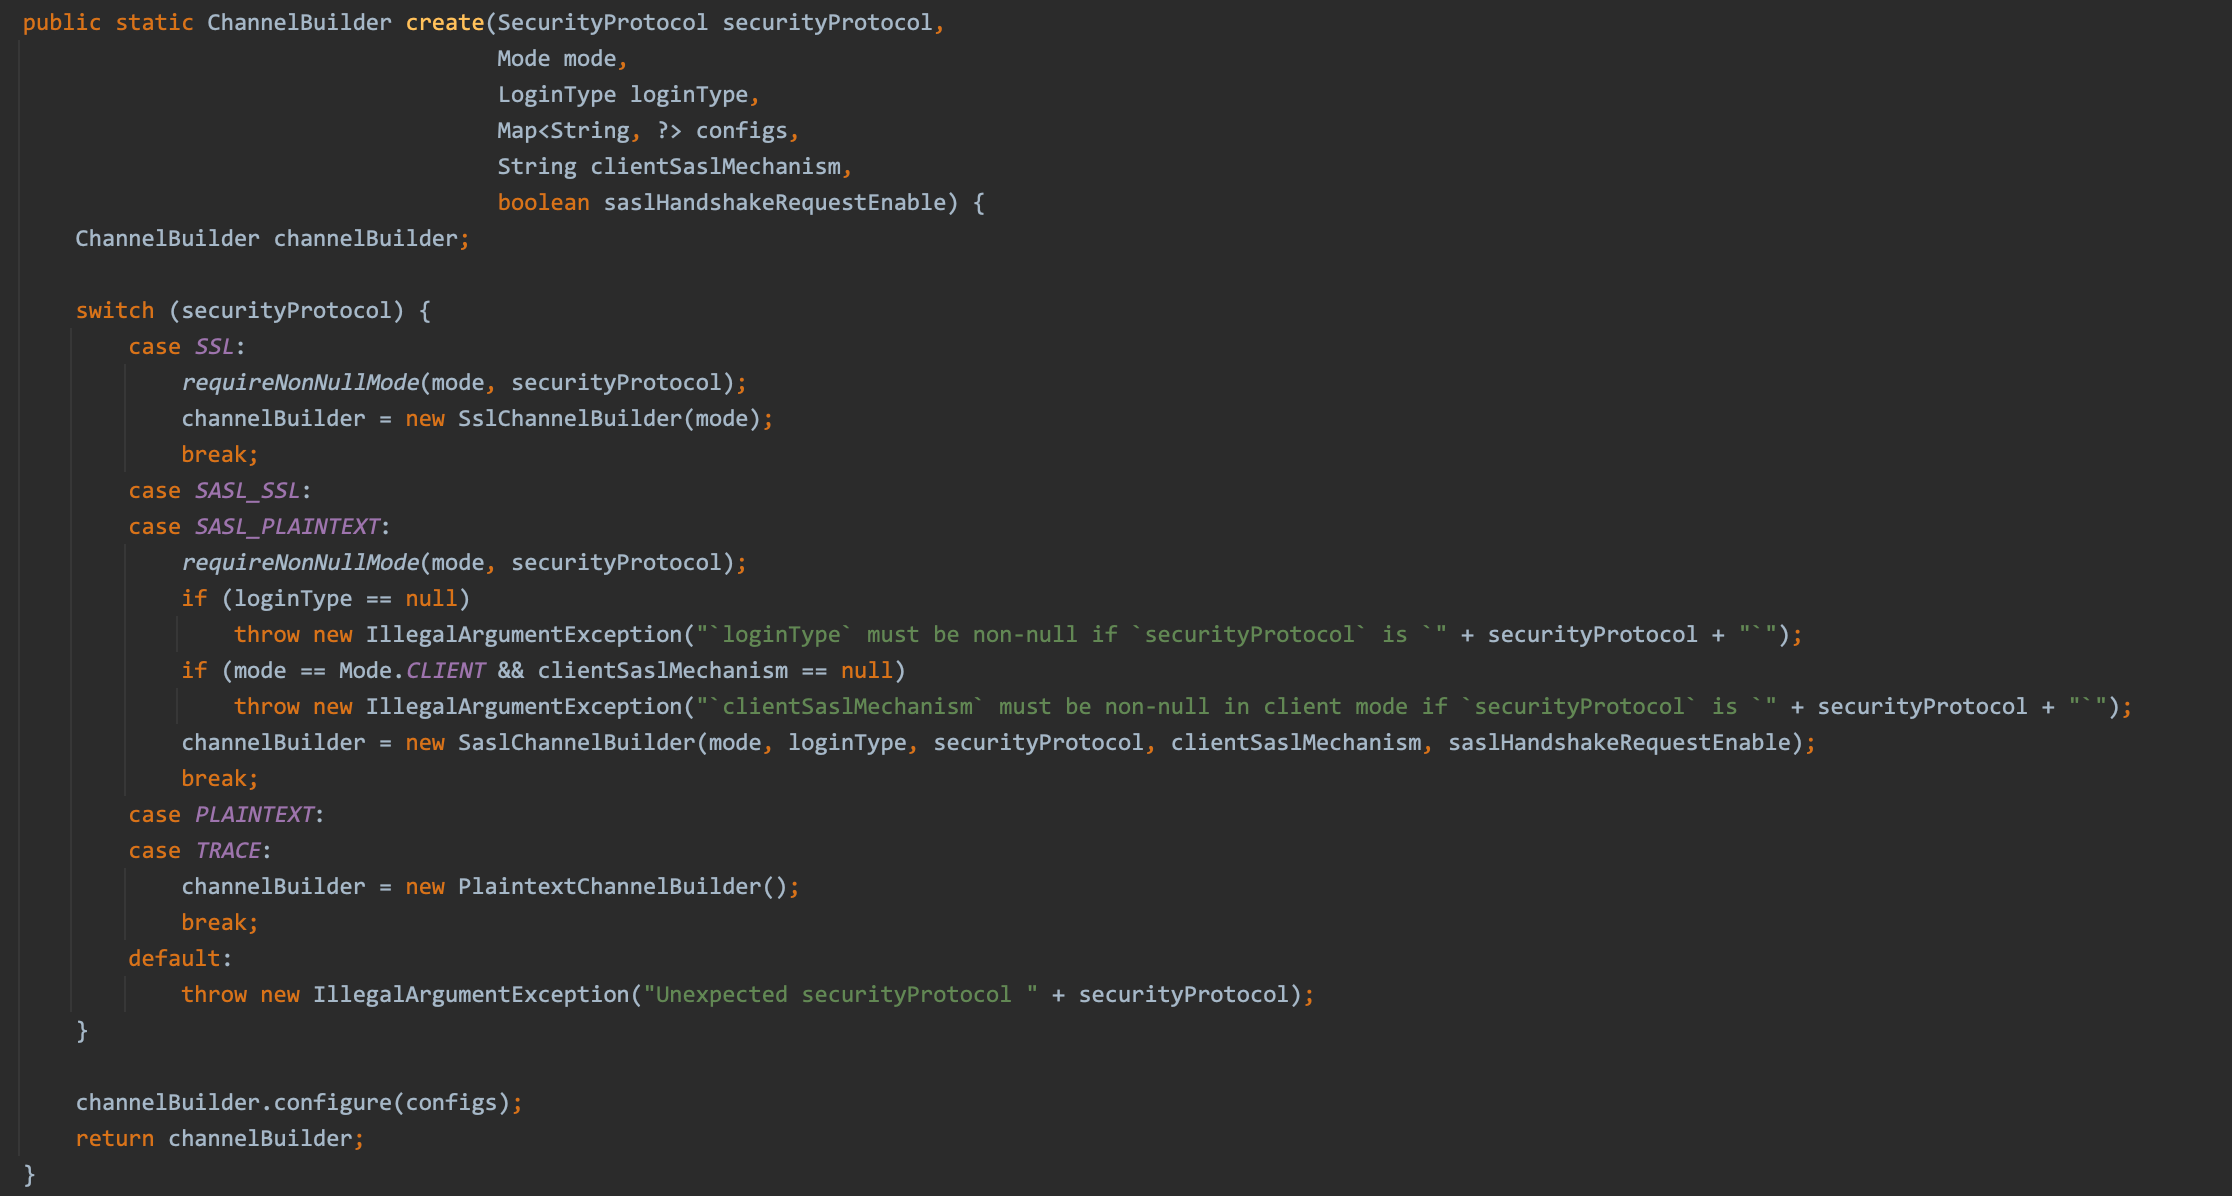
ChannelBuilder channelBuilder = ClientUtils.createChannelBuilder(config.values());
// TODO 核心组件4:网络通信客户端
NetworkClient client = new NetworkClient(
// 每个broker连接最大空闲时间 默认 9 分钟,超时连接会被回收
new Selector(config.getLong(ProducerConfig.CONNECTIONS_MAX_IDLE_MS_CONFIG), this.metrics, time, "producer", channelBuilder),
this.metadata,
clientId,
// 每个broker最多接收五个没有响应的request,会存在消息乱序的问题
config.getInt(ProducerConfig.MAX_IN_FLIGHT_REQUESTS_PER_CONNECTION),
// 重试连接时间间隔5毫秒
config.getLong(ProducerConfig.RECONNECT_BACKOFF_MS_CONFIG),
// socket 发送缓冲区大小,默认 128k
config.getInt(ProducerConfig.SEND_BUFFER_CONFIG),
// socket 接收缓冲区大小,默认 32k
config.getInt(ProducerConfig.RECEIVE_BUFFER_CONFIG),
this.requestTimeoutMs, time);
// TODO 核心组件5:sender 线程,从缓冲区获取数据发送到broker
ChannelBuilder 字面意思创建 Channel 的工具类,主要是根据配置进行加密和权限相关的创建(不是重点)
new Selector(config.getLong(ProducerConfig.CONNECTIONS_MAX_IDLE_MS_CONFIG), this.metrics, time, "producer", channelBuilder)
Selector 只需要关注其构造方法即可
public Selector(int maxReceiveSize, long connectionMaxIdleMs, Metrics metrics, Time time, String metricGrpPrefix, Map<String, String> metricTags, boolean metricsPerConnection, ChannelBuilder channelBuilder) {
  try {
    // 封装原生 java nio 的 selector 组件
    this.nioSelector = java.nio.channels.Selector.open();
  } catch (IOException e) {
    throw new KafkaException(e);
  }
  // 最大接收的数据量大小
  this.maxReceiveSize = maxReceiveSize;
  // 最大空闲的网络连接时间(纳秒)
  this.connectionsMaxIdleNanos = connectionMaxIdleMs * 1000 * 1000;
  this.time = time;
  this.metricGrpPrefix = metricGrpPrefix;
  this.metricTags = metricTags;
  // 一个 broker 对应一个 SocketChannel
  this.channels = new HashMap<>();
  // 已发送的请求
  this.completedSends = new ArrayList<>();
  // 已接收的响应
  this.completedReceives = new ArrayList<>();
  // 每个 broker 接收到还没处理的响应
  this.stagedReceives = new HashMap<>();
  this.immediatelyConnectedKeys = new HashSet<>();
  // 已建立连接的 brokers
  this.connected = new ArrayList<>();
  // 未建立连接的 brokers
  this.disconnected = new ArrayList<>();
  this.failedSends = new ArrayList<>();
  this.sensors = new SelectorMetrics(metrics);
  this.channelBuilder = channelBuilder;
  // initial capacity and load factor are default, we set them explicitly because we want to set accessOrder = true
  this.lruConnections = new LinkedHashMap<>(16, .75F, true);
  currentTimeNanos = time.nanoseconds();
  nextIdleCloseCheckTime = currentTimeNanos + connectionsMaxIdleNanos;
  this.metricsPerConnection = metricsPerConnection;
}
发现 Selector 居然就是封装了 java nio 原生的 Selector,加上注释的属性后面都会重点讲到。NIO 的三大组件就剩 Channel 没有找到了。
从上一节可以看出封装原生 Channel 的一定就是 KafkaChannel 了,下面是他的构造方法
public KafkaChannel(String id, TransportLayer transportLayer, Authenticator authenticator, int maxReceiveSize) throws IOException {
  this.id = id;
  this.transportLayer = transportLayer;
  this.authenticator = authenticator;
  this.maxReceiveSize = maxReceiveSize;
}
似乎只有 transportLayer 才有可能封装 Channel,发现 transportLayer 是一个接口有两个实现类

PlaintextTransportLayer 的属性如下
private final SelectionKey key;
private final SocketChannel socketChannel;
private final Principal principal = KafkaPrincipal.ANONYMOUS;
这样 Java NIO 的东西就被完美的封装进去了
更新流程图
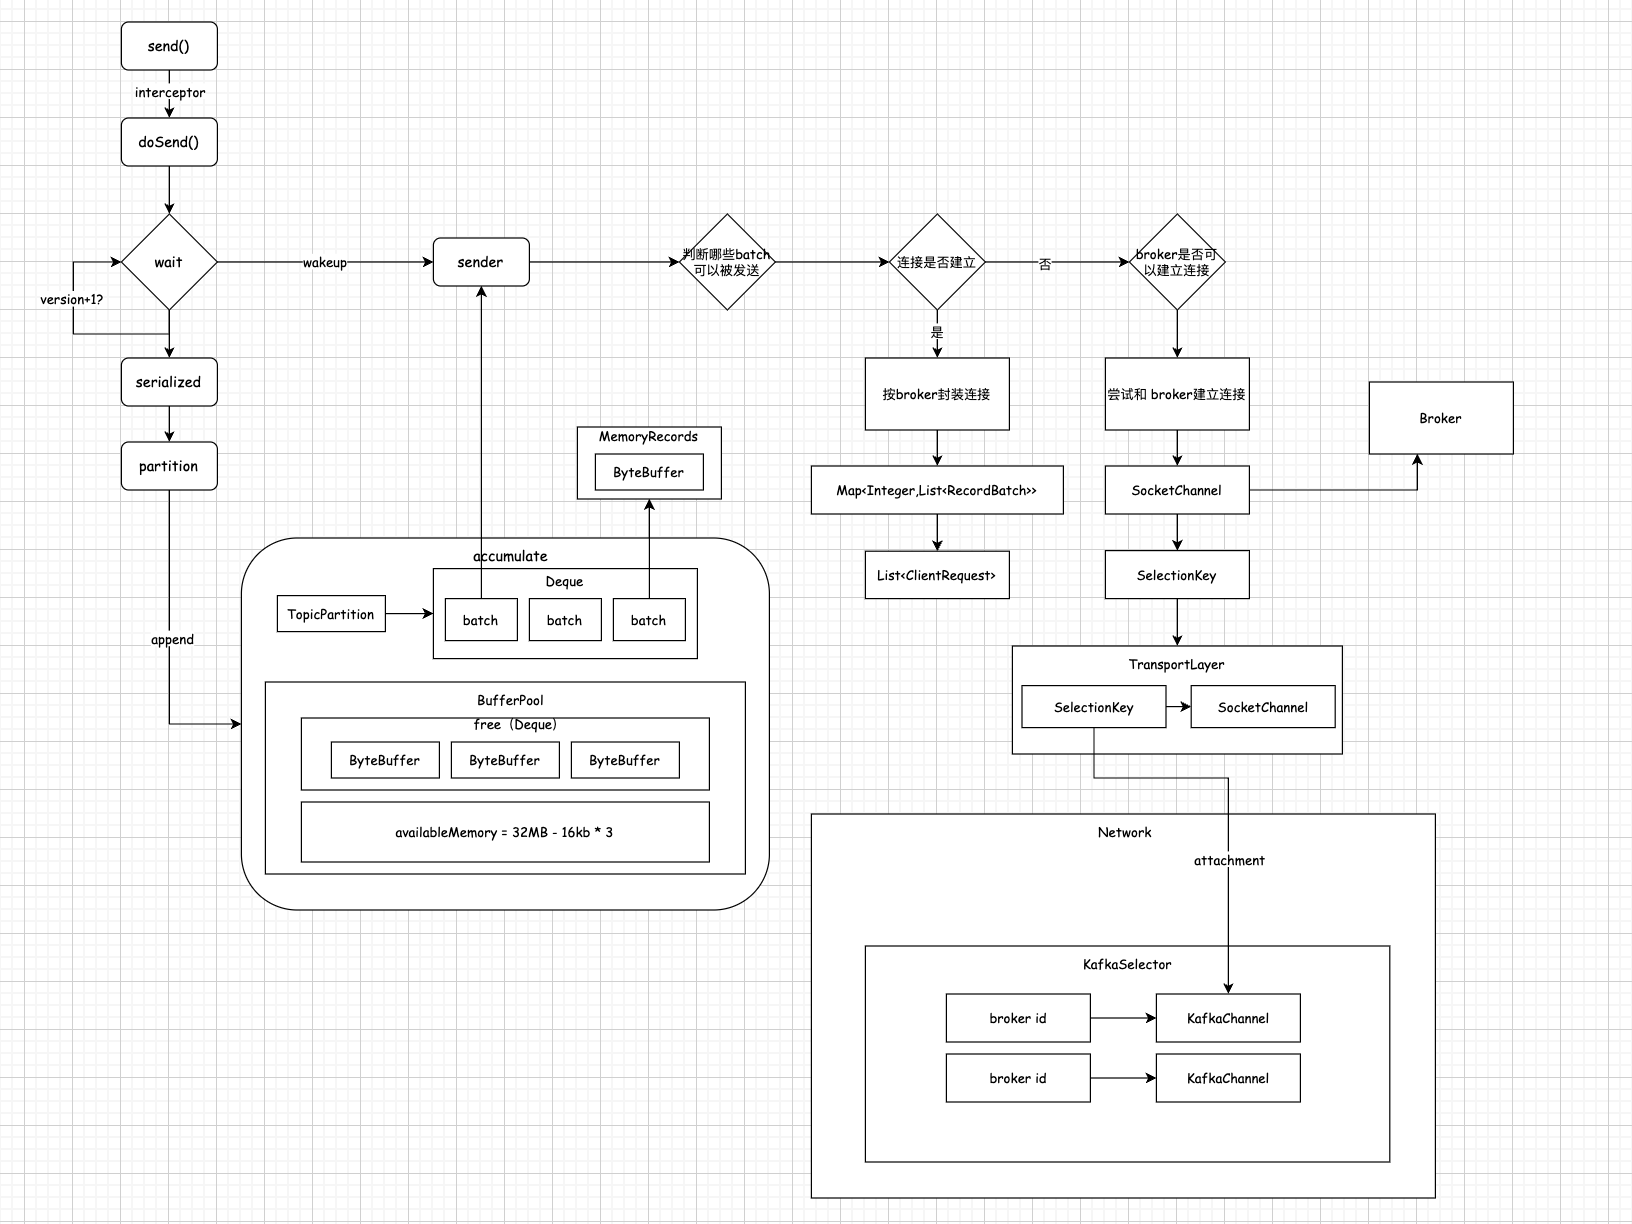
到这里客户端并没有真正的连接到服务端只是做了连接前的初始化,因为此时只是注册了 OP_CONNECT 事件,按照 NIO 的逻辑一定是在 Selector.select() 中获取到连接事件后才算真正的连接
5.6 回到 Sender 流程看 batch 如何被打包
上述已经说清楚了,一个 broker 建立一个连接对应一个 KafkaChannel,因此需要将可以被发送的 batch 按照 broker 进行打包
// TODO  按照 broker 对 partition 进行分组,相同 broker 的多个 batch 会被封装成一个请求发送到 broker
Map<Integer, List<RecordBatch>> batches = this.accumulator.drain(cluster,
                                                                 result.readyNodes,
                                                                 this.maxRequestSize,
                                                                 now);
从入参可以看出 drain 会根据传入的可以被发送的 broker 信息结合缓存的元数据就可以知道有哪个分区的 deque 可以取数据。
public Map<Integer, List<RecordBatch>> drain(Cluster cluster,
                                             Set<Node> nodes,
                                             int maxSize,
                                             long now) {
  if (nodes.isEmpty())
    return Collections.emptyMap();

  Map<Integer, List<RecordBatch>> batches = new HashMap<>();
  for (Node node : nodes) {
    int size = 0;
    // 获取 broker 所有的 partition
    List<PartitionInfo> parts = cluster.partitionsForNode(node.id());
    List<RecordBatch> ready = new ArrayList<>();
    /* to make starvation less likely this loop doesn't start at 0 */
    int start = drainIndex = drainIndex % parts.size();
    // 遍历所有的 partition
    do {
      PartitionInfo part = parts.get(drainIndex);
      TopicPartition tp = new TopicPartition(part.topic(), part.partition());
      // Only proceed if the partition has no in-flight batches.
      if (!muted.contains(tp)) {
        Deque<RecordBatch> deque = getDeque(new TopicPartition(part.topic(), part.partition()));
        if (deque != null) {
          synchronized (deque) {
            RecordBatch first = deque.peekFirst();
            if (first != null) {
              boolean backoff = first.attempts > 0 && first.lastAttemptMs + retryBackoffMs > now;
              // Only drain the batch if it is not during backoff period.
              if (!backoff) {
                if (size + first.records.sizeInBytes() > maxSize && !ready.isEmpty()) {
                  // there is a rare case that a single batch size is larger than the request size due
                  // to compression; in this case we will still eventually send this batch in a single
                  // request
                  break;
                } else {
                  // 取出 batch
                  RecordBatch batch = deque.pollFirst();
                  batch.records.close();
                  size += batch.records.sizeInBytes();
                  ready.add(batch);
                  batch.drainedMs = now;
                }
              }
            }
          }
        }
      }
      this.drainIndex = (this.drainIndex + 1) % parts.size();
    } while (start != drainIndex);
    batches.put(node.id(), ready);
  }
  return batches;
}
从这个方法可以看出来应该不是同一批人写的(代码风格不一样),但是逻辑其实很简单:取出对应的 deque -> 加锁 -> pollFirst 取头 -> 关闭当前 batch(在前面判断batch是否满会判断当前 batch 是否被关闭) -> 添加当前 batch 的结果集合返回
这样一个个待发送的 batch 就会被按照 broker 进行打包
5.7 batch 过时怎么办
这里看一下对于过期的 batch 是怎么判定的,同时如何处理过期的 batch;关注方法 abortExpiredBatches 的核心逻辑
if (batch.maybeExpire(requestTimeout, retryBackoffMs, now, this.lingerMs, isFull)) {
  expiredBatches.add(batch);
  count++;
  // 删除batch
  batchIterator.remove();
  // 归还内存
  deallocate(batch);
}
可以得出结论过期的 batch 会被删除并且释放内存,下面主要是分析如何判定 batch 是否超时,即 maybeExpire 方法
public boolean maybeExpire(int requestTimeoutMs, long retryBackoffMs, long now, long lingerMs, boolean isFull) {
  boolean expire = false;

  if (!this.inRetry() && isFull && requestTimeoutMs < (now - this.lastAppendTime))
    expire = true;
  else if (!this.inRetry() && requestTimeoutMs < (now - (this.createdMs + lingerMs)))
    expire = true;
  else if (this.inRetry() && requestTimeoutMs < (now - (this.lastAttemptMs + retryBackoffMs)))
    expire = true;

  if (expire) {
    this.records.close();
    // 做一次回调,通知超时
    this.done(-1L, Record.NO_TIMESTAMP, new TimeoutException("Batch containing " + recordCount + " record(s) expired due to timeout while requesting metadata from brokers for " + topicPartition));
  }

  return expire;
}
满足三个条件的其中一个即可
- 没有重试、batch 满了、最后一次追加消息的时间距离现在已经超过了最大的请求时间
- 没有重试、应该发送的时间(创建时间+发送间隔)距离现在已经超过了最大的请求时间
- 处于重试、应该发送的时间(最后一次消息追加+重试间隔)距离现在已经超过了最大的请求时间
对于过期的 batch 会被调用 done 方法,这个方法就是用来调用生产者的回调函数的,回调这部分将在处理响应的部分做介绍。
5.8 batch 如何封装成 request
接着 5.7 继续走
List<ClientRequest> requests = createProduceRequests(batches, now);
个人觉得这部分不是重点
private List<ClientRequest> createProduceRequests(Map<Integer, List<RecordBatch>> collated, long now) {
  List<ClientRequest> requests = new ArrayList<ClientRequest>(collated.size());
  for (Map.Entry<Integer, List<RecordBatch>> entry : collated.entrySet())
    requests.add(produceRequest(now, entry.getKey(), acks, requestTimeout, entry.getValue()));
  return requests;
}

/**
 * Create a produce request from the given record batches
 */
private ClientRequest produceRequest(long now, int destination, short acks, int timeout, List<RecordBatch> batches) {
  Map<TopicPartition, ByteBuffer> produceRecordsByPartition = new HashMap<TopicPartition, ByteBuffer>(batches.size());
  final Map<TopicPartition, RecordBatch> recordsByPartition = new HashMap<TopicPartition, RecordBatch>(batches.size());
  for (RecordBatch batch : batches) {
    TopicPartition tp = batch.topicPartition;
    produceRecordsByPartition.put(tp, batch.records.buffer());
    recordsByPartition.put(tp, batch);
  }
  ProduceRequest request = new ProduceRequest(acks, timeout, produceRecordsByPartition);
  RequestSend send = new RequestSend(Integer.toString(destination),
                                     this.client.nextRequestHeader(ApiKeys.PRODUCE),
                                     request.toStruct());
  RequestCompletionHandler callback = new RequestCompletionHandler() {
    public void onComplete(ClientResponse response) {
      handleProduceResponse(response, recordsByPartition, time.milliseconds());
    }
  };

  return new ClientRequest(now, acks != 0, send, callback);
}
ClientRequest 最终只有内部封装的 RequestSend 被发送出去,其构造方法如下
public RequestSend(String destination, RequestHeader header, Struct body) {
  super(destination, serialize(header, body));
  this.header = header;
  this.body = body;
}
这里的 header 就是用来区分消息的类型,例如这里是发送生产者的消息,传入的值是 ApiKeys.PRODUCE,而更多的 header 如下:
PRODUCE(0, "Produce"),
FETCH(1, "Fetch"),
LIST_OFFSETS(2, "Offsets"),
METADATA(3, "Metadata"),
LEADER_AND_ISR(4, "LeaderAndIsr"),
STOP_REPLICA(5, "StopReplica"),
UPDATE_METADATA_KEY(6, "UpdateMetadata"),
CONTROLLED_SHUTDOWN_KEY(7, "ControlledShutdown"),
OFFSET_COMMIT(8, "OffsetCommit"),
OFFSET_FETCH(9, "OffsetFetch"),
GROUP_COORDINATOR(10, "GroupCoordinator"),
JOIN_GROUP(11, "JoinGroup"),
HEARTBEAT(12, "Heartbeat"),
LEAVE_GROUP(13, "LeaveGroup"),
SYNC_GROUP(14, "SyncGroup"),
DESCRIBE_GROUPS(15, "DescribeGroups"),
LIST_GROUPS(16, "ListGroups"),
SASL_HANDSHAKE(17, "SaslHandshake"),
API_VERSIONS(18, "ApiVersions");
5.9 request 如何被发送
当 batch 被封装成一个个 request 后依次发送即可,但此时真的会被发送吗?熟悉 NIO 的同学肯定会说不会?因此到目前为止我们只注册了 OP_CONNECT 事件,只有在注册 OP_WRITE 事件并且在 select 中获取到对应的 key 才可以执行,因此可以大胆的推测这一步操作是缓存 request
for (ClientRequest request : requests)
  // TODO  发送消息
  client.send(request, now);
省略深入的过程,一步到位
private void doSend(ClientRequest request, long now) {
  request.setSendTimeMs(now);
  this.inFlightRequests.add(request);
  selector.send(request.request());
}
将请求加入 inFlightRequests 中,而 inFlightRequests 内部就是封装了 maxInFlightRequestsPerConnection 参数,字面意思就是 in-flight 正在飞的请求,表示请求正在发送等待响应中。
继续追
public void send(Send send) {
  KafkaChannel channel = channelOrFail(send.destination());
  try {
    channel.setSend(send);
  } catch (CancelledKeyException e) {
    this.failedSends.add(send.destination());
    close(channel);
  }
}
到这里请求就只剩下上面所说的 Send 了具体的实现类是 RequestSend。获取到请求的目标从中获取到缓存的 KafkaChannel 从而到了最后一步(流程到了这一步就停止了,这就是网络编程的风格:追了半年突然没了音讯)
public void setSend(Send send) {
  if (this.send != null)
    throw new IllegalStateException("Attempt to begin a send operation with prior send operation still in progress.");
  this.send = send;
  this.transportLayer.addInterestOps(SelectionKey.OP_WRITE);
}
注意到 send 被缓存起来同时这里添加了对 OP_WRITE 事件的关注(前后呼应)。后续只要检测到有可写事件 send 就会被真正的发送出去。
至此就执行下纯 NIO 的东西,我打算单独开一章来解析 kafka 是如何巧妙的利用 NIO 发送消息,同时有解决了怎样的网络编程都会遇到的粘包拆包问题、以及工业级的 NIO 到底怎么写
更新流程图

六、kafka 工业级 NIO
至此整个生产者就只剩下最后一个方法没有被执行了
this.client.poll(pollTimeout, now);
而这个方法将是生产者网络请求最核心、最有研究价值的一个方法,每一行都是重点。
@Override
public List<ClientResponse> poll(long timeout, long now) {
  long metadataTimeout = metadataUpdater.maybeUpdate(now);
  try {
    // TODO 这里完成连接建立
    this.selector.poll(Utils.min(timeout, metadataTimeout, requestTimeoutMs));
  } catch (IOException e) {
    log.error("Unexpected error during I/O", e);
  }

  // process completed actions
  long updatedNow = this.time.milliseconds();
  List<ClientResponse> responses = new ArrayList<>();
  handleCompletedSends(responses, updatedNow);
  handleCompletedReceives(responses, updatedNow);
  handleDisconnections(responses, updatedNow);
  handleConnections();
  handleTimedOutRequests(responses, updatedNow);

  // invoke callbacks
  for (ClientResponse response : responses) {
    if (response.request().hasCallback()) {
      try {
        response.request().callback().onComplete(response);
      } catch (Exception e) {
        log.error("Uncaught error in request completion:", e);
      }
    }
  }

  return responses;
}
6.1 回头看看元数据更新
(终于等到了元数据的更新)
long metadataTimeout = metadataUpdater.maybeUpdate(now);
从方法名推测该方法有两个逻辑:是否要更新元数据以及更新元数据的具体逻辑
@Override
public long maybeUpdate(long now) {
  // should we update our metadata?
  long timeToNextMetadataUpdate = metadata.timeToNextUpdate(now);
  long timeToNextReconnectAttempt = Math.max(this.lastNoNodeAvailableMs + metadata.refreshBackoff() - now, 0);
  long waitForMetadataFetch = this.metadataFetchInProgress ? Integer.MAX_VALUE : 0;
  // if there is no node available to connect, back off refreshing metadata
  long metadataTimeout = Math.max(Math.max(timeToNextMetadataUpdate, timeToNextReconnectAttempt),
                                  waitForMetadataFetch);

  if (metadataTimeout == 0) {
    // Beware that the behavior of this method and the computation of timeouts for poll() are
    // highly dependent on the behavior of leastLoadedNode.
    Node node = leastLoadedNode(now);
    maybeUpdate(now, node);
  }

  return metadataTimeout;
}
都到这一步这些时间的计算应该都能看得懂,直接解析需要更新元数据时的逻辑。leastLoadedNode 从负载最小的节点上拉取元数据(想一下生产者是如何认为哪个节点负载小,答案是:inFlightRequests 的数量),该部分源码可以自己琢磨一下,主要看元数据的更新逻辑
if (canSendRequest(nodeConnectionId)) {
  this.metadataFetchInProgress = true;
  MetadataRequest metadataRequest;
  if (metadata.needMetadataForAllTopics())
    metadataRequest = MetadataRequest.allTopics();
  else
    metadataRequest = new MetadataRequest(new ArrayList<>(metadata.topics()));
  ClientRequest clientRequest = request(now, nodeConnectionId, metadataRequest);
  log.debug("Sending metadata request {} to node {}", metadataRequest, node.id());
  doSend(clientRequest, now);
}
本质上和消息的发送没有区别,构造 ClientRequest 请求调用 doSend 缓存请求而构造的请求可以断定 ApiKey 为 Metadata
private ClientRequest request(long now, String node, MetadataRequest metadata) {
  RequestSend send = new RequestSend(node, nextRequestHeader(ApiKeys.METADATA), metadata.toStruct());
  return new ClientRequest(now, true, send, null, true);
}
6.2 不断轮训的 poll 是如何将消息发送出去的
解析下面方法
this.selector.poll(Utils.min(timeout, metadataTimeout, requestTimeoutMs));
源代码如下
@Override
public void poll(long timeout) throws IOException {
  if (timeout < 0)
    throw new IllegalArgumentException("timeout should be >= 0");

  clear();

  if (hasStagedReceives() || !immediatelyConnectedKeys.isEmpty())
    timeout = 0;

  /* check ready keys */
  long startSelect = time.nanoseconds();
  // 封装 nio 的 select 会阻塞,返回可以处理的 key 的个数
  int readyKeys = select(timeout);
  long endSelect = time.nanoseconds();
  currentTimeNanos = endSelect;
  this.sensors.selectTime.record(endSelect - startSelect, time.milliseconds());

  if (readyKeys > 0 || !immediatelyConnectedKeys.isEmpty()) {
    pollSelectionKeys(this.nioSelector.selectedKeys(), false);
    pollSelectionKeys(immediatelyConnectedKeys, true);
  }

  addToCompletedReceives();

  long endIo = time.nanoseconds();
  this.sensors.ioTime.record(endIo - endSelect, time.milliseconds());
  // lru 算法的应用,断掉空闲的连接
  maybeCloseOldestConnection();
}
核心点在于 select 阻塞方法,当有关注的事件发生时恢复阻塞会返回发生的事件,因此将在 pollSelectionKeys 中处理所有可能的事件:OP_CONNECT、OP_WRITE、OP_READ(目前这个事件还没有被关注)
后面还有两个比较核心的方法
addToCompletedReceives():处理响应数据
maybeCloseOldestConnection():处理空闲连接(不重要感兴趣可以看)
6.3 如何处理 OP_CONNECT 事件
在 pollSelectionKeys 将会处理所有可能发生的时间,那么最先发生的一定是 OP_CONNECT 事件,对应源码如下:
if (isImmediatelyConnected || key.isConnectable()) {
  // 完成连接
  if (channel.finishConnect()) {
    this.connected.add(channel.id());
    this.sensors.connectionCreated.record();
  } else
    continue;
}
主要看一下 finishConnect 到底做了什么
@Override
public boolean finishConnect() throws IOException {
  boolean connected = socketChannel.finishConnect();
  if (connected)
    // 取消关注连接事件,并且新增对可读事件的关注
    key.interestOps(key.interestOps() & ~SelectionKey.OP_CONNECT | SelectionKey.OP_READ);
  return connected;
}
当建立完连接后当前 channel(可以理解为当前连接)取消对 OP_CONNECT 的关注并且添加了对 OP_READ 的关注,至此算是完成对一个 broker 连接的建立,同时建立起完整的消息发送与消息响应的通道(可读可写)
后续还做了一些权限上的校验(不重要)
/* if channel is not ready finish prepare */
// ready 是否完成认证和授权
if (channel.isConnected() && !channel.ready())
  channel.prepare();
6.4 如何处理 OP_WRITE 事件
即请求到底是如何被发送出去的,同时 OP_WRITE 往往会伴随一个问题:当消息太大一次写不完全怎么办(这类问题主要首先内核 socket 的影响,因此需要在代码级别来处理这个问题)
代码如下:
if (channel.ready() && key.isWritable()) {
  Send send = channel.write();
  if (send != null) {
    this.completedSends.add(send);
    this.sensors.recordBytesSent(channel.id(), send.size());
  }
}
channel.write()
public Send write() throws IOException {
  Send result = null;
  if (send != null && send(send)) {
    result = send;
    send = null;
  }
  return result;
}
send(send)
private boolean send(Send send) throws IOException {
  send.writeTo(transportLayer);
  if (send.completed())
    transportLayer.removeInterestOps(SelectionKey.OP_WRITE);

  return send.completed();
}
send.writeTo(transportLayer)
@Override
public long writeTo(GatheringByteChannel channel) throws IOException {
  long written = channel.write(buffers);
  if (written < 0)
    throw new EOFException("Wrote negative bytes to channel. This shouldn't happen.");
  remaining -= written;
  if (channel instanceof TransportLayer)
    pending = ((TransportLayer) channel).hasPendingWrites();

  return written;
}
从最底层 write 开始,通过调用获取到的 channel 将 ByteBuffer 写入即:将消息发送给服务端,并返回本次写入字节数,随后开始计算剩余字节数 remaining,从构造方法看出
public ByteBufferSend(String destination, ByteBuffer... buffers) {
  super();
  this.destination = destination;
  this.buffers = buffers;
  for (int i = 0; i < buffers.length; i++)
    remaining += buffers[i].remaining();
  this.size = remaining;
}
remaining 就是所有消息对应的 ByteBuffer 的 remaining 之和
writeTo 方法返回本次写入的字节数,源码里面这个返回值被舍弃了。最后判断一下是否写入完成
if (send.completed())
  transportLayer.removeInterestOps(SelectionKey.OP_WRITE);

@Override
public boolean completed() {
  return remaining <= 0 && !pending;
}
如果一次写入
移除 OP_WRITE 事件,表示本次数据发送完成;有消息需要发送逻辑就是:缓存消息关注 OP_WRITE 事件(前面分析过)。send(send) 返回 true 将 send 置为 null 返回本次的 send;最后将本次发送的 send 添加到 completedSends
如果需要多次写入
假如消息太大需要分多次写入,那么 send(send) 返回 false,不会取消 OP_WRITE 事件然后本次 poll 就结束了,等待下一次 poll 会再次进入直到全部写完 remaining = 0
这里有人提出过问题:为什么每一次 poll 只会发送一次数据,对于大消息为什么不在这里采用循环方式一次写入?
答案:因为如果采用 while 循环会产生无效的轮训,只有服务端接收完本次的消息后客户端才能继续写入。
6.5 如何处理 OP_READ 事件
源代码如下
if (channel.ready() && key.isReadable() && !hasStagedReceive(channel)) {
  NetworkReceive networkReceive;
  // 一个 broker 会发送多个请求,多个请求就对应多个响应,因此这里使用wile多次读取
  while ((networkReceive = channel.read()) != null)
    // 暂存响应,后续必须处理这个响应否则不会在继续读取
    addToStagedReceives(channel, networkReceive);
}
这里将感受一下工业级的代码,如何通过一套代码解决网络请求的粘包拆包问题。要解决这个问题其核心就是双方需要提前沟通好数据格式,如果没有一个确定的数据格式就无法在二进制流中分割一个个的消息。因此 kafka 采用一个固定 4byte 长度描述本次消息的长度,即:先读 4byte 数据获取本次消息长度然后再读取对应长度的字节即可。
下面看生产者最最最精彩的代码
public NetworkReceive read() throws IOException {
  NetworkReceive result = null;

  if (receive == null) {
    receive = new NetworkReceive(maxReceiveSize, id);
  }

  receive(receive);
  if (receive.complete()) {
    receive.payload().rewind();
    result = receive;
    receive = null;
  }
  return result;
}
第一次读取 receive == null,此时创建一个 NetworkReceive,构造方法如下:
public NetworkReceive(int maxSize, String source) {
  this.source = source;
  // 用于读取固定长度的数据来获取本次消息的长度
  this.size = ByteBuffer.allocate(4);
  this.buffer = null;
  this.maxSize = maxSize;
}
通过 receive() 开始读取响应数据
public long readFromReadableChannel(ReadableByteChannel channel) throws IOException {
  int read = 0;
  if (size.hasRemaining()) {
    int bytesRead = channel.read(size);
    if (bytesRead < 0)
      throw new EOFException();
    read += bytesRead;
    if (!size.hasRemaining()) {
      size.rewind();
      int receiveSize = size.getInt();
      if (receiveSize < 0)
        throw new InvalidReceiveException("Invalid receive (size = " + receiveSize + ")");
      if (maxSize != UNLIMITED && receiveSize > maxSize)
        throw new InvalidReceiveException("Invalid receive (size = " + receiveSize + " larger than " + maxSize + ")");

      this.buffer = ByteBuffer.allocate(receiveSize);
    }
  }
  if (buffer != null) {
    int bytesRead = channel.read(buffer);
    if (bytesRead < 0)
      throw new EOFException();
    read += bytesRead;
  }

  return read;
}
- 调用 size.hasRemaining() 判断 size 是否可以写入
- 尝试读取 4byte 的数据并且记录到已经读取的数据 read 中
- 再次判断 size 是否可以写入(准确说判断是否写满了)
- 假如写满,意味着成功读取到消息长度,随后创建对应长度的 ByteBuffer
- 判断 ByteBuffer 是否创建(为后面粘包半包情况做准备)
- 成功创建后读满整个 ByteBuffer 完成一次读取
最后返回调用 receive.complete() 逻辑和 OP_WRITE 一样返回一个不为 null 的 NetworkReceive 并将其添加到缓存中,猜测后续一定会对这个缓存做解析。
上面如果循环多次是可以解决粘包现象的,即将返回的响应数据分割成一个个 NetworkReceive 对象
下面分析如何发生了拆包现象,这套代码是怎么运行的。同时拆包分两种情况:消息头(4btye那部分)被拆了以及消息体被拆了
消息头被拆
假设在某次循环中连 4byte 都读取不完,逻辑如下:
- 调用 size.hasRemaining() 判断 size 是否可以写入
- 发生拆包只读取到 2byte
- 再次判断 size 是否可以写入,结果为 true;if 取反方法执行结束
- 返回本次读取数据量 2byte
- 调用 receive.complete() 结果为 false
- 返回 result,但 result 为 null 导致 while 结束本次 OP_READ 事件处理结束
- 下一次 OP_READ 开始,receive 为上一次创建的不需要重新创建
- 调用 size.hasRemaining() 判断 size 是否可以写入
- 因为上一次已经写了 2byte,此次只能写 2byte
- 读满消息头后续逻辑一致
消息体被拆
- 调用 size.hasRemaining() 判断 size 是否可以写入
- 尝试读取 4byte 的数据并且记录到已经读取的数据 read 中
- 再次判断 size 是否可以写入(准确说判断是否写满了)
- 假如写满,意味着成功读取到消息长度,随后创建对应长度的 ByteBuffer
- 判断 ByteBuffer 是否创建
- 发生消息体拆包 ByteBuffer 没有读满
- 调用 receive.complete() 结果为 false
- 返回 result,但 result 为 null 导致 while 结束本次 OP_READ 事件处理结束
- 下一次 OP_READ 开始,receive 为上一次创建的不需要重新创建
- 调用 size.hasRemaining() 返回 false
- 判断 ByteBuffer 是否创建,receive 为上一次 buffer 已经被创建
- 尝试再次读取
- 调用 receive.complete(),如果读满后续逻辑一致,如果没有读满还是消息体被拆到第7步知道全部读完
至此,kafka 用一套代码解决了粘包半包的情况,这段逻辑真的是太完美了。
当消息的响应被缓存后接下来就是来处理这些响应的数据了
除了 copy 还能怎么办,果然是世界上最复杂的消息系统,这代码质量妥妥的工业级。
6.6 如何处理响应数据
poll 方法终于可以往下面执行一行了
addToCompletedReceives();
这个方法就是将上面提取到的一个个响应添加到一个新的 completedReceives 集合中
private void addToCompletedReceives() {
  if (!this.stagedReceives.isEmpty()) {
    Iterator<Map.Entry<KafkaChannel, Deque<NetworkReceive>>> iter = this.stagedReceives.entrySet().iterator();
    while (iter.hasNext()) {
      Map.Entry<KafkaChannel, Deque<NetworkReceive>> entry = iter.next();
      KafkaChannel channel = entry.getKey();
      if (!channel.isMute()) {
        Deque<NetworkReceive> deque = entry.getValue();
        // 一次只取一条响应
        NetworkReceive networkReceive = deque.poll();
        this.completedReceives.add(networkReceive);
        this.sensors.recordBytesReceived(channel.id(), networkReceive.payload().limit());
        if (deque.isEmpty())
          iter.remove();
      }
    }
  }
}
至此 selector.poll(Utils.min(timeout, metadataTimeout, requestTimeoutMs)) 就执行完了,后续就是对响应数据做处理了
handleCompletedSends(responses, updatedNow);
handleCompletedReceives(responses, updatedNow);
handleDisconnections(responses, updatedNow);
handleConnections();
handleTimedOutRequests(responses, updatedNow);
6.6.1 处理元数据的响应
这部分的逻辑就很简单了
private void handleCompletedReceives(List<ClientResponse> responses, long now) {
  for (NetworkReceive receive : this.selector.completedReceives()) {
    String source = receive.source();
    ClientRequest req = inFlightRequests.completeNext(source);
    Struct body = parseResponse(receive.payload(), req.request().header());
    if (!metadataUpdater.maybeHandleCompletedReceive(req, now, body))
      responses.add(new ClientResponse(req, now, false, body));
  }
}
从 inFlightRequests 移除请求数据(表明请求全部完成),根据响应数据的 apikey 提取 body
public static Struct parseResponse(ByteBuffer responseBuffer, RequestHeader requestHeader) {
  ResponseHeader responseHeader = ResponseHeader.parse(responseBuffer);
  // Always expect the response version id to be the same as the request version id
  short apiKey = requestHeader.apiKey();
  short apiVer = requestHeader.apiVersion();
  Struct responseBody = ProtoUtils.responseSchema(apiKey, apiVer).read(responseBuffer);
  correlate(requestHeader, responseHeader);
  return responseBody;
}

public boolean maybeHandleCompletedReceive(ClientRequest req, long now, Struct body) {
  short apiKey = req.request().header().apiKey();
  if (apiKey == ApiKeys.METADATA.id && req.isInitiatedByNetworkClient()) {
    handleResponse(req.request().header(), body, now);
    return true;
  }
  return false;
}
handleResponse 本质上就是更新 Cluster 里面的集合
6.6.2 处理普通的响应
源码如下
for (ClientResponse response : responses) {
  if (response.request().hasCallback()) {
    try {
      response.request().callback().onComplete(response);
    } catch (Exception e) {
      log.error("Uncaught error in request completion:", e);
    }
  }
}
对于普通消息的响应无非就是回调函数的执行,其响应也会被服务端正确处理的响应和错误处理的响应
最终 onComplete 会被定位到下面的代码
private void handleProduceResponse(ClientResponse response, Map<TopicPartition, RecordBatch> batches, long now) {
  int correlationId = response.request().request().header().correlationId();
  if (response.wasDisconnected()) {
    log.trace("Cancelled request {} due to node {} being disconnected", response, response.request()
              .request()
              .destination());
    for (RecordBatch batch : batches.values())
      completeBatch(batch, Errors.NETWORK_EXCEPTION, -1L, Record.NO_TIMESTAMP, correlationId, now);
  } else {
    log.trace("Received produce response from node {} with correlation id {}",
              response.request().request().destination(),
              correlationId);
    // if we have a response, parse it
    if (response.hasResponse()) {
      ProduceResponse produceResponse = new ProduceResponse(response.responseBody());
      for (Map.Entry<TopicPartition, ProduceResponse.PartitionResponse> entry : produceResponse.responses().entrySet()) {
        TopicPartition tp = entry.getKey();
        ProduceResponse.PartitionResponse partResp = entry.getValue();
        Errors error = Errors.forCode(partResp.errorCode);
        RecordBatch batch = batches.get(tp);
        // ack != 0
        completeBatch(batch, error, partResp.baseOffset, partResp.timestamp, correlationId, now);
      }
      this.sensors.recordLatency(response.request().request().destination(), response.requestLatencyMs());
      this.sensors.recordThrottleTime(response.request().request().destination(),
                                      produceResponse.getThrottleTime());
    } else {
      // this is the acks = 0 case, just complete all requests
      for (RecordBatch batch : batches.values())
        completeBatch(batch, Errors.NONE, -1L, Record.NO_TIMESTAMP, correlationId, now);
    }
  }
}
response.hasResponse() 的返回值本质上就是 acks == 0,对于 acks = 0 的情况 completeBatch 传入的参数基本都是默认值,否则会从返回的响应数据中提取错误信息、时间戳、偏移量、correlationId等。
下面分析一下 completeBatch 方法对错误响应的处理
有可以重试的异常
if (error != Errors.NONE && canRetry(batch, error)) {
  // retry
  log.warn("Got error produce response with correlation id {} on topic-partition {}, retrying ({} attempts left). Error: {}",
           correlationId,
           batch.topicPartition,
           this.retries - batch.attempts - 1,
           error);
  // 异常:batch 重新放回缓冲区
  this.accumulator.reenqueue(batch, now);
  this.sensors.recordRetries(batch.topicPartition.topic(), batch.recordCount);
}
这里的 canRetry 做的判断就是当前 batch 重试次数 < 最大可重试次数,且响应返回的异常是 RetriableException 类及其子类
对于此类异常的处理是调用 reenqueue 将 batch 重新放回 deque 中(队首,优先被发送),同时修改必要的重试参数(至此重试机制闭环了)
public void reenqueue(RecordBatch batch, long now) {
  batch.attempts++;
  batch.lastAttemptMs = now;
  batch.lastAppendTime = now;
  batch.setRetry();
  Deque<RecordBatch> deque = getOrCreateDeque(batch.topicPartition);
  synchronized (deque) {
    deque.addFirst(batch);
  }
}
有权限类异常
if (error == Errors.TOPIC_AUTHORIZATION_FAILED)
  exception = new TopicAuthorizationException(batch.topicPartition.topic());
无异常
batch.done(baseOffset, timestamp, exception);
// 成功后释放batch
this.accumulator.deallocate(batch);
这里的 done 就是回调,下一节说;最后释放当前 batch 的内存(至此内存管理闭环)
6.7 如何执行回调函数
其实就是 done 的逻辑,源码如下:
public void done(long baseOffset, long timestamp, RuntimeException exception) {
  log.trace("Produced messages to topic-partition {} with base offset offset {} and error: {}.",
            topicPartition,
            baseOffset,
            exception);
  // execute callbacks
  for (int i = 0; i < this.thunks.size(); i++) {
    try {
      Thunk thunk = this.thunks.get(i);
      if (exception == null) {
        // If the timestamp returned by server is NoTimestamp, that means CreateTime is used. Otherwise LogAppendTime is used.
        RecordMetadata metadata = new RecordMetadata(this.topicPartition,  baseOffset, thunk.future.relativeOffset(),
                                                     timestamp == Record.NO_TIMESTAMP ? thunk.future.timestamp() : timestamp,
                                                     thunk.future.checksum(),
                                                     thunk.future.serializedKeySize(),
                                                     thunk.future.serializedValueSize());
        thunk.callback.onCompletion(metadata, null);
      } else {
        thunk.callback.onCompletion(null, exception);
      }
    } catch (Exception e) {
      log.error("Error executing user-provided callback on message for topic-partition {}:", topicPartition, e);
    }
  }
  this.produceFuture.done(topicPartition, baseOffset, exception);
}
还记得在 4.4 节让其记住的 thunks 吗,每个消息被添加到 batch 中其定义的回调函数(如果有的话)会被添加到 thunks 中,在这里被遍历和执行(至此回调函数闭环)
最后一次更新一下流程图
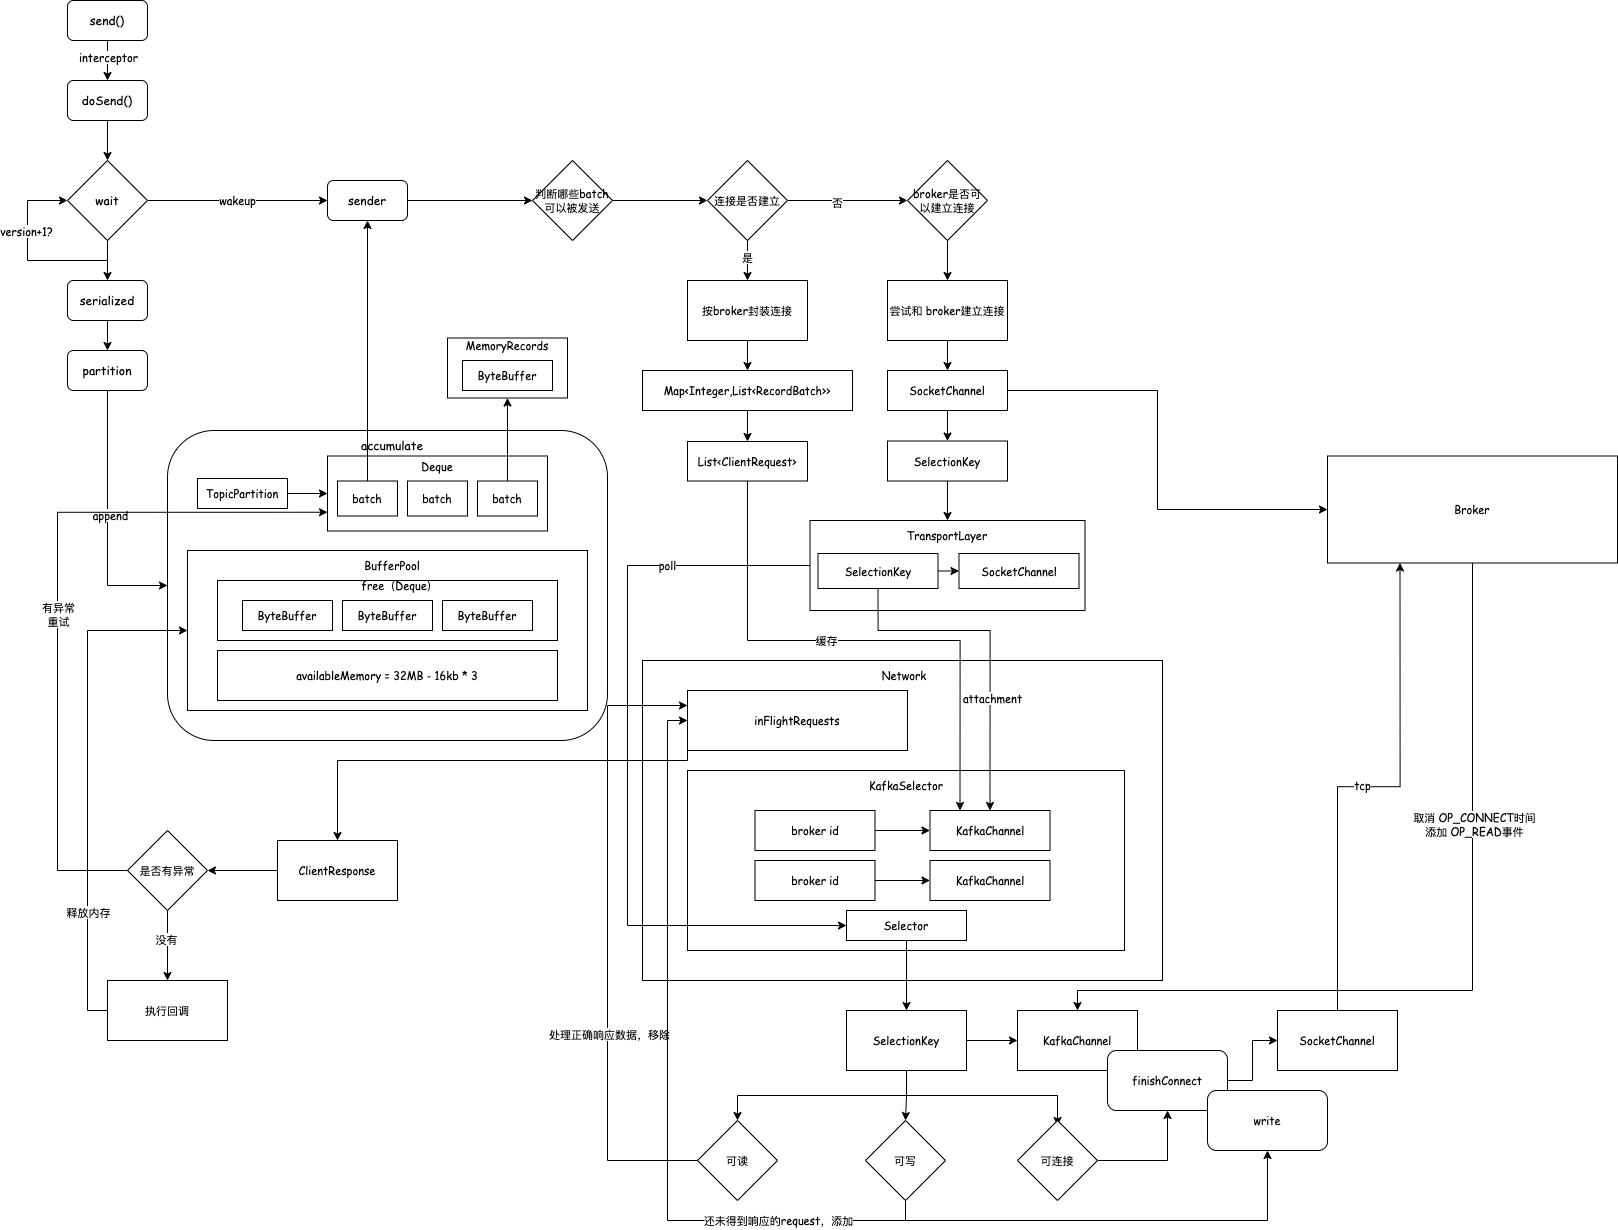
到这里 kafka 生产者源码就全部解析完了,我愿称之为从未有过如此详细的源码解析
评论区