承接上篇 BIO,看 NIO 是如何处理阻塞
NIO三个组件:Buffer、Channel、Selector;NIO 的起点从 Channel 开始,Channel 有点像流,数据在 Channel 中可以"流进"、“流出”,但是 Channel 不存储数据只是起管道的作用,因此 Channel 需要和 Buffer 进行交互,这就变成了 Channel 可以将数据写入 Buffer,也可以从 Buffer 读取数据写出去,而 Selector 的作用就是管理多个 Channel。先有个大概的了解,你可以随着文章的深入逐渐理解三者的关系和存在的必要性。因此我们需要分别介绍这三个部分…
一、Buffer
NIO 中用于存储数据的组件,在 Java 中以抽象类的形式组织架构,其集成关系如下,最常用的为 ByteBuffer,本篇也是以 ByteBuffer 为例进行演示。

1.1 创建方式
通过静态方法allocate、allocateDirect创建
package tech.kpretty.nio.buffer;

import lombok.extern.slf4j.Slf4j;

import java.nio.ByteBuffer;

/**
 * @author wjun
 * @date 2022/6/19 10:44
 * @email wjunjobs@outlook.com
 * @describe bytebuffer 内存分配
 */
@Slf4j
public class ByteBufferAllocate {
    public static void main(String[] args) {
        // HeapByteBuffer java堆内存,读写效率较低,受GC影响,分配效率高
        System.out.println(ByteBuffer.allocate(10).getClass());
        // DirectByteBuffer 直接内存,系统内存,读写效率高(零拷贝技术),不受GC影响,分配效率低,使用不当会造成内存泄露
        System.out.println(ByteBuffer.allocateDirect(10).getClass());
    }
}
两者区别在于
| 内存类型 | 优点 | 缺点 | |
|---|---|---|---|
| allocate | jvm堆内存 | 分配效率高 | 读写效率低、受GC影响 |
| allocateDirect | 系统内存 | 读写效率高、不受GC影响 | 分配效率低,有内存泄露风险 |
1.2 数据结构
ByteBuffer 底层使用字节数组存储数据,同时内部维护若干个指针用于提供丰富的操作,其中有
- postition:下一次读写位置的索引,默认 0
- mark:用于记录 postition 值,在 postition 发生改变的时候可以用 mark 回退,默认 -1
- limit:数据读写的界限,limit 后的位置不可读写
- capacity:缓冲区容量,一旦赋值无法修改
四者的关系:mark <= position <= limit <= capacity
当我们进行内存空间的分配时(不关注直接内存空间),看上面指针的初始化
public static ByteBuffer allocate(int capacity) {
  if (capacity < 0)
    throw new IllegalArgumentException();
  return new HeapByteBuffer(capacity, capacity);
}
要求:容量必须为正整数
HeapByteBuffer(int cap, int lim) {
  super(-1, 0, lim, cap, new byte[cap], 0);
}

ByteBuffer(int mark, int pos, int lim, int cap,
           byte[] hb, int offset)
{
  super(mark, pos, lim, cap);
  this.hb = hb;
  this.offset = offset;
}
mark=-1、postition=0、limit=capacity 同时创建对应大小的数组,offset 为辅助 postition 移动
为了方便后续探究指针的移动,这里给一个黑马的工具类,本篇文章也是在学习完黑马的课程后的总结,课程地址:https://www.bilibili.com/video/BV1py4y1E7oA
package tech.kpretty.nio.util;

import io.netty.util.internal.MathUtil;
import io.netty.util.internal.StringUtil;

import java.nio.ByteBuffer;

/**
 * @author wjun
 * @date 2022/6/19 10:26
 * @email wjunjobs@outlook.com
 * @describe
 */
@SuppressWarnings("all")
public class ByteBufferUtil {
    private static final char[] BYTE2CHAR = new char[256];
    private static final char[] HEXDUMP_TABLE = new char[256 * 4];
    private static final String[] HEXPADDING = new String[16];
    private static final String[] HEXDUMP_ROWPREFIXES = new String[65536 >>> 4];
    private static final String[] BYTE2HEX = new String[256];
    private static final String[] BYTEPADDING = new String[16];

    static {
        final char[] DIGITS = "0123456789abcdef".toCharArray();
        for (int i = 0; i < 256; i++) {
            HEXDUMP_TABLE[i << 1] = DIGITS[i >>> 4 & 0x0F];
            HEXDUMP_TABLE[(i << 1) + 1] = DIGITS[i & 0x0F];
        }

        int i;

        // Generate the lookup table for hex dump paddings
        for (i = 0; i < HEXPADDING.length; i++) {
            int padding = HEXPADDING.length - i;
            StringBuilder buf = new StringBuilder(padding * 3);
            for (int j = 0; j < padding; j++) {
                buf.append("   ");
            }
            HEXPADDING[i] = buf.toString();
        }

        // Generate the lookup table for the start-offset header in each row (up to 64KiB).
        for (i = 0; i < HEXDUMP_ROWPREFIXES.length; i++) {
            StringBuilder buf = new StringBuilder(12);
            buf.append(StringUtil.NEWLINE);
            buf.append(Long.toHexString(i << 4 & 0xFFFFFFFFL | 0x100000000L));
            buf.setCharAt(buf.length() - 9, '|');
            buf.append('|');
            HEXDUMP_ROWPREFIXES[i] = buf.toString();
        }

        // Generate the lookup table for byte-to-hex-dump conversion
        for (i = 0; i < BYTE2HEX.length; i++) {
            BYTE2HEX[i] = ' ' + StringUtil.byteToHexStringPadded(i);
        }

        // Generate the lookup table for byte dump paddings
        for (i = 0; i < BYTEPADDING.length; i++) {
            int padding = BYTEPADDING.length - i;
            StringBuilder buf = new StringBuilder(padding);
            for (int j = 0; j < padding; j++) {
                buf.append(' ');
            }
            BYTEPADDING[i] = buf.toString();
        }

        // Generate the lookup table for byte-to-char conversion
        for (i = 0; i < BYTE2CHAR.length; i++) {
            if (i <= 0x1f || i >= 0x7f) {
                BYTE2CHAR[i] = '.';
            } else {
                BYTE2CHAR[i] = (char) i;
            }
        }
    }

    /**
     * 打印所有内容
     *
     * @param buffer
     */
    public static void debugAll(ByteBuffer buffer) {
        int oldlimit = buffer.limit();
        buffer.limit(buffer.capacity());
        StringBuilder origin = new StringBuilder(256);
        appendPrettyHexDump(origin, buffer, 0, buffer.capacity());
        System.out.println("+--------+-------------------- all ------------------------+----------------+");
        System.out.printf("position: [%d], limit: [%d]\n", buffer.position(), oldlimit);
        System.out.println(origin);
        buffer.limit(oldlimit);
    }

    /**
     * 打印可读取内容
     *
     * @param buffer
     */
    public static void debugRead(ByteBuffer buffer) {
        StringBuilder builder = new StringBuilder(256);
        appendPrettyHexDump(builder, buffer, buffer.position(), buffer.limit() - buffer.position());
        System.out.println("+--------+-------------------- read -----------------------+----------------+");
        System.out.printf("position: [%d], limit: [%d]\n", buffer.position(), buffer.limit());
        System.out.println(builder);
    }

    private static void appendPrettyHexDump(StringBuilder dump, ByteBuffer buf, int offset, int length) {
        if (MathUtil.isOutOfBounds(offset, length, buf.capacity())) {
            throw new IndexOutOfBoundsException(
                    "expected: " + "0 <= offset(" + offset + ") <= offset + length(" + length
                            + ") <= " + "buf.capacity(" + buf.capacity() + ')');
        }
        if (length == 0) {
            return;
        }
        dump.append(
                "         +-------------------------------------------------+" +
                        StringUtil.NEWLINE + "         |  0  1  2  3  4  5  6  7  8  9  a  b  c  d  e  f |" +
                        StringUtil.NEWLINE + "+--------+-------------------------------------------------+----------------+");

        final int startIndex = offset;
        final int fullRows = length >>> 4;
        final int remainder = length & 0xF;

        // Dump the rows which have 16 bytes.
        for (int row = 0; row < fullRows; row++) {
            int rowStartIndex = (row << 4) + startIndex;

            // Per-row prefix.
            appendHexDumpRowPrefix(dump, row, rowStartIndex);

            // Hex dump
            int rowEndIndex = rowStartIndex + 16;
            for (int j = rowStartIndex; j < rowEndIndex; j++) {
                dump.append(BYTE2HEX[getUnsignedByte(buf, j)]);
            }
            dump.append(" |");

            // ASCII dump
            for (int j = rowStartIndex; j < rowEndIndex; j++) {
                dump.append(BYTE2CHAR[getUnsignedByte(buf, j)]);
            }
            dump.append('|');
        }

        // Dump the last row which has less than 16 bytes.
        if (remainder != 0) {
            int rowStartIndex = (fullRows << 4) + startIndex;
            appendHexDumpRowPrefix(dump, fullRows, rowStartIndex);

            // Hex dump
            int rowEndIndex = rowStartIndex + remainder;
            for (int j = rowStartIndex; j < rowEndIndex; j++) {
                dump.append(BYTE2HEX[getUnsignedByte(buf, j)]);
            }
            dump.append(HEXPADDING[remainder]);
            dump.append(" |");

            // Ascii dump
            for (int j = rowStartIndex; j < rowEndIndex; j++) {
                dump.append(BYTE2CHAR[getUnsignedByte(buf, j)]);
            }
            dump.append(BYTEPADDING[remainder]);
            dump.append('|');
        }

        dump.append(StringUtil.NEWLINE +
                "+--------+-------------------------------------------------+----------------+");
    }

    private static void appendHexDumpRowPrefix(StringBuilder dump, int row, int rowStartIndex) {
        if (row < HEXDUMP_ROWPREFIXES.length) {
            dump.append(HEXDUMP_ROWPREFIXES[row]);
        } else {
            dump.append(StringUtil.NEWLINE);
            dump.append(Long.toHexString(rowStartIndex & 0xFFFFFFFFL | 0x100000000L));
            dump.setCharAt(dump.length() - 9, '|');
            dump.append('|');
        }
    }

    public static short getUnsignedByte(ByteBuffer buffer, int index) {
        return (short) (buffer.get(index) & 0xFF);
    }
}
1.3 核心方法
1.3.1 基本读写
package tech.kpretty.nio.buffer;

import lombok.extern.slf4j.Slf4j;

import static tech.kpretty.nio.util.ByteBufferUtil.*;

import java.nio.ByteBuffer;

/**
 * @author wjun
 * @date 2022/6/19 10:27
 * @email wjunjobs@outlook.com
 * @describe bytebuffer 基本读写
 */
@Slf4j
public class ByteBufferStructure {
    public static void main(String[] args) {
        // 分配一个10个字节的内存空间
        ByteBuffer buffer = ByteBuffer.allocate(10);
        // 写入一个字节
        buffer.put((byte) 0x61);
        debugAll(buffer);
        // 写入一个字节数组
        buffer.put(new byte[]{0x62, 0x63, 0x64});
        debugAll(buffer);
        // 尝试读取一个字节
        log.info("尝试不切换读取 {}", buffer.get());
        // 反转 buffer
        buffer.flip();
        // 再次读取
        log.info("尝试不切换读取 {}", buffer.get());
        debugAll(buffer);
    }
}
调用 put 方法写入一个字节,其底层做的操作是移动 postition 指针到下一位,并将数据放在数据的 postition 移动前的位置
public ByteBuffer put(byte x) {
  hb[ix(nextPutIndex())] = x;
  return this;
}

final int nextPutIndex() {
  int p = position;
  if (p >= limit)
    throw new BufferOverflowException();
  position = p + 1;// 移动指针到下一位
  return p;
}

protected int ix(int i) {
  return i + offset;
}
调用 get 方法获取一个字节,其底层做的操作是移动 postition 指针到下一位,并返回 postition 移动前位置的数据,如果我们在 put 后直接 get 会发现并不能得到数据或者得到的数据并不是我们期望的,其本质在于 postition 指针,因为上述的读写操作都会移动指针,因此我们在进行读操作之前需要将 postition 指针拨到 0,然后才能进行读取,即:flip()
public final Buffer flip() {
  limit = position;
  position = 0;
  mark = -1;
  return this;
}
flip() 将 limit 限制到 postition 后,将 postition 置为 0,修改 limit 值的目的是保护读取数据不会被污染,因为当我们多次读写后可能整个数组都会有值,而 limit 的含义就是其后面的位置不可读写。因此 flip() 通常又称为将 buffer 切换为读模式
1.3.2 读操作
get(int index):不移动指针读,该方法不移动 postition 直接获取对应位置的数据,在一个特定的场合有比较神奇的用法
下面讲解如何进行重复读的方法
方法一:rewind()
public final Buffer rewind() {
  position = 0;
  mark = -1;
  return this;
}
暴力地将 postition 置 0,可以实现重复的从头读
方法二:mark 指针
rewind() 方法只能实现从头读,无法实现自定义位置的反复读取,因此 mark 指针是对 rewind() 的增强
package tech.kpretty.nio.buffer;

import static tech.kpretty.nio.util.ByteBufferUtil.*;

import java.nio.ByteBuffer;

/**
 * @author wjun
 * @date 2022/6/19 10:49
 * @email wjunjobs@outlook.com
 * @describe 读取 buffer 数据
 */
public class ByteBufferRead {
  public static void main(String[] args) {
    ByteBuffer buffer = ByteBuffer.allocate(10);
    buffer.put(new byte[]{'a', 'b', 'c', 'd'});
    buffer.flip();

    for (int i = 0; i < buffer.limit(); i++) {
      System.out.println(buffer.get(i));// 不移动指针读
    }

    // 反复读,从头读,get()会移动position指针,git(index)不会
    buffer.get(new byte[4]);
    debugAll(buffer);
    buffer.rewind();
    System.out.println((char) buffer.get());

    // mark & reset,对 rewind 增强,rewind 每次都是将 position 置为 0
    buffer.position(2);
    buffer.mark();
    debugAll(buffer);
    for (int i = 0; i < 2; i++) {
      System.out.println((char) buffer.get());
      System.out.println((char) buffer.get());
      buffer.reset();
    }
  }
}
通过 mark() 将 postition 赋值给 mark,再进行读取
public final Buffer mark() {
  mark = position;
  return this;
}
当进行第二次读取时,通过 reset() 将 postition 还原到 mark 位置实现重复读取
public final Buffer reset() {
  int m = mark;
  if (m < 0)
    throw new InvalidMarkException();
  position = m;
  return this;
}
1.3.3 Buffer 与 String 互转
比较推荐的方式是通过 Charset 的 encode、decode 方法
package tech.kpretty.nio.buffer;

import static tech.kpretty.nio.util.ByteBufferUtil.*;

import java.nio.ByteBuffer;
import java.nio.CharBuffer;
import java.nio.charset.StandardCharsets;

/**
 * @author wjun
 * @date 2022/6/19 11:04
 * @email wjunjobs@outlook.com
 * @describe 字符串、bytebuffer 互转
 */
public class ByteBufferString {
    public static void main(String[] args) {
        // 1. 字符串转ByteBuffer
        ByteBuffer buffer = ByteBuffer.allocate(16);
        buffer.put("hello".getBytes());
        debugAll(buffer);
        // 2. Charset
        ByteBuffer buffer1 = StandardCharsets.UTF_8.encode("hello");
        debugAll(buffer1);
        /*
        1和2 比较
            1.最后的buffer是写模式
            2.最后的buffer是读模式
         */
        // 3. wrap
        ByteBuffer buffer2 = ByteBuffer.wrap("hello".getBytes());
        debugAll(buffer2);

        // a. ByteBuffer转字符串,注意 position 的位置
        CharBuffer charBuffer = StandardCharsets.UTF_8.decode(buffer2);
        System.out.println(charBuffer);

    }
}
1.3.4 粘包和半包
属于网络请求服务端接收数据的一种现象
粘包:为了提高发送效率、客户端往往是攒一批数据再发送,因此服务器一次性会接收到多条请求
半包:因为服务器缓冲区限制导致一批数据接收不完,需要多次接收
这里仅使用 buffer 简单模拟一下粘包半包的解决方案,更多细节在后面会重点处理。假设约定客户端的多次请求以 \n 结束,而服务端则需要对数据进行拆分
package tech.kpretty.nio.buffer;

import tech.kpretty.nio.util.ByteBufferUtil;

import java.nio.ByteBuffer;

/**
 * @author wjun
 * @date 2022/6/19 11:30
 * @email wjunjobs@outlook.com
 * @describe bytebuffer 粘包和半包<br/>
 * 粘包:为了提高发送效率,客户端往往是攒一批的数据发送<br/>
 * 半包:因为服务器缓冲区大小限制导致一批数据接收不完,需要在第二次接收
 */
public class ByteBufferExam {
    public static void main(String[] args) {
        ByteBuffer buffer = ByteBuffer.allocate(32);
        buffer.put("hello world\nhello ne".getBytes());
        split(buffer);
        buffer.put("tty\n".getBytes());
        split(buffer);
    }

    private static void split(ByteBuffer buffer) {
        // 切换为读模式
        buffer.flip();
        for (int i = 0; i < buffer.limit(); i++) {
            if (buffer.get(i) == '\n') {
                // 获取一条消息的长度
                int length = i - buffer.position();
                // 创建一个消息长度一样的buffer
                ByteBuffer tmp = ByteBuffer.allocate(length);
                for (int j = 0; j < length; j++) {
                    tmp.put(buffer.get());
                }
                ByteBufferUtil.debugAll(tmp);
            }
        }
        // 跳过分割符
        buffer.position(buffer.position() + 1);
        // 将没有读完的交给下次读
        buffer.compact();
    }
}
基本逻辑:服务端依次遍历消息判断是不是消息的结束标记即 \n(不移动指针获取),当获取到 \n 的位置,将数据全部去读后调用 compact() 将剩下的数据交给下次读取,
public ByteBuffer compact() {
  int pos = position();
  int lim = limit();
  assert (pos <= lim);
  int rem = (pos <= lim ? lim - pos : 0);
  System.arraycopy(hb, ix(pos), hb, ix(0), rem);
  position(rem);
  limit(capacity());
  discardMark();
  return this;
}
compact 的逻辑就是将没有读取数据向前压缩,并切换为写模式;数据前移后,原位置的数据不会被清除,等待写入的时候覆盖

1.3.5 清除
clear():重置 position、limit、mark,数据不会删除
public final Buffer clear() {
  position = 0;
  limit = capacity;
  mark = -1;
  return this;
}
二、Channel
通道,负责与 Buffer 进行交互,有如下特征:
- 类似流但 Channel 是双向的,既可以从 Buffer 读取数据,也可以向 Buffer 写入数据
- 通道可以进行异步读写
- 通道的数据总是读到 Buffer,或者从一个 Buffer 写出
Java NIO 的通道有如下实现:
- FileChannel:文件交互,阻塞的无法搭配 Selector 使用
- ServerSocketChannel:TCP网络中的服务端
- SocketChannel:TCP网络中的客户端
- DatagramChannel:实现 UDP 协议
2.1 FileChannel
即文件编程,相较于传统的 IO 流,FileChannel 在文件拷贝、语法风格上有更优秀的表现。但不是 NIO 的重点,因此只是介绍 FileChannel 简单和比较有特色的用法
2.1.1 实例化
FileChannel 不能直接 open,必须通过传统的 IO 流来获取,如:
- FileInputStream:获取的 Channel 只能读
- FileOutputStream:获取的 Channel 只能写
- RandomAccessFile:根据实例化对象传入的读写模式决定
2.1.2 简单读写
package tech.kpretty.nio.channel;

import tech.kpretty.nio.util.ByteBufferUtil;

import java.io.FileInputStream;
import java.io.FileOutputStream;
import java.io.IOException;
import java.nio.ByteBuffer;
import java.nio.channels.FileChannel;
import java.nio.charset.StandardCharsets;

/**
 * @author wjun
 * @date 2022/6/26 09:27
 * @email wjunjobs@outlook.com
 * @describe 基于 Channel 实现简单的读写
 */
public class FileChannelStart {
    public static void main(String[] args) {
        try (FileChannel outChannel = new FileOutputStream("example.txt").getChannel();
             FileChannel inChannel = new FileInputStream("example.txt").getChannel()) {
            // 构造一个 ByteBuffer,并将 buffer 数据写入文件中
            ByteBuffer writeBuffer = StandardCharsets.UTF_8.encode("hello nio");
            // 将 buffer 数据写入文件
            outChannel.write(writeBuffer);
            // 通过 inChannel 读取文件数据到 buffer
            ByteBuffer readBuffer = ByteBuffer.allocate(16);
            inChannel.read(readBuffer);
            // 切换为读模式
            readBuffer.flip();
            ByteBufferUtil.debugRead(readBuffer);
        } catch (IOException e) {
            e.printStackTrace();
        }
    }
}
相较于传统 IO,FileChannel 有着更加优雅的语法
2.1.3 分散读取
基于 FileChannel 可以实现将文件中的数据分散地读取到多个 buffer
package tech.kpretty.nio.buffer;

import static tech.kpretty.nio.util.ByteBufferUtil.*;

import java.io.IOException;
import java.io.RandomAccessFile;
import java.nio.ByteBuffer;
import java.nio.channels.FileChannel;

/**
 * @author wjun
 * @date 2022/6/19 11:18
 * @email wjunjobs@outlook.com
 * @describe bytebuffer 分散读取
 */
public class ByteBufferReads {
    public static void main(String[] args) {
        try (FileChannel channel = new RandomAccessFile("src/main/resources/data.json", "rw").getChannel()) {
            // 分散读取
            ByteBuffer buffer1 = ByteBuffer.allocate(10);
            ByteBuffer buffer2 = ByteBuffer.allocate(10);
            ByteBuffer buffer3 = ByteBuffer.allocate(10);
            // 按顺序一次写入这三个 buffer 中,能写多少是多少
            channel.read(new ByteBuffer[]{buffer1,buffer2,buffer3});
            debugAll(buffer1);
            debugAll(buffer2);
            debugAll(buffer3);
        } catch (IOException e) {
            e.printStackTrace();
        }
    }
}
2.1.4 集中写入
基于 FileChannel 实现将多个 buffer 数据写入一个文件中
package tech.kpretty.nio.buffer;

import java.io.IOException;
import java.io.RandomAccessFile;
import java.nio.ByteBuffer;
import java.nio.channels.FileChannel;
import java.nio.charset.StandardCharsets;

/**
 * @author wjun
 * @date 2022/6/19 11:21
 * @email wjunjobs@outlook.com
 * @describe bytebuffer 集中写入
 */
public class ByteBufferWrites {
    public static void main(String[] args) {
        ByteBuffer buffer1 = StandardCharsets.UTF_8.encode("hello\n");
        ByteBuffer buffer2 = StandardCharsets.UTF_8.encode("world\n");
        ByteBuffer buffer3 = StandardCharsets.UTF_8.encode("netty\n");

        try (FileChannel channel = new RandomAccessFile("data.txt", "rw").getChannel()) {
            channel.write(new ByteBuffer[]{buffer1, buffer2, buffer3});
        } catch (IOException e) {
            e.printStackTrace();
        }
    }
}
2.1.5 零拷贝
FileChannel 提供了零拷贝技术,这点相较于传统的 IO 在复制文件数据时会有非常大的性能提升
package tech.kpretty.nio.channel;

import java.io.IOException;
import java.io.RandomAccessFile;
import java.nio.channels.FileChannel;

/**
 * @author wjun
 * @date 2022/6/21 17:24
 * @email wjunjobs@outlook.com
 * @describe 零拷贝
 */
public class FileChannelTransferTo {
    public static void main(String[] args) {
        try (FileChannel inChannel = new RandomAccessFile("data.txt", "rw").getChannel();
             FileChannel outChannel = new RandomAccessFile("data1.txt", "rw").getChannel()) {
            // 效率高,零拷贝,但是一次只能传输2G数据,大于2G的需要多次传输,记录位置即可
            inChannel.transferTo(0,inChannel.size(),outChannel);
        } catch (IOException e) {
            e.printStackTrace();
        }
    }
}
注:transferTo 一次只能传输 2G 的数据,因此当文件大小超过限制需要进行多次读写
例如:
package tech.kpretty.nio.channel;

import java.io.IOException;
import java.io.RandomAccessFile;
import java.nio.channels.FileChannel;

/**
 * @author wjun
 * @date 2022/6/21 17:24
 * @email wjunjobs@outlook.com
 * @describe 零拷贝,超 2G 文件读写
 */
public class FileChannelTransferToGt2G {
    public static void main(String[] args) {
        try (FileChannel inChannel = new RandomAccessFile("/Users/wjun/Downloads/学习资料/CentOS-7-x86_64-DVD-2009.iso", "rw").getChannel();
             FileChannel outChannel = new RandomAccessFile("/Users/wjun/Downloads/学习资料/CentOS-7-x86_64-DVD-2009bk.iso", "rw").getChannel()) {
            // 效率高,零拷贝,但是一次只能传输2G数据,大于2G的需要多次传输,记录位置即可
            inChannel.transferTo(0, inChannel.size(), outChannel);
        } catch (IOException e) {
            e.printStackTrace();
        }
    }
}
无法拷贝完全
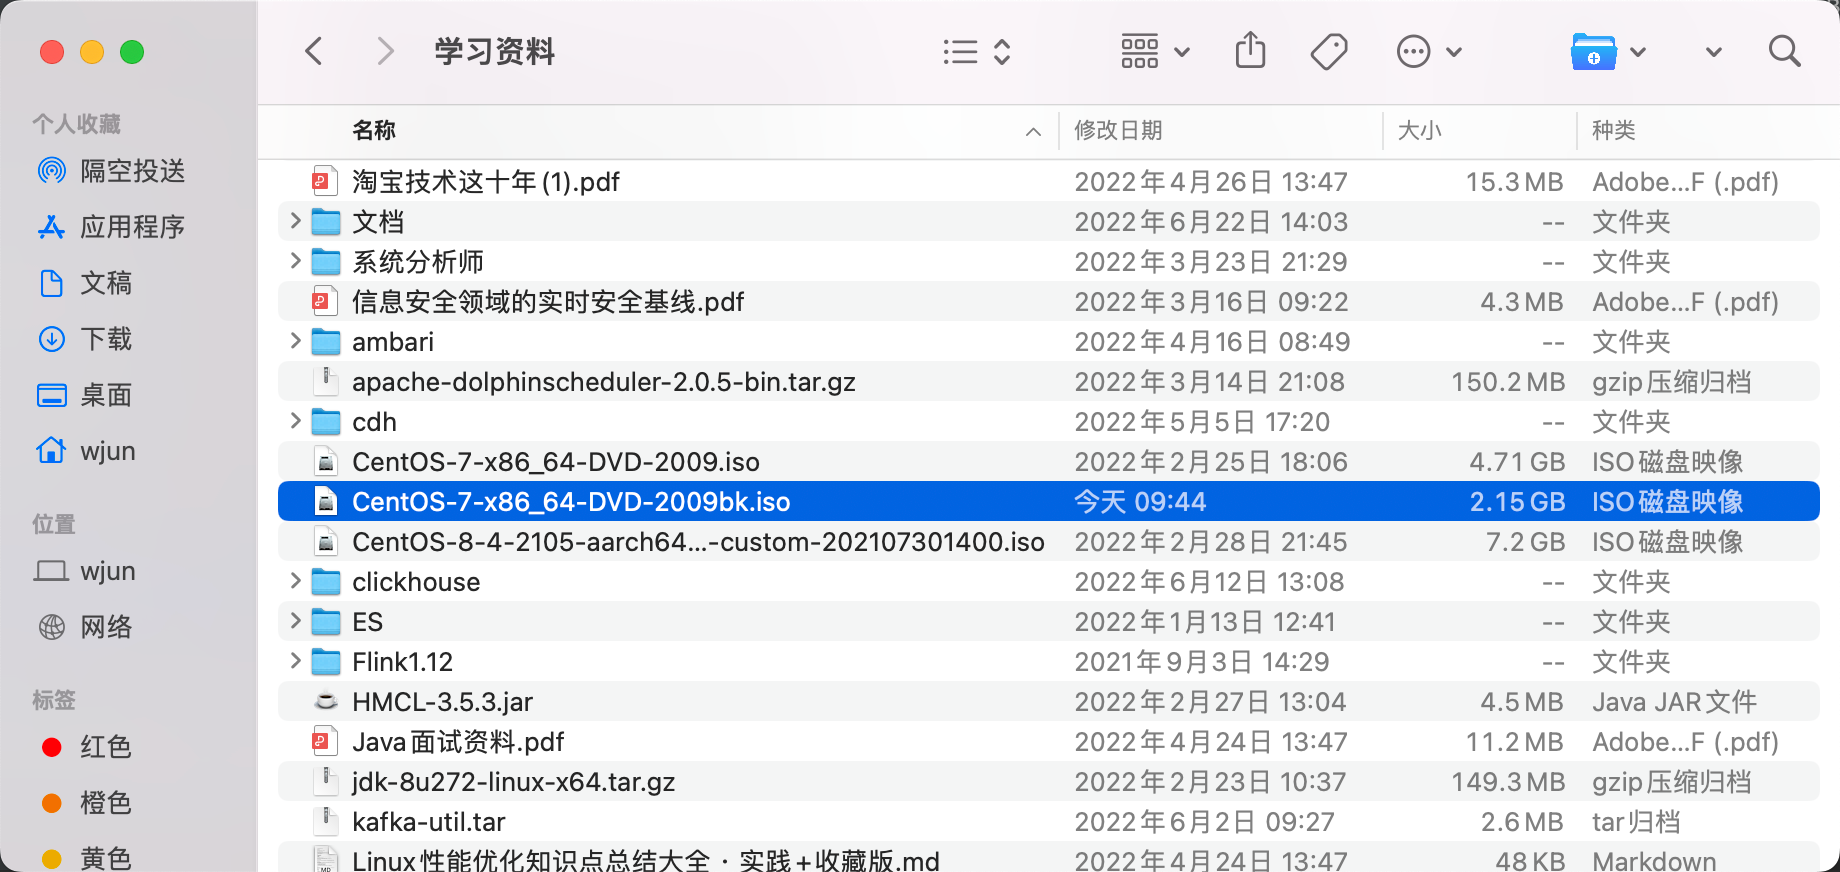
多次读写
package tech.kpretty.nio.channel;

import java.io.IOException;
import java.io.RandomAccessFile;
import java.nio.channels.FileChannel;

/**
 * @author wjun
 * @date 2022/6/21 17:24
 * @email wjunjobs@outlook.com
 * @describe 零拷贝,超 2G 文件读写
 */
public class FileChannelTransferToGt2G {
    public static void main(String[] args) {
        try (FileChannel inChannel = new RandomAccessFile("/Users/wjun/Downloads/学习资料/CentOS-7-x86_64-DVD-2009.iso", "rw").getChannel();
             FileChannel outChannel = new RandomAccessFile("/Users/wjun/Downloads/学习资料/CentOS-7-x86_64-DVD-2009bk.iso", "rw").getChannel()) {
            // 记录输入文件大小
            long capacity = inChannel.size();
            // 多次读写
            while (capacity > 0) {
                // 当前已经写入了多少
                long size = outChannel.size();
                capacity -= inChannel.transferTo(size, capacity, outChannel);
                System.out.println("写入:" + size + " 还剩:" + capacity);
            }
        } catch (IOException e) {
            e.printStackTrace();
        }
    }
}
结果如下
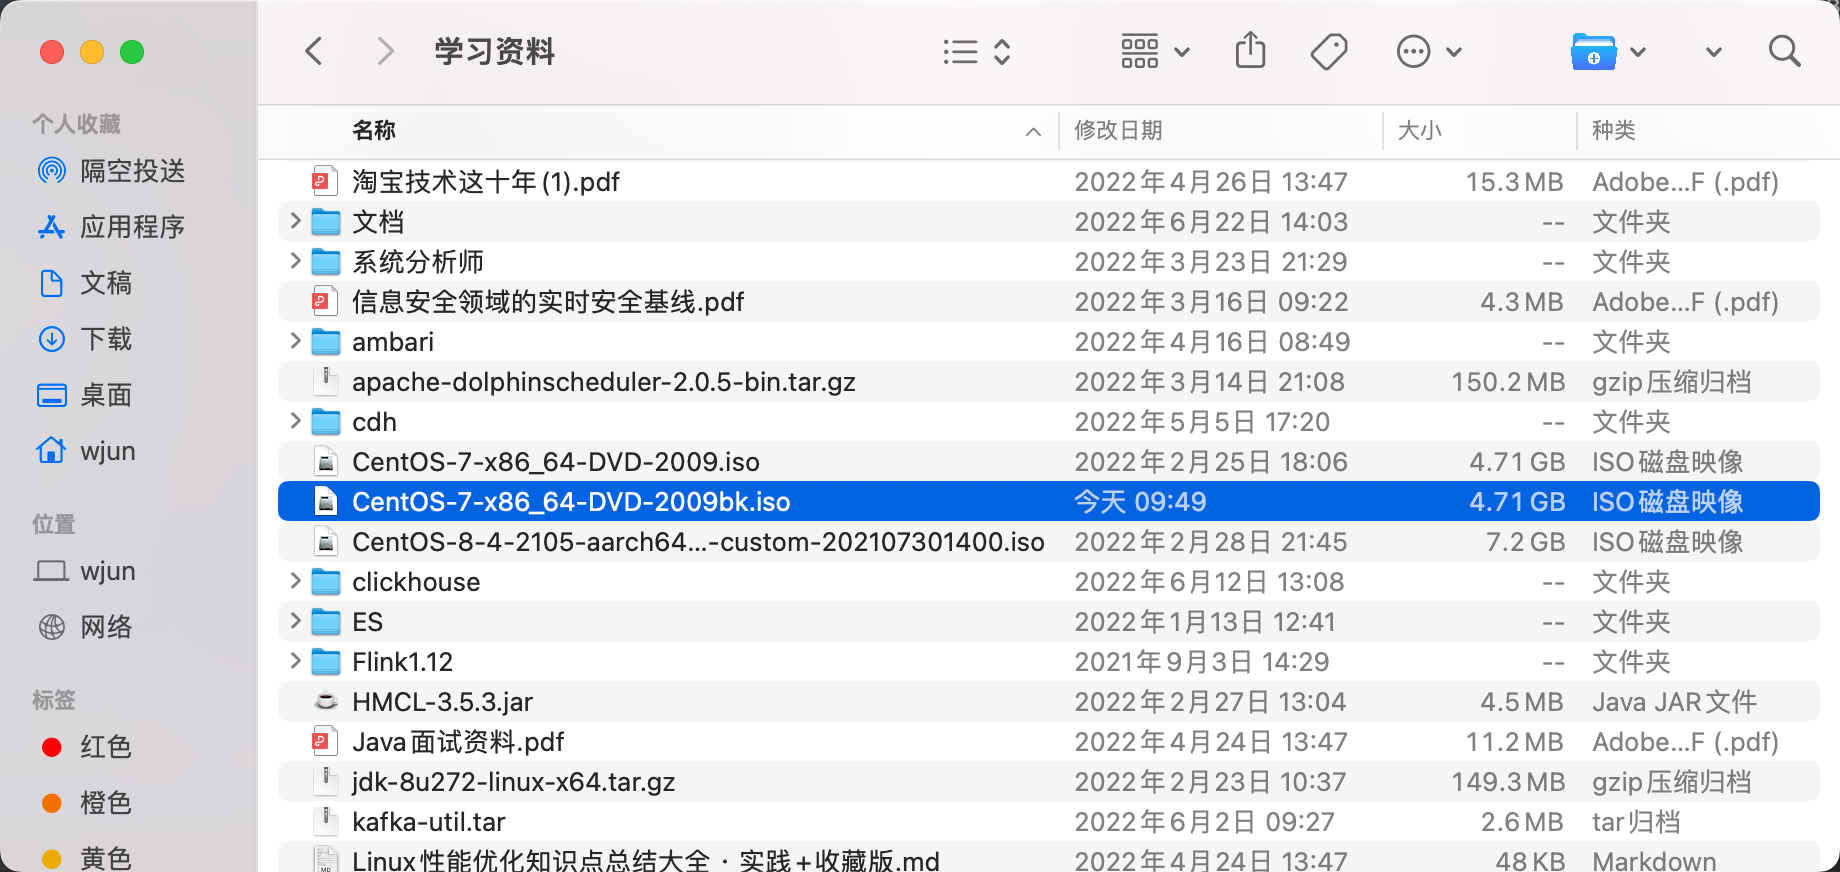
2.2 ServerSocketChannel & SocketChannel
重点,NIO 绝对的重点。本节先通过 Channel 实现一个阻塞的网络 IO 即 BIO,并基于此逐步改进最终实现完整的 NIO
2.2.1 bio
这小结需要有一定的网络编程基础,最好可以提前看一下上一篇讲述 BIO 的文章
package tech.kpretty.nio.selector;

import lombok.extern.slf4j.Slf4j;
import tech.kpretty.nio.util.ByteBufferUtil;

import java.io.IOException;
import java.net.InetSocketAddress;
import java.nio.ByteBuffer;
import java.nio.channels.ServerSocketChannel;
import java.nio.channels.SocketChannel;
import java.util.ArrayList;

/**
 * @author wjun
 * @date 2022/6/26 10:03
 * @email wjunjobs@outlook.com
 * @describe
 */
@Slf4j
public class ServerSocketChannelExample {
    public static void main(String[] args) {
        // 打开 Channel
        try (ServerSocketChannel ssc = ServerSocketChannel.open()) {
            // 绑定端口
            ssc.bind(new InetSocketAddress("localhost", 9999));
            log.debug("服务开启,等待客户端连接");
            while (true) {
                // 等待客户端连接,成功连接获取 SocketChannel
                SocketChannel socketChannel = ssc.accept();// 阻塞方法
                log.debug("获取到客户端连接:{}", socketChannel);
                log.debug("等待客户端{}发送请求", socketChannel);
                ByteBuffer buffer = ByteBuffer.allocate(16);
                socketChannel.read(buffer);// 阻塞方法
                log.debug("接收到客户端请求");
                buffer.flip();
                ByteBufferUtil.debugRead(buffer);
            }

        } catch (IOException e) {
            e.printStackTrace();
        }
    }
}
当程序启动时,程序会阻塞在 accept 处,等待客户端的连接

下面开始编写客户端代码
package tech.kpretty.nio.selector;

import java.io.IOException;
import java.net.InetSocketAddress;
import java.nio.channels.SocketChannel;
import java.nio.charset.StandardCharsets;

/**
 * @author wjun
 * @date 2022/6/26 10:29
 * @email wjunjobs@outlook.com
 * @describe
 */
public class SocketChannelExample {
    public static void main(String[] args) {
        // 打开 SocketChannel
        try (SocketChannel socketChannel = SocketChannel.open()) {
            // 连接到服务端
            socketChannel.connect(new InetSocketAddress("localhost", 9999));
            // 开始写入数据
            socketChannel.write(StandardCharsets.UTF_8.encode("hello nio"));
            // 不让客户端退出
            System.in.read();
        } catch (IOException e) {
            e.printStackTrace();
        }
    }
}
这里为了方便调试观察服务端运行情况,客户端每行打入断点
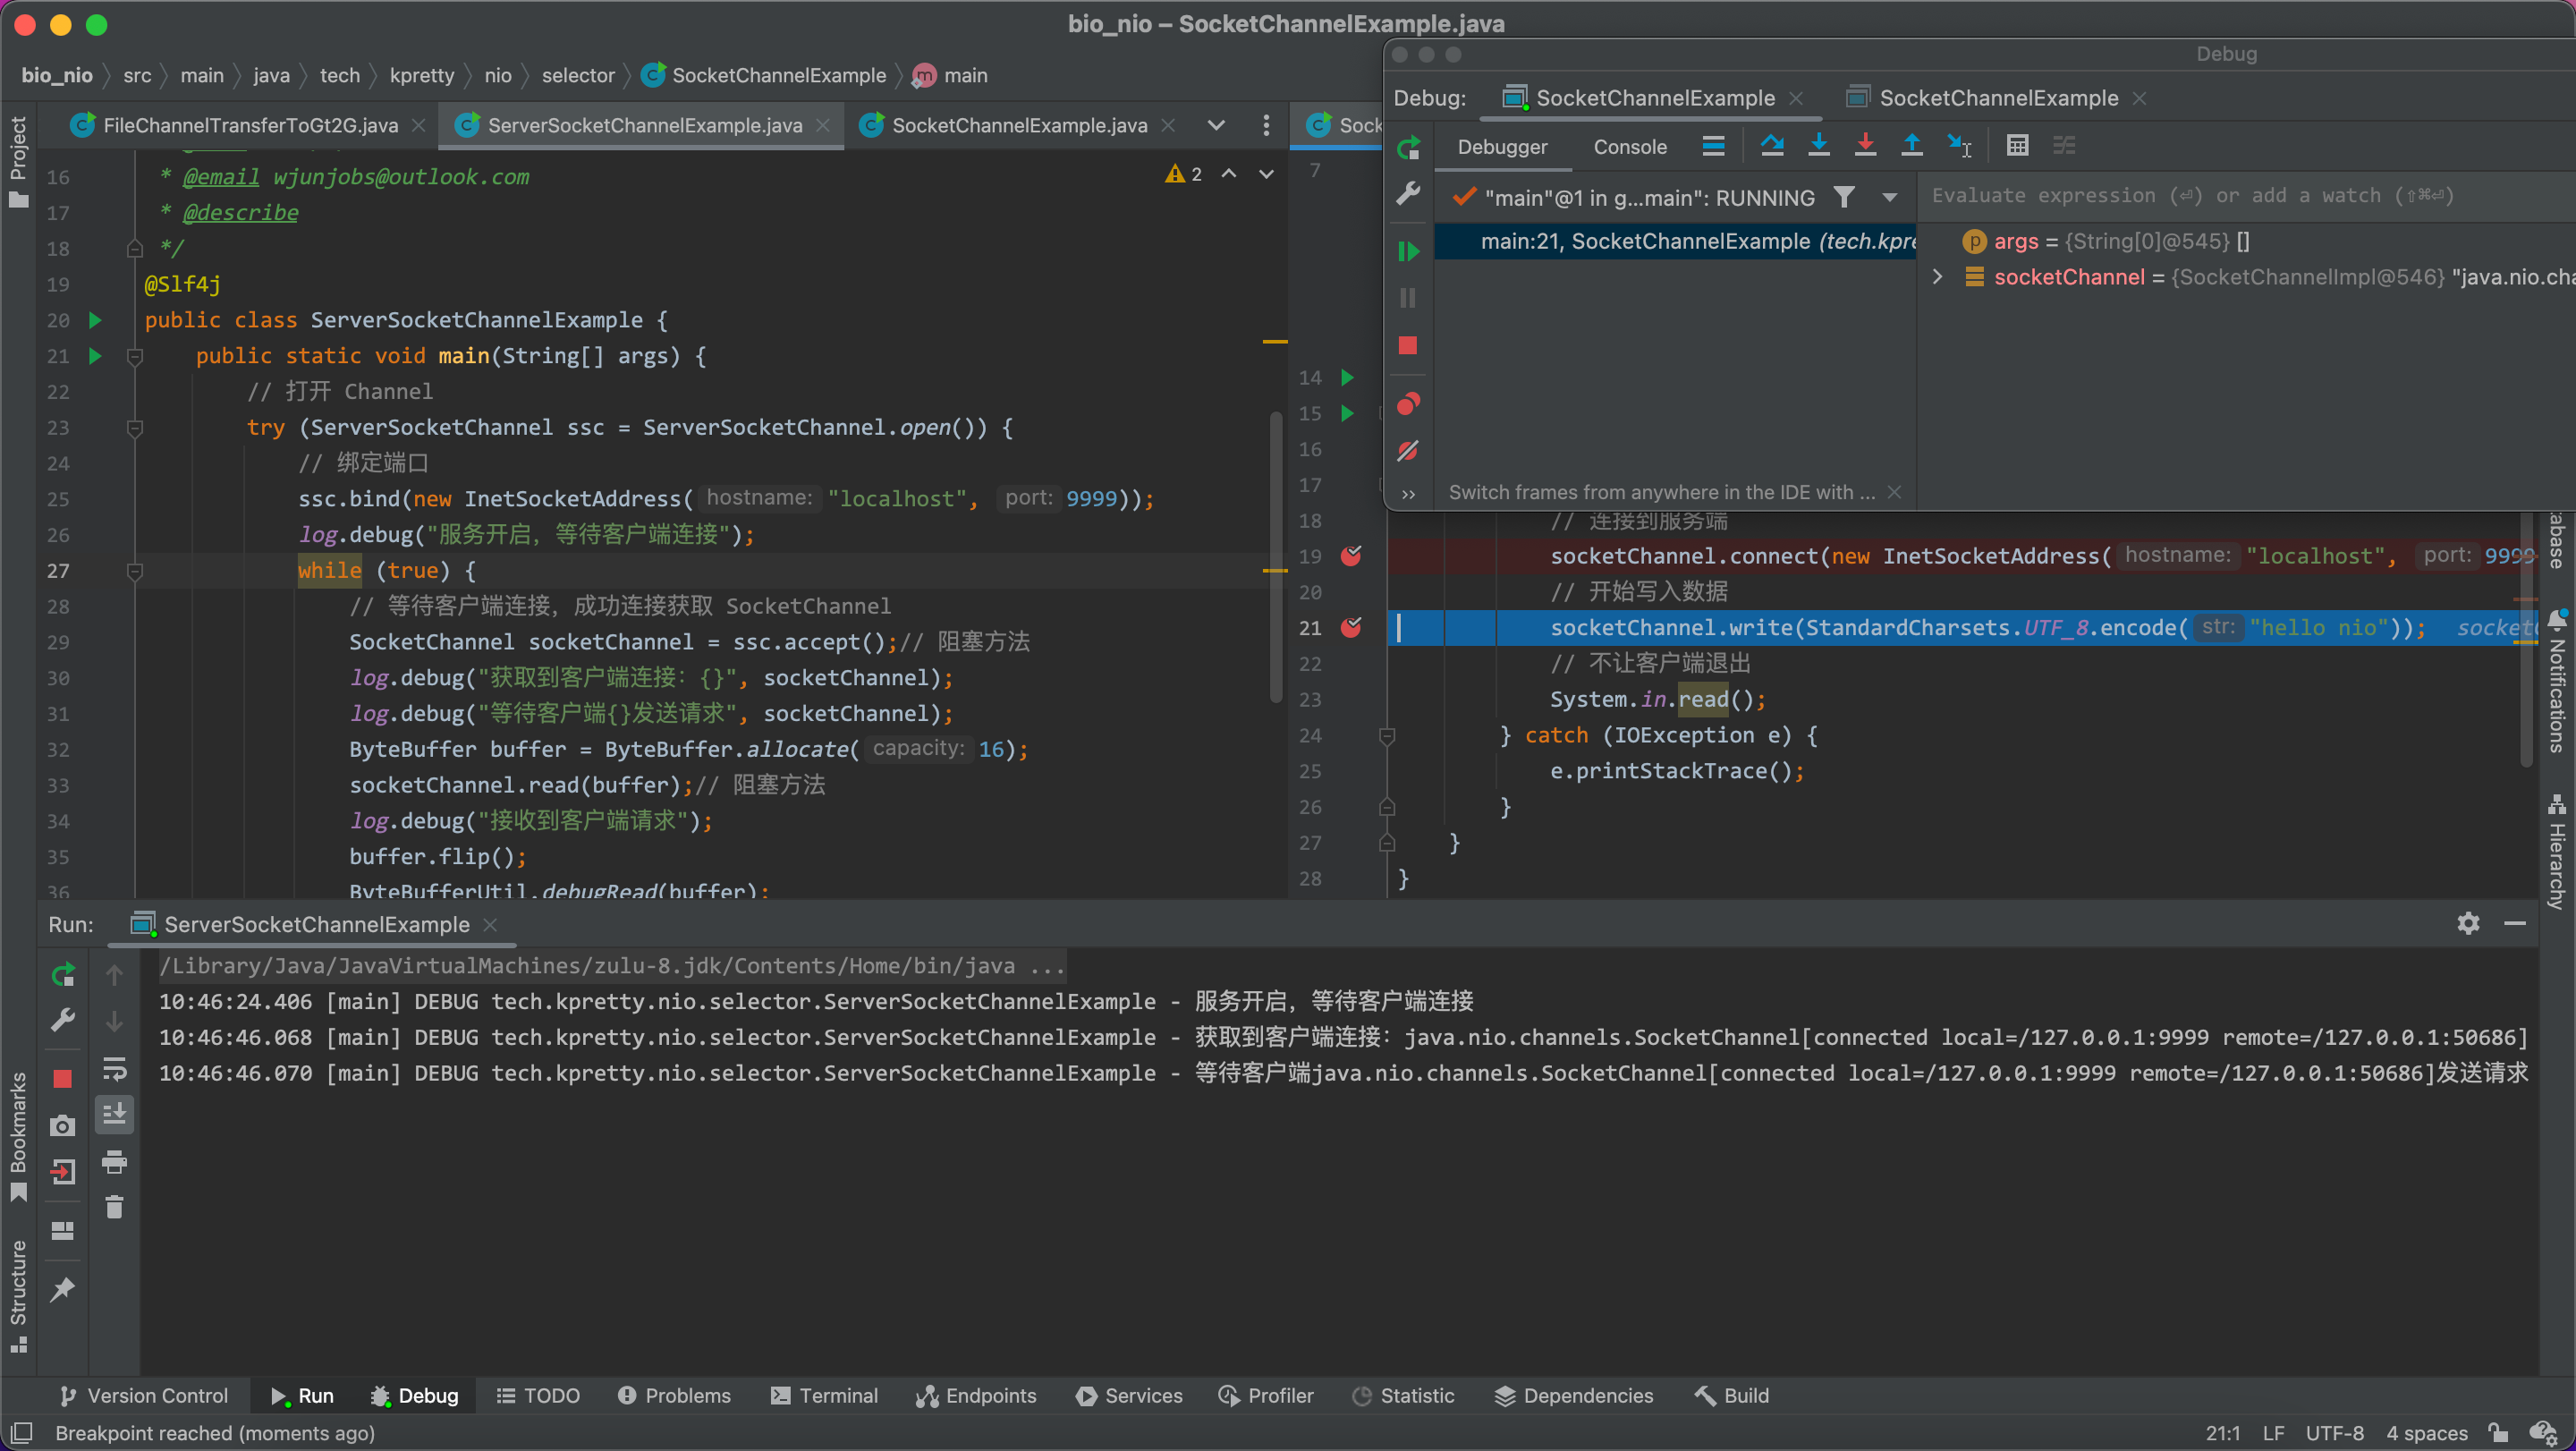
当客户端连接成功后,程序从 accept 处开始运行,但随后有阻塞在 read 处,此时当我们再开一个客户端时,服务器不会有新的信息打印,因为程序还没有回到 accept 处来接收第二个客户端连接,只有等第一个客户端完成请求的发送,才能接收下一个连接
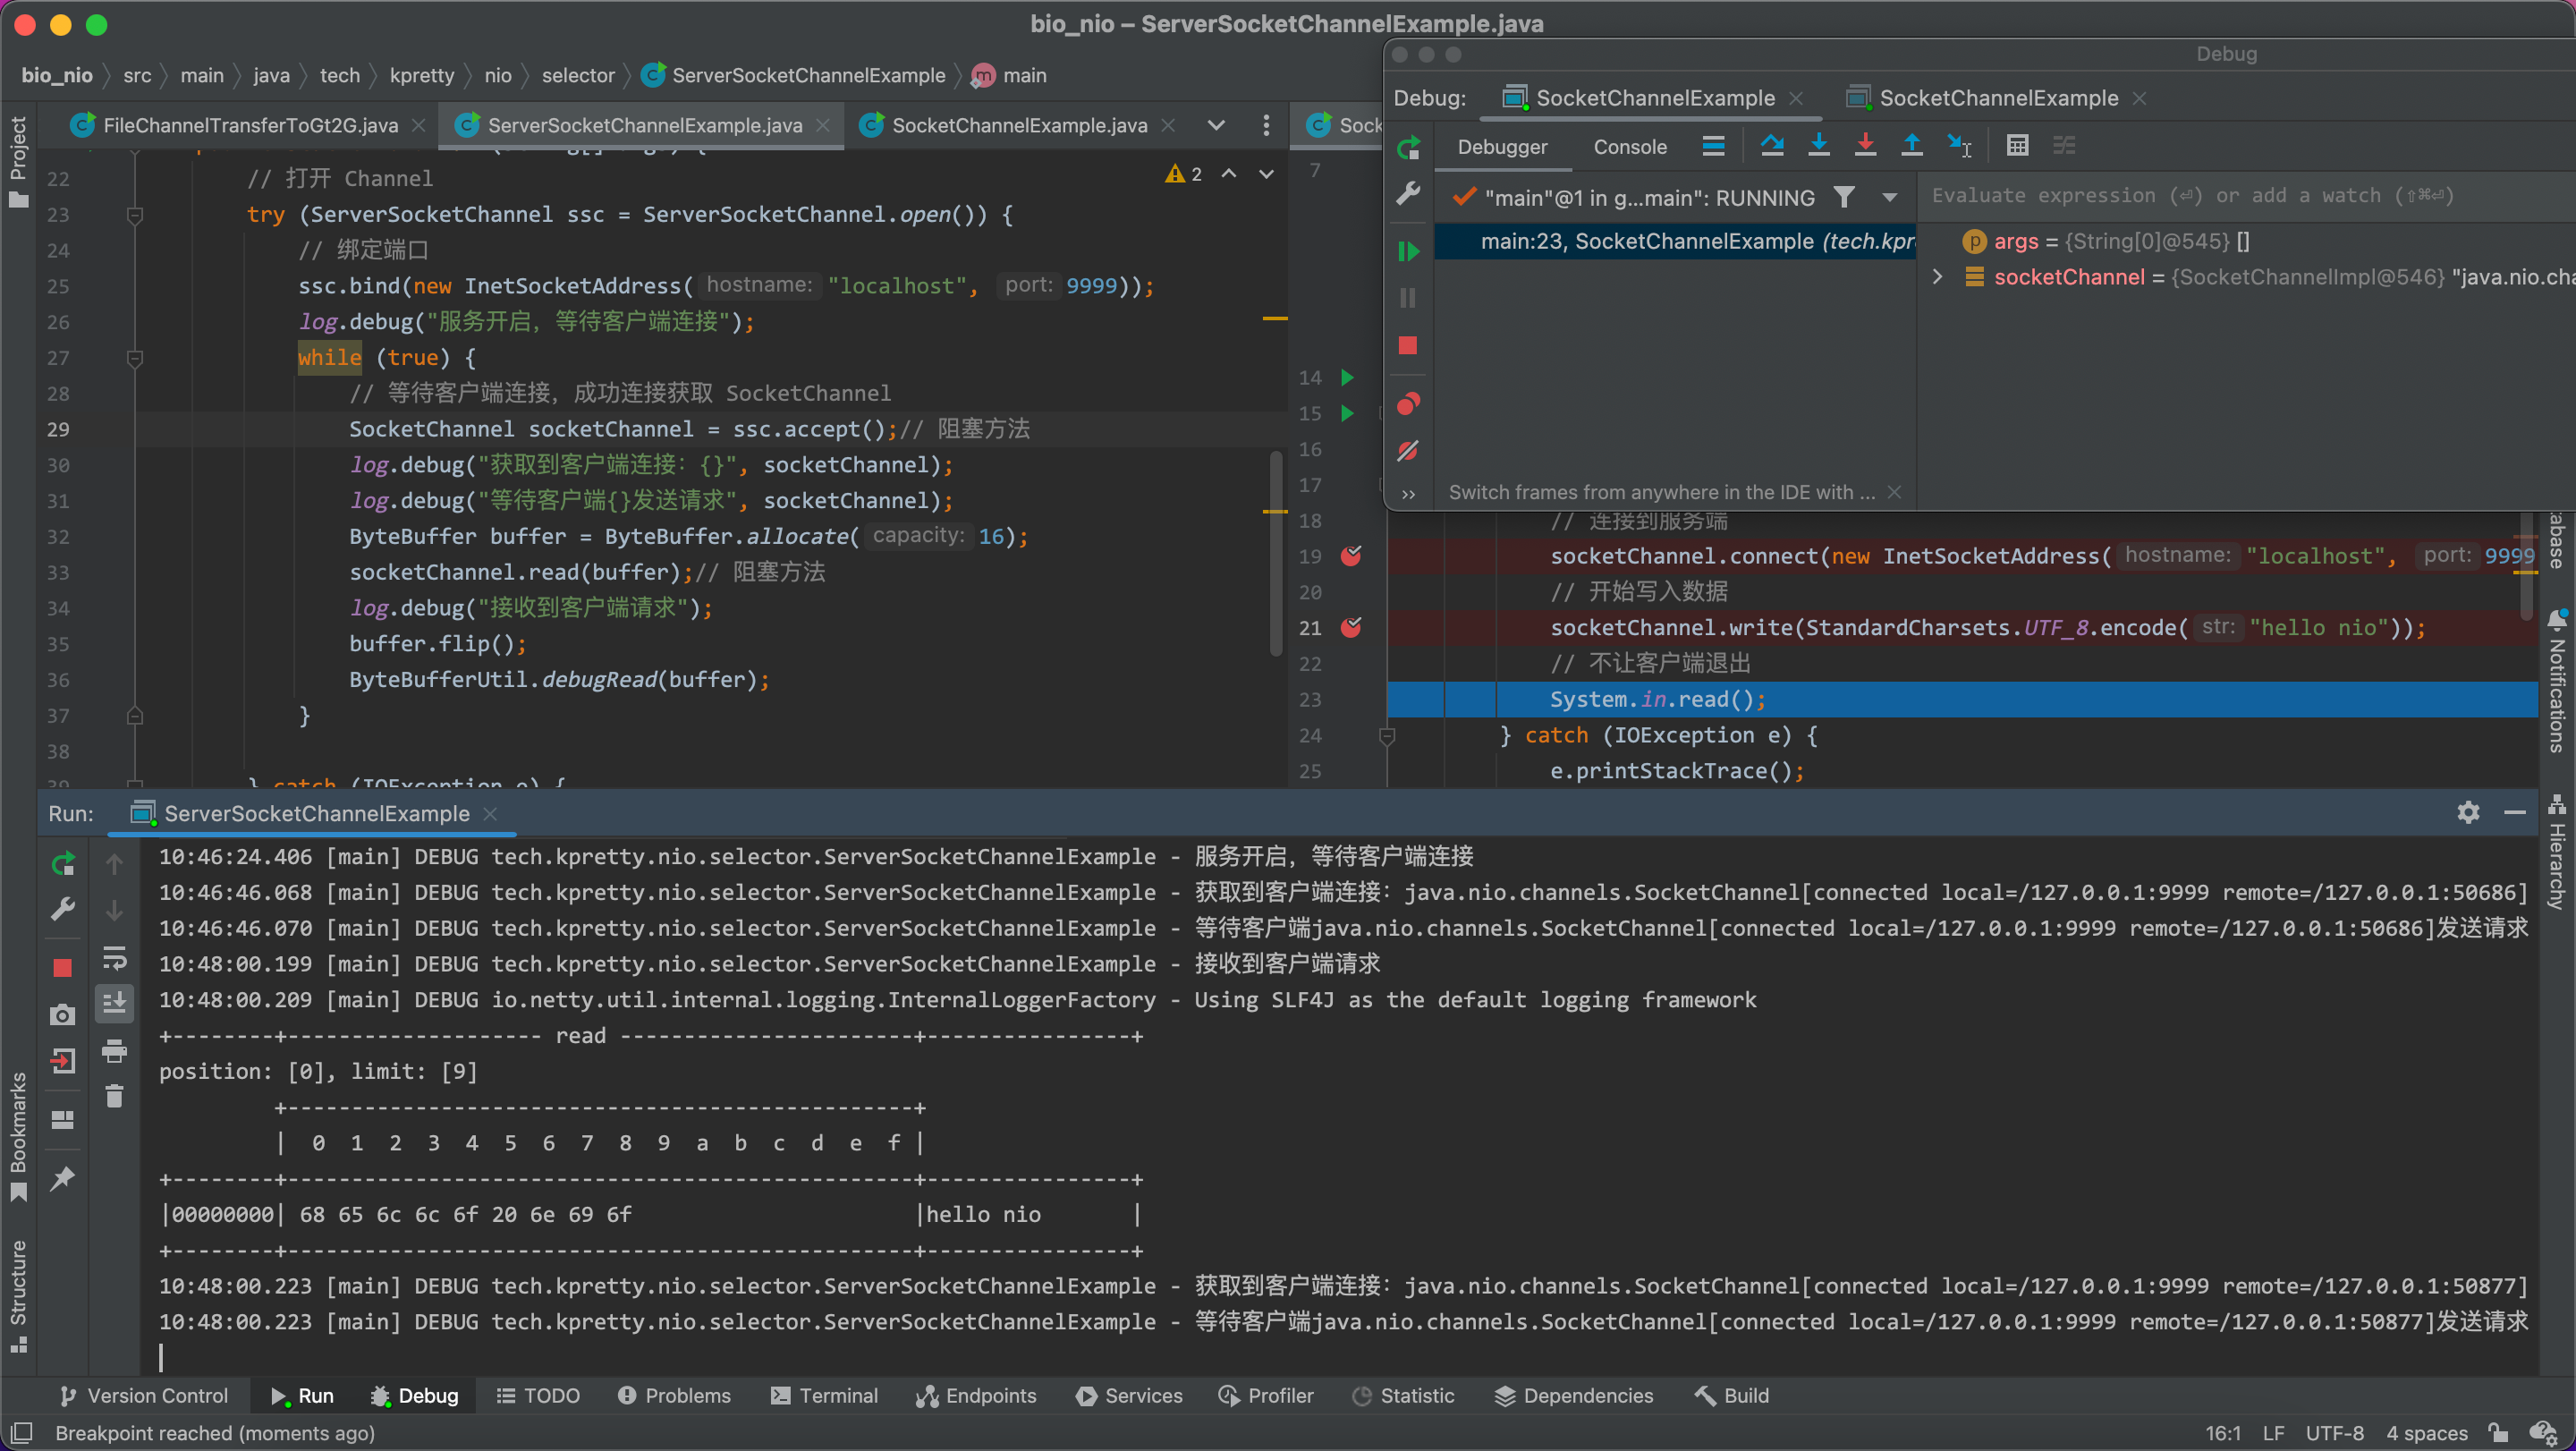
看到这里有小伙伴就有疑问了,这个和ServerSocket有什么区别,还是阻塞的呀!!!不要着急,NIO 之旅从这里开始,接下来将开始一段改造和 java 网络编程思想演变的过程
2.2.2 nio
ServerSocketChannel/SocketChannel 的功能当然不止于此,它们可以切换为非阻塞模式
改造 ServerSocketChannel
// 修改 ServerSocketChannel 为非阻塞模式
ssc.configureBlocking(false);
改造 SocketChannel
// SocketChannel 为非阻塞模式
socketChannel.configureBlocking(false);
整体代码如下:
package tech.kpretty.nio.selector;

import lombok.extern.slf4j.Slf4j;
import tech.kpretty.nio.util.ByteBufferUtil;

import java.io.IOException;
import java.net.InetSocketAddress;
import java.nio.ByteBuffer;
import java.nio.channels.ServerSocketChannel;
import java.nio.channels.SocketChannel;
import java.util.ArrayList;

/**
 * @author wjun
 * @date 2022/6/26 10:03
 * @email wjunjobs@outlook.com
 * @describe
 */
@Slf4j
public class ServerSocketChannelExample {
    public static void main(String[] args) {
        // 打开 Channel
        try (ServerSocketChannel ssc = ServerSocketChannel.open()) {
            // 绑定端口
            ssc.bind(new InetSocketAddress("localhost", 9999));
            // 修改 ServerSocketChannel 为非阻塞模式
            ssc.configureBlocking(false);
            log.debug("服务开启,等待客户端连接");
            while (true) {
                // 等待客户端连接,成功连接获取 SocketChannel
                SocketChannel socketChannel = ssc.accept();// 阻塞方法
                // SocketChannel 为非阻塞模式
                socketChannel.configureBlocking(false);
                log.debug("获取到客户端连接:{}", socketChannel);
                log.debug("等待客户端{}发送请求", socketChannel);
                ByteBuffer buffer = ByteBuffer.allocate(16);
                socketChannel.read(buffer);// 阻塞方法
                log.debug("接收到客户端请求");
                buffer.flip();
                ByteBufferUtil.debugRead(buffer);
            }
        } catch (IOException e) {
            e.printStackTrace();
        }
    }
}
尝试运行一下😏😏😏

空指针异常…这是因为当切换到非阻塞模式后 accept 将不等待客户端连接,若此时刚好有客户端连接则返回对应的 SocketChannel,否则返回 null,因此我们需要处理连接为 null
package tech.kpretty.nio.selector;

import lombok.extern.slf4j.Slf4j;
import tech.kpretty.nio.util.ByteBufferUtil;

import java.io.IOException;
import java.net.InetSocketAddress;
import java.nio.ByteBuffer;
import java.nio.channels.ServerSocketChannel;
import java.nio.channels.SocketChannel;
import java.util.ArrayList;

/**
 * @author wjun
 * @date 2022/6/26 10:03
 * @email wjunjobs@outlook.com
 * @describe
 */
@Slf4j
public class ServerSocketChannelExample {
    public static void main(String[] args) {
        // 打开 Channel
        try (ServerSocketChannel ssc = ServerSocketChannel.open()) {
            // 绑定端口
            ssc.bind(new InetSocketAddress("localhost", 9999));
            // 修改 ServerSocketChannel 为非阻塞模式
            ssc.configureBlocking(false);
            log.debug("服务开启,等待客户端连接");
            while (true) {
                // 等待客户端连接,成功连接获取 SocketChannel
                SocketChannel socketChannel = ssc.accept();
                if (socketChannel != null) {
                    // SocketChannel 为非阻塞模式
                    socketChannel.configureBlocking(false);
                    log.debug("获取到客户端连接:{}", socketChannel);
                    log.debug("等待客户端{}发送请求", socketChannel);
                    ByteBuffer buffer = ByteBuffer.allocate(16);
                    socketChannel.read(buffer);
                    log.debug("接收到客户端请求");
                    buffer.flip();
                    ByteBufferUtil.debugRead(buffer);
                }
            }
        } catch (IOException e) {
            e.printStackTrace();
        }
    }
}
再次运行,发现多个客户端可以同时连接了
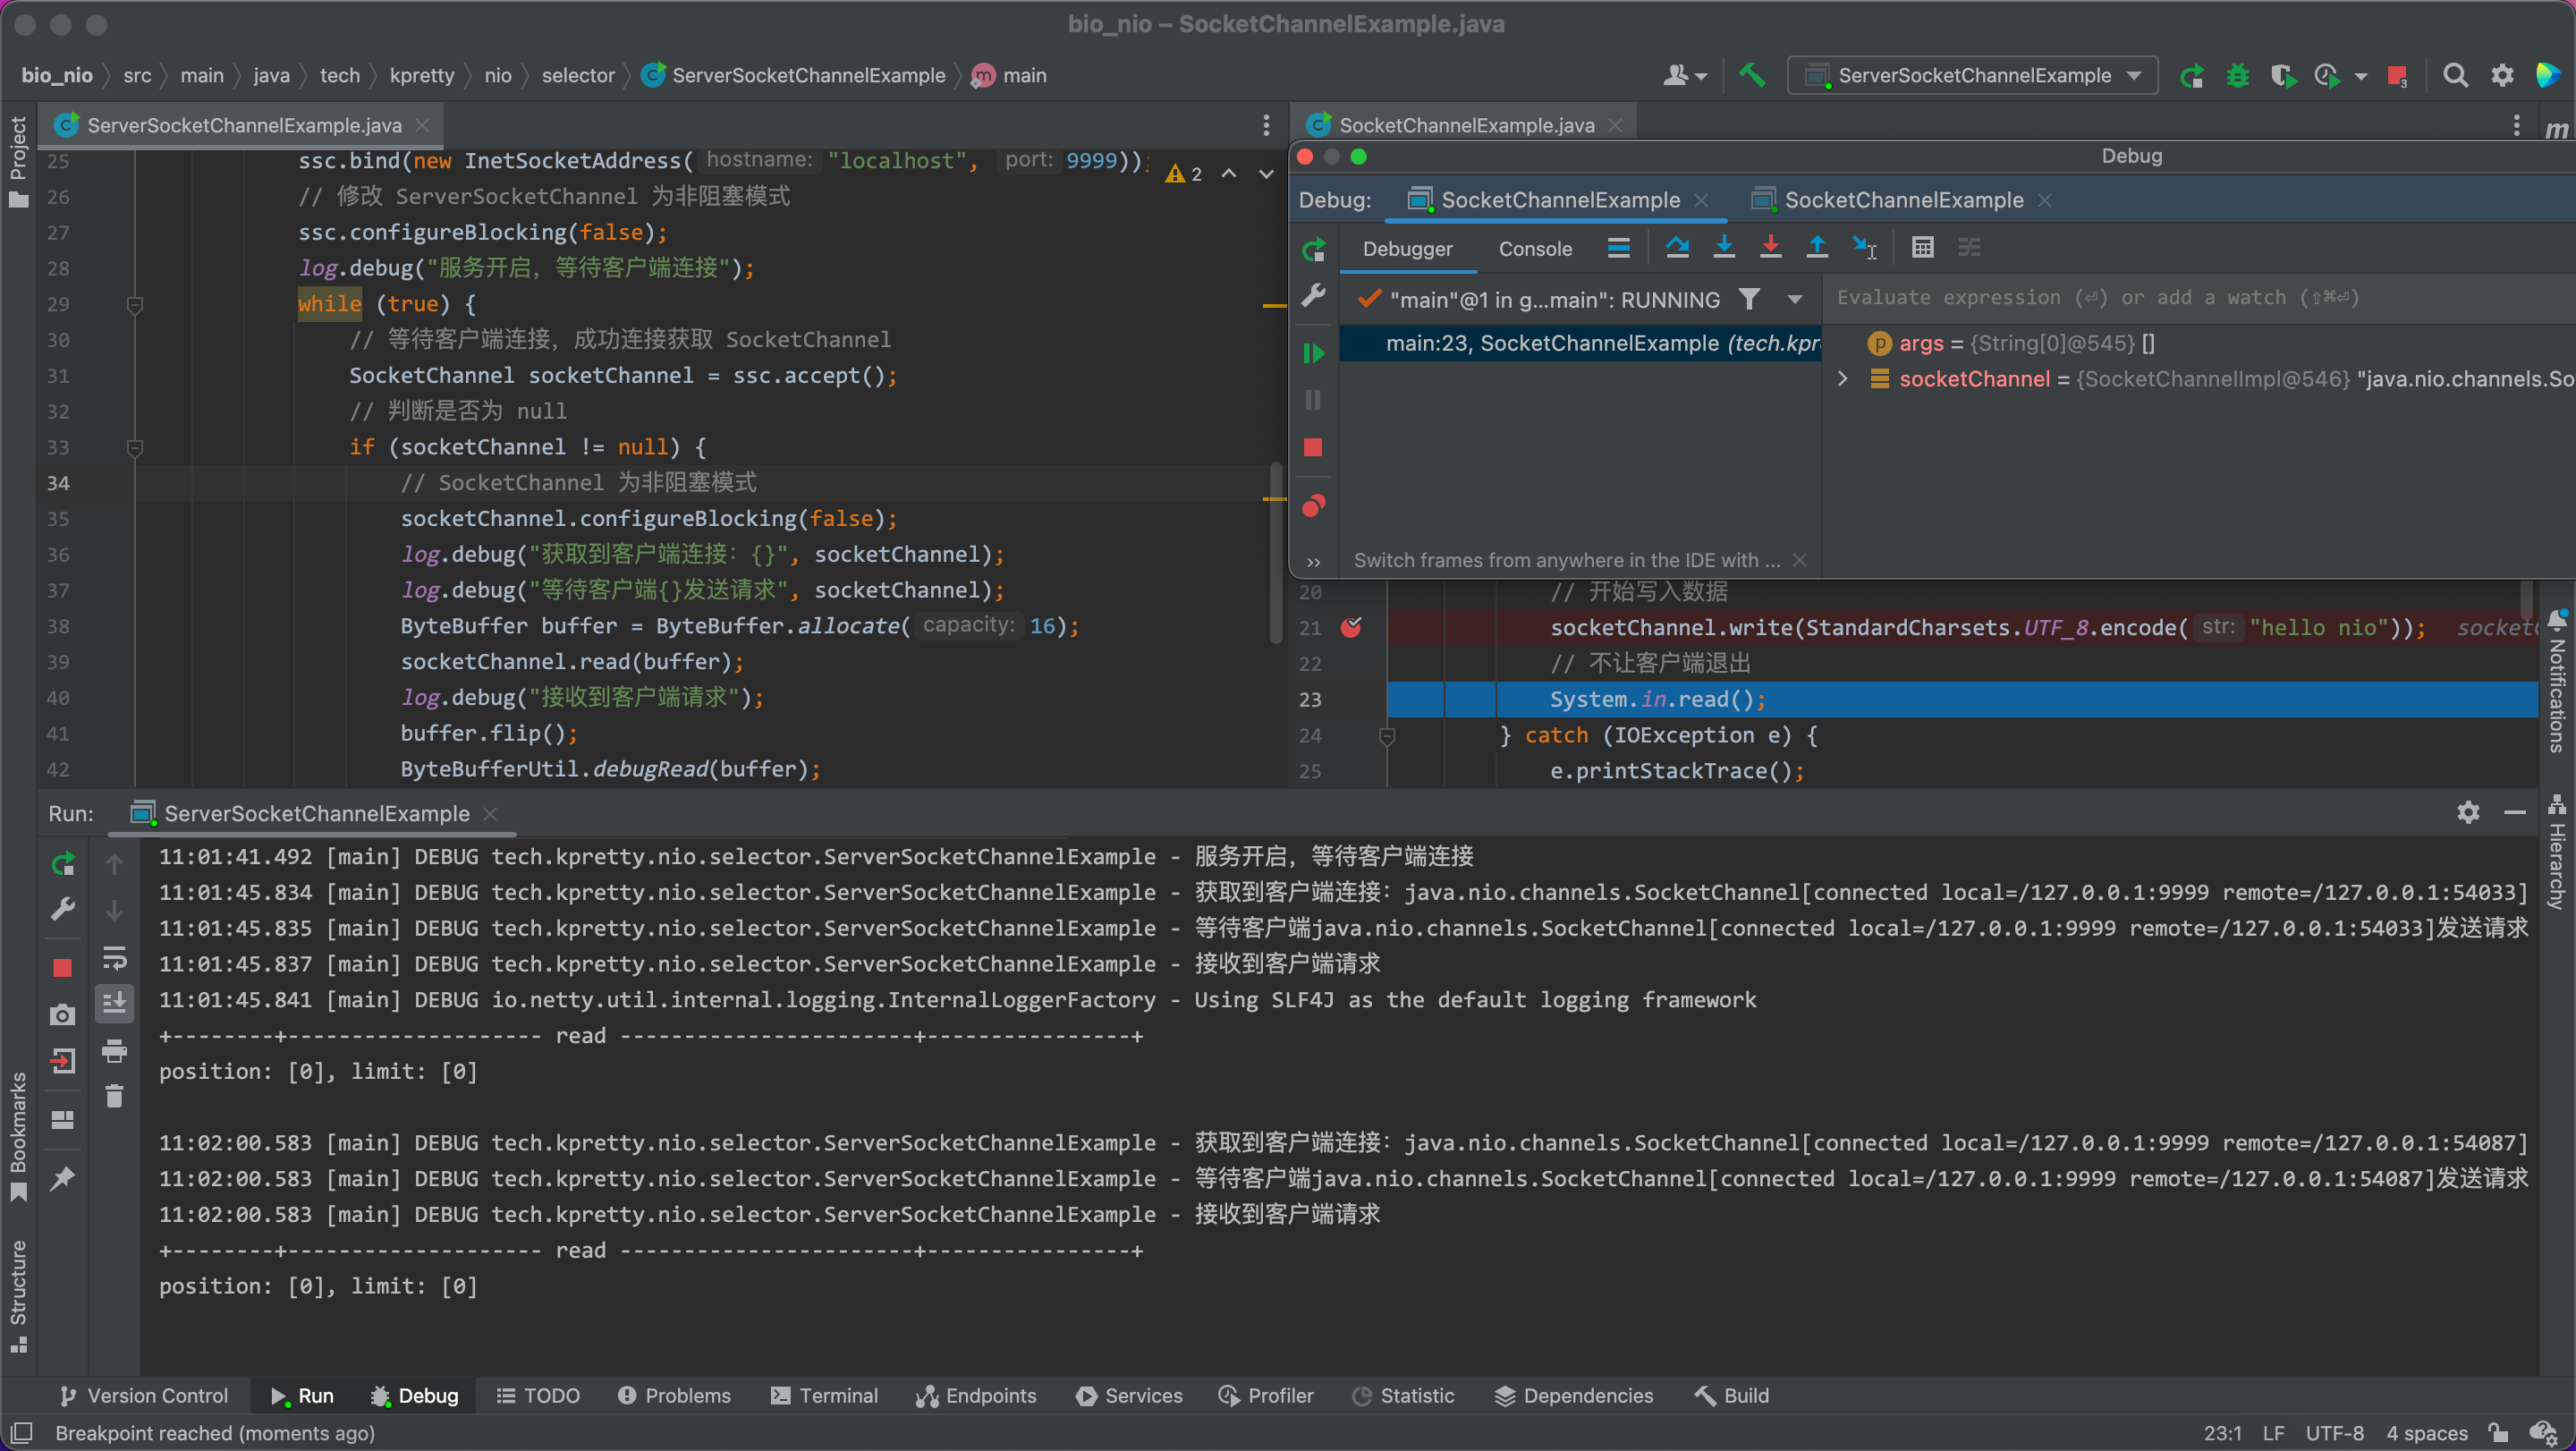
细心的小伙伴可能发现问题了,当客户端准备发送消息的时候发现服务端没有任何响应…这个原因和上面一样,因为 SocketChannel 也为非阻塞模式,当服务端接收到连接后随即执行 read 操作,此时客户端还没有发送消息;而当客户端准备发送消息的时候服务端已经不知道循环多少次了,当前的 SocketChannel 早就被销毁了,因此接下来需要解决客户端消息丢失问题
方法就是将每个不为 null 的 SocketChannel 保存起来,每次循环的时候遍历所有的 SocketChannel,尝试读取数据即可
package tech.kpretty.nio.selector;

import lombok.extern.slf4j.Slf4j;
import tech.kpretty.nio.util.ByteBufferUtil;

import java.io.IOException;
import java.net.InetSocketAddress;
import java.nio.ByteBuffer;
import java.nio.channels.ServerSocketChannel;
import java.nio.channels.SocketChannel;
import java.util.ArrayList;

/**
 * @author wjun
 * @date 2022/6/26 10:03
 * @email wjunjobs@outlook.com
 * @describe
 */
@Slf4j
public class ServerSocketChannelExample {
    public static void main(String[] args) {
        // 打开 Channel
        try (ServerSocketChannel ssc = ServerSocketChannel.open()) {
            // 绑定端口
            ssc.bind(new InetSocketAddress("localhost", 9999));
            // 修改 ServerSocketChannel 为非阻塞模式
            ssc.configureBlocking(false);
            // 创建集合用于保存 SocketChannel
            ArrayList<SocketChannel> socketChannels = new ArrayList<>();
            log.debug("服务开启,等待客户端连接");
            while (true) {
                // 等待客户端连接,成功连接获取 SocketChannel
                SocketChannel socketChannel = ssc.accept();
                // 判断是否为 null
                if (socketChannel != null) {
                    // SocketChannel 为非阻塞模式
                    socketChannel.configureBlocking(false);
                    socketChannels.add(socketChannel);
                    log.debug("获取到客户端连接:{}", socketChannel);
                    log.debug("等待客户端{}发送请求", socketChannel);
                }
                for (SocketChannel channel : socketChannels) {
                    ByteBuffer buffer = ByteBuffer.allocate(16);
                    // 返回读取到的数据,如果客户端没有发送数据返回0
                    int size = channel.read(buffer);
                    if (size > 0) {
                        log.debug("接收到客户端请求");
                        buffer.flip();
                        ByteBufferUtil.debugRead(buffer);
                    }
                }
            }
        } catch (IOException e) {
            e.printStackTrace();
        }
    }
}
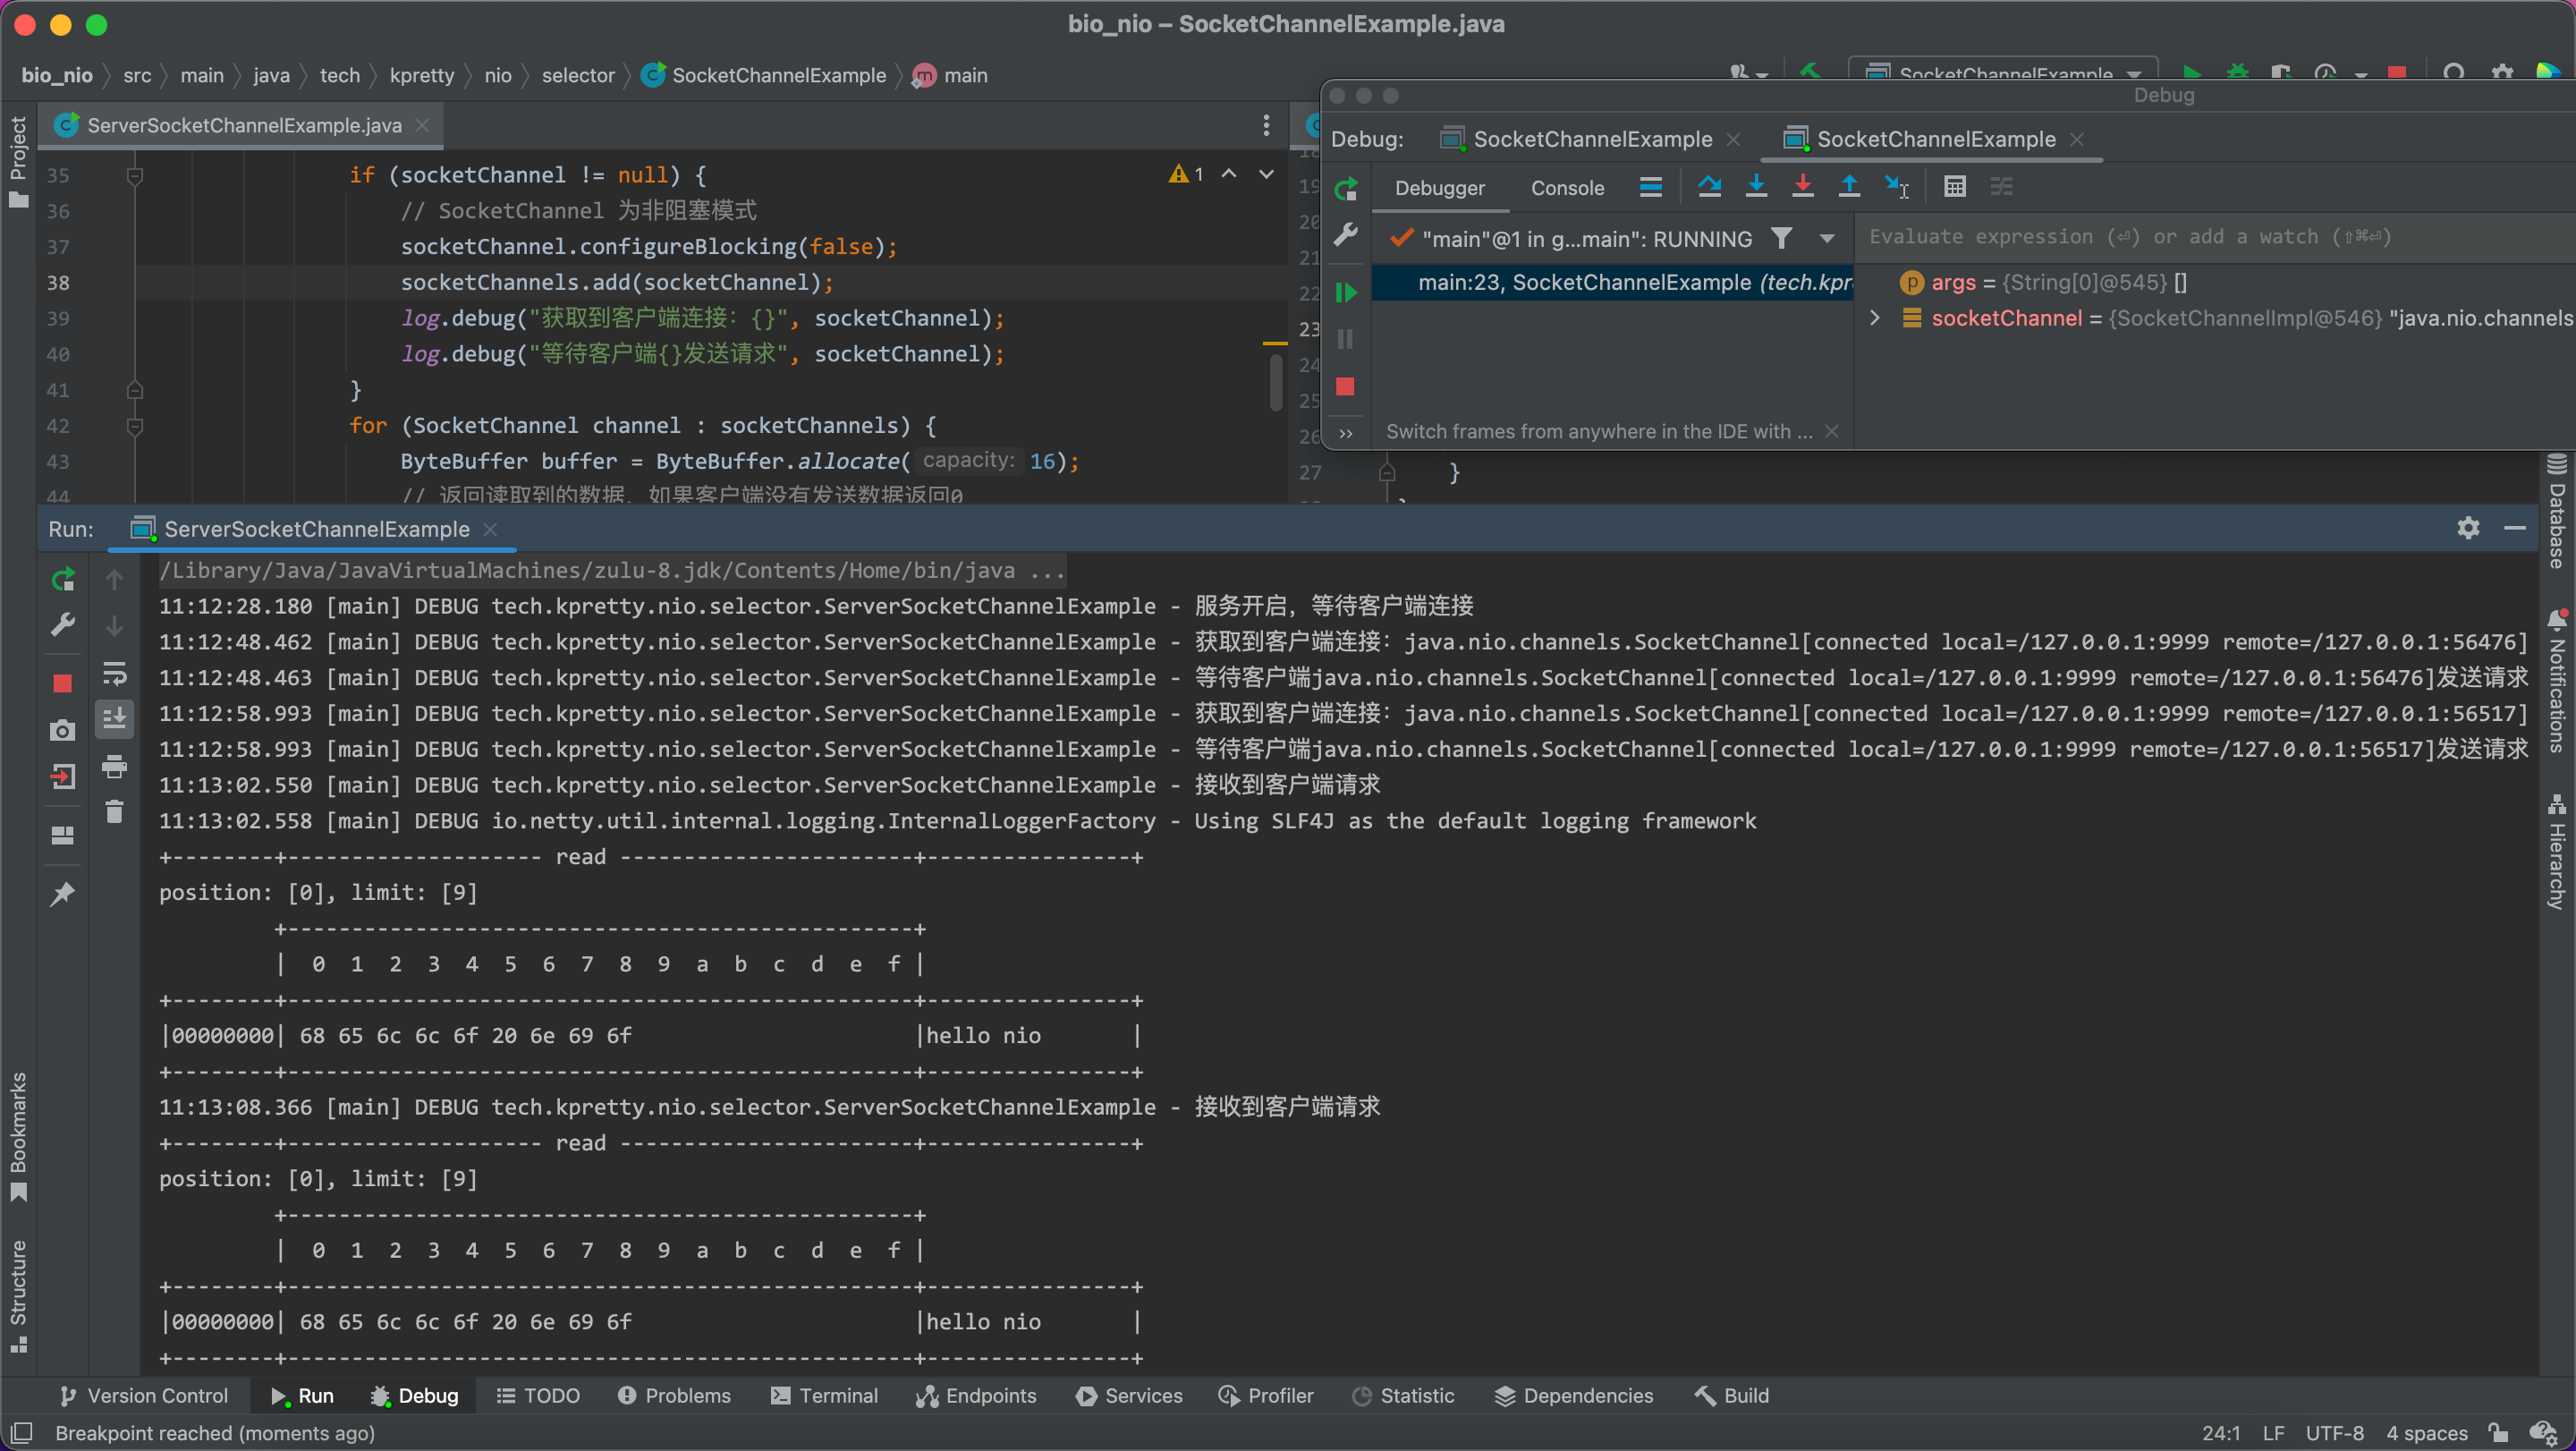
再次运行,发现此时服务端可以接收到过个客户端的消息
三、Selector
为了解决无效的空轮训,引入 Selector 通过 Selector 来管理各个 Channel,当 Channel 有事件发生时通知 Selector 来进行处理,当没有事件发生时 Selector 处于阻塞状态,因此 Selector 是一个用事件驱动的模型,同时单线程可以配合 Selector 完成对多个 Channel 事件的监控,这称之为多路复用,而 Selector 的时间共分为四种
| 事件 | 描述 | 十进制 |
|---|---|---|
| accept | 会在有连接请求时触发 | 16 |
| connect | 客户端建立连接后触发 | 8 |
| read | 可读事件 | 1 |
| write | 可写事件 | 4 |
对应源码SelectionKey中
public static final int OP_READ 		= 1 << 0;
public static final int OP_WRITE 		= 1 << 2;
public static final int OP_CONNECT 		= 1 << 3;
public static final int OP_ACCEPT 		= 1 << 4;
而 Selector 管理 Channel 的模式是 Channel 在 Selector 上注册感兴趣的事件类型,当有事件发生时会返回这个事件类型,同时返回绑定该事件类型的 Channel,那么此时的 Channel 就一定有对应事件发生,因此就避免了无效等待和空值判断的过程,所以接下来使用 Selector 来重构上面的代码。
3.1 基本方法
将 Channel 注册到 Selector 上
// 通过 channel 调用 register 并传入对应的 selector
Channel.register(selector,ops,att)
ops:感兴趣的事件类型,为上面描述的四种类型
att:附件attachment,后面会说到为绑定到当前 channel、ops 的一个对象
无事件阻塞
Selector.select()
获取事件,当有事件发生 select() 立刻恢复开始执行后面的逻辑,如获取事件并遍历、处理事件
Selector.selectedKeys()
3.2 基本框架
根据上面的方法可以搭建一个基本框架
package tech.kpretty.nio.selector;

import lombok.extern.slf4j.Slf4j;

import java.io.IOException;
import java.net.InetSocketAddress;
import java.nio.channels.SelectionKey;
import java.nio.channels.Selector;
import java.nio.channels.ServerSocketChannel;


/**
 * @author wjun
 * @date 2022/6/26 10:03
 * @email wjunjobs@outlook.com
 * @describe
 */
@Slf4j
public class ServerSocketChannelExample {
    public static void main(String[] args) {
        try (// 打开 Channel
             ServerSocketChannel ssc = ServerSocketChannel.open();
             // 打开 Selector
             Selector selector = Selector.open()) {
            // 绑定端口
            ssc.bind(new InetSocketAddress("localhost", 9999));
            // 修改 ServerSocketChannel 为非阻塞模式
            ssc.configureBlocking(false);
            // 将 Channel 注册到 Selector 上
            // TODO  对于 ServerSocketChannel 来说只对 accept 感兴趣
            ssc.register(selector, SelectionKey.OP_ACCEPT, null);
            while (true) {
                log.debug("等待事件发生...");
                selector.select();
                for (SelectionKey selectedKey : selector.selectedKeys()) {
                    log.debug("发生{}事件", selectedKey);
                    // 这个方法先忽略,后面会重点说明
                    selectedKey.cancel();
                }
            }
        } catch (IOException e) {
            e.printStackTrace();
        }
    }
}
这时候尝试连接一个客户端,可以看到服务端启动时会阻塞在 select 出,当有客户端连接后立刻恢复;当然这个代码现在是有问题的,需要一步步的改进。
首先为了代码的可读性,对事件类型进行一个封装
封装事件类型
package tech.kpretty.util;

/**
 * @author wjun
 * @date 2022/6/23 17:44
 * @email wjunjobs@outlook.com
 * @describe
 */
public enum KeyOp {
    ACCEPT,
    CONNECT,
    READ,
    WRITE,
    VOID
}
封装事件类型的转换
package tech.kpretty.util;

import java.nio.channels.SelectionKey;

/**
 * @author wjun
 * @date 2022/6/23 17:45
 * @email wjunjobs@outlook.com
 * @describe
 */
public class SelectUtils {
    public static KeyOp ConvertKey(SelectionKey key) {
        if (key.isAcceptable()) {
            return KeyOp.ACCEPT;
        } else if (key.isConnectable()) {
            return KeyOp.CONNECT;
        } else if (key.isReadable()) {
            return KeyOp.READ;
        } else if (key.isWritable()) {
            return KeyOp.WRITE;
        } else {
            return KeyOp.VOID;
        }
    }
}
3.3 处理 accept 事件
需要明确一件事情,accept 需要怎么处理,即:当我们接收到 accept 事件就意味着有一个客户端连接上来了,那么我们是不是就可以调用 accept() 来接收这个客户端的连接即获取到一个 SocketChannel,同时需要关注这个 Channel 未来可能有的请求,即可读事件(客户端连接上不一定立刻的发消息),也就是说 accept 事件的处理逻辑:调用 accept 方法获取 SocketChannel,将 SocketChannel 注册到 Selector 上并关注可读事件,因此代码如下:
package tech.kpretty.nio.selector;

import lombok.extern.slf4j.Slf4j;
import tech.kpretty.util.SelectUtils;

import java.io.IOException;
import java.net.InetSocketAddress;
import java.nio.channels.SelectionKey;
import java.nio.channels.Selector;
import java.nio.channels.ServerSocketChannel;
import java.nio.channels.SocketChannel;


/**
 * @author wjun
 * @date 2022/6/26 10:03
 * @email wjunjobs@outlook.com
 * @describe
 */
@Slf4j
public class ServerSocketChannelExample {
    public static void main(String[] args) {
        try (// 打开 Channel
             ServerSocketChannel ssc = ServerSocketChannel.open();
             // 打开 Selector
             Selector selector = Selector.open()) {
            // 绑定端口
            ssc.bind(new InetSocketAddress("localhost", 9999));
            // 修改 ServerSocketChannel 为非阻塞模式
            ssc.configureBlocking(false);
            // 将 Channel 注册到 Selector 上
            // TODO  对于 ServerSocketChannel 来说只对 accept 感兴趣
            ssc.register(selector, SelectionKey.OP_ACCEPT, null);
            while (true) {
                log.debug("等待事件发生...");
                selector.select();
                for (SelectionKey key : selector.selectedKeys()) {
                    switch (SelectUtils.ConvertKey(key)) {
                        case ACCEPT: {
                            // accept 获取到的 channel 一定是 ServerSocketChannel
                            // 通常情况下 Selector 只会绑定一个 ServerSocketChannel
                            // 也就是说 通过 key.channel() 获取到的 channel 一定是原先的 ssc
                            // 因此直接调用 ssc.accept() 返回值一定不为 null
                            SocketChannel socketChannel = ssc.accept();
                            log.debug("接收到连接事件,客户端为{}", socketChannel);
                            // SocketChannel 切换为非阻塞
                            socketChannel.configureBlocking(false);
                            // 将 SocketChannel 注册到 Selector 同时关注可写事件
                            socketChannel.register(selector, SelectionKey.OP_READ, null);
                            break;
                        }
                        default:
                            key.cancel();
                    }
                }
            }
        } catch (IOException e) {
            e.printStackTrace();
        }
    }
}
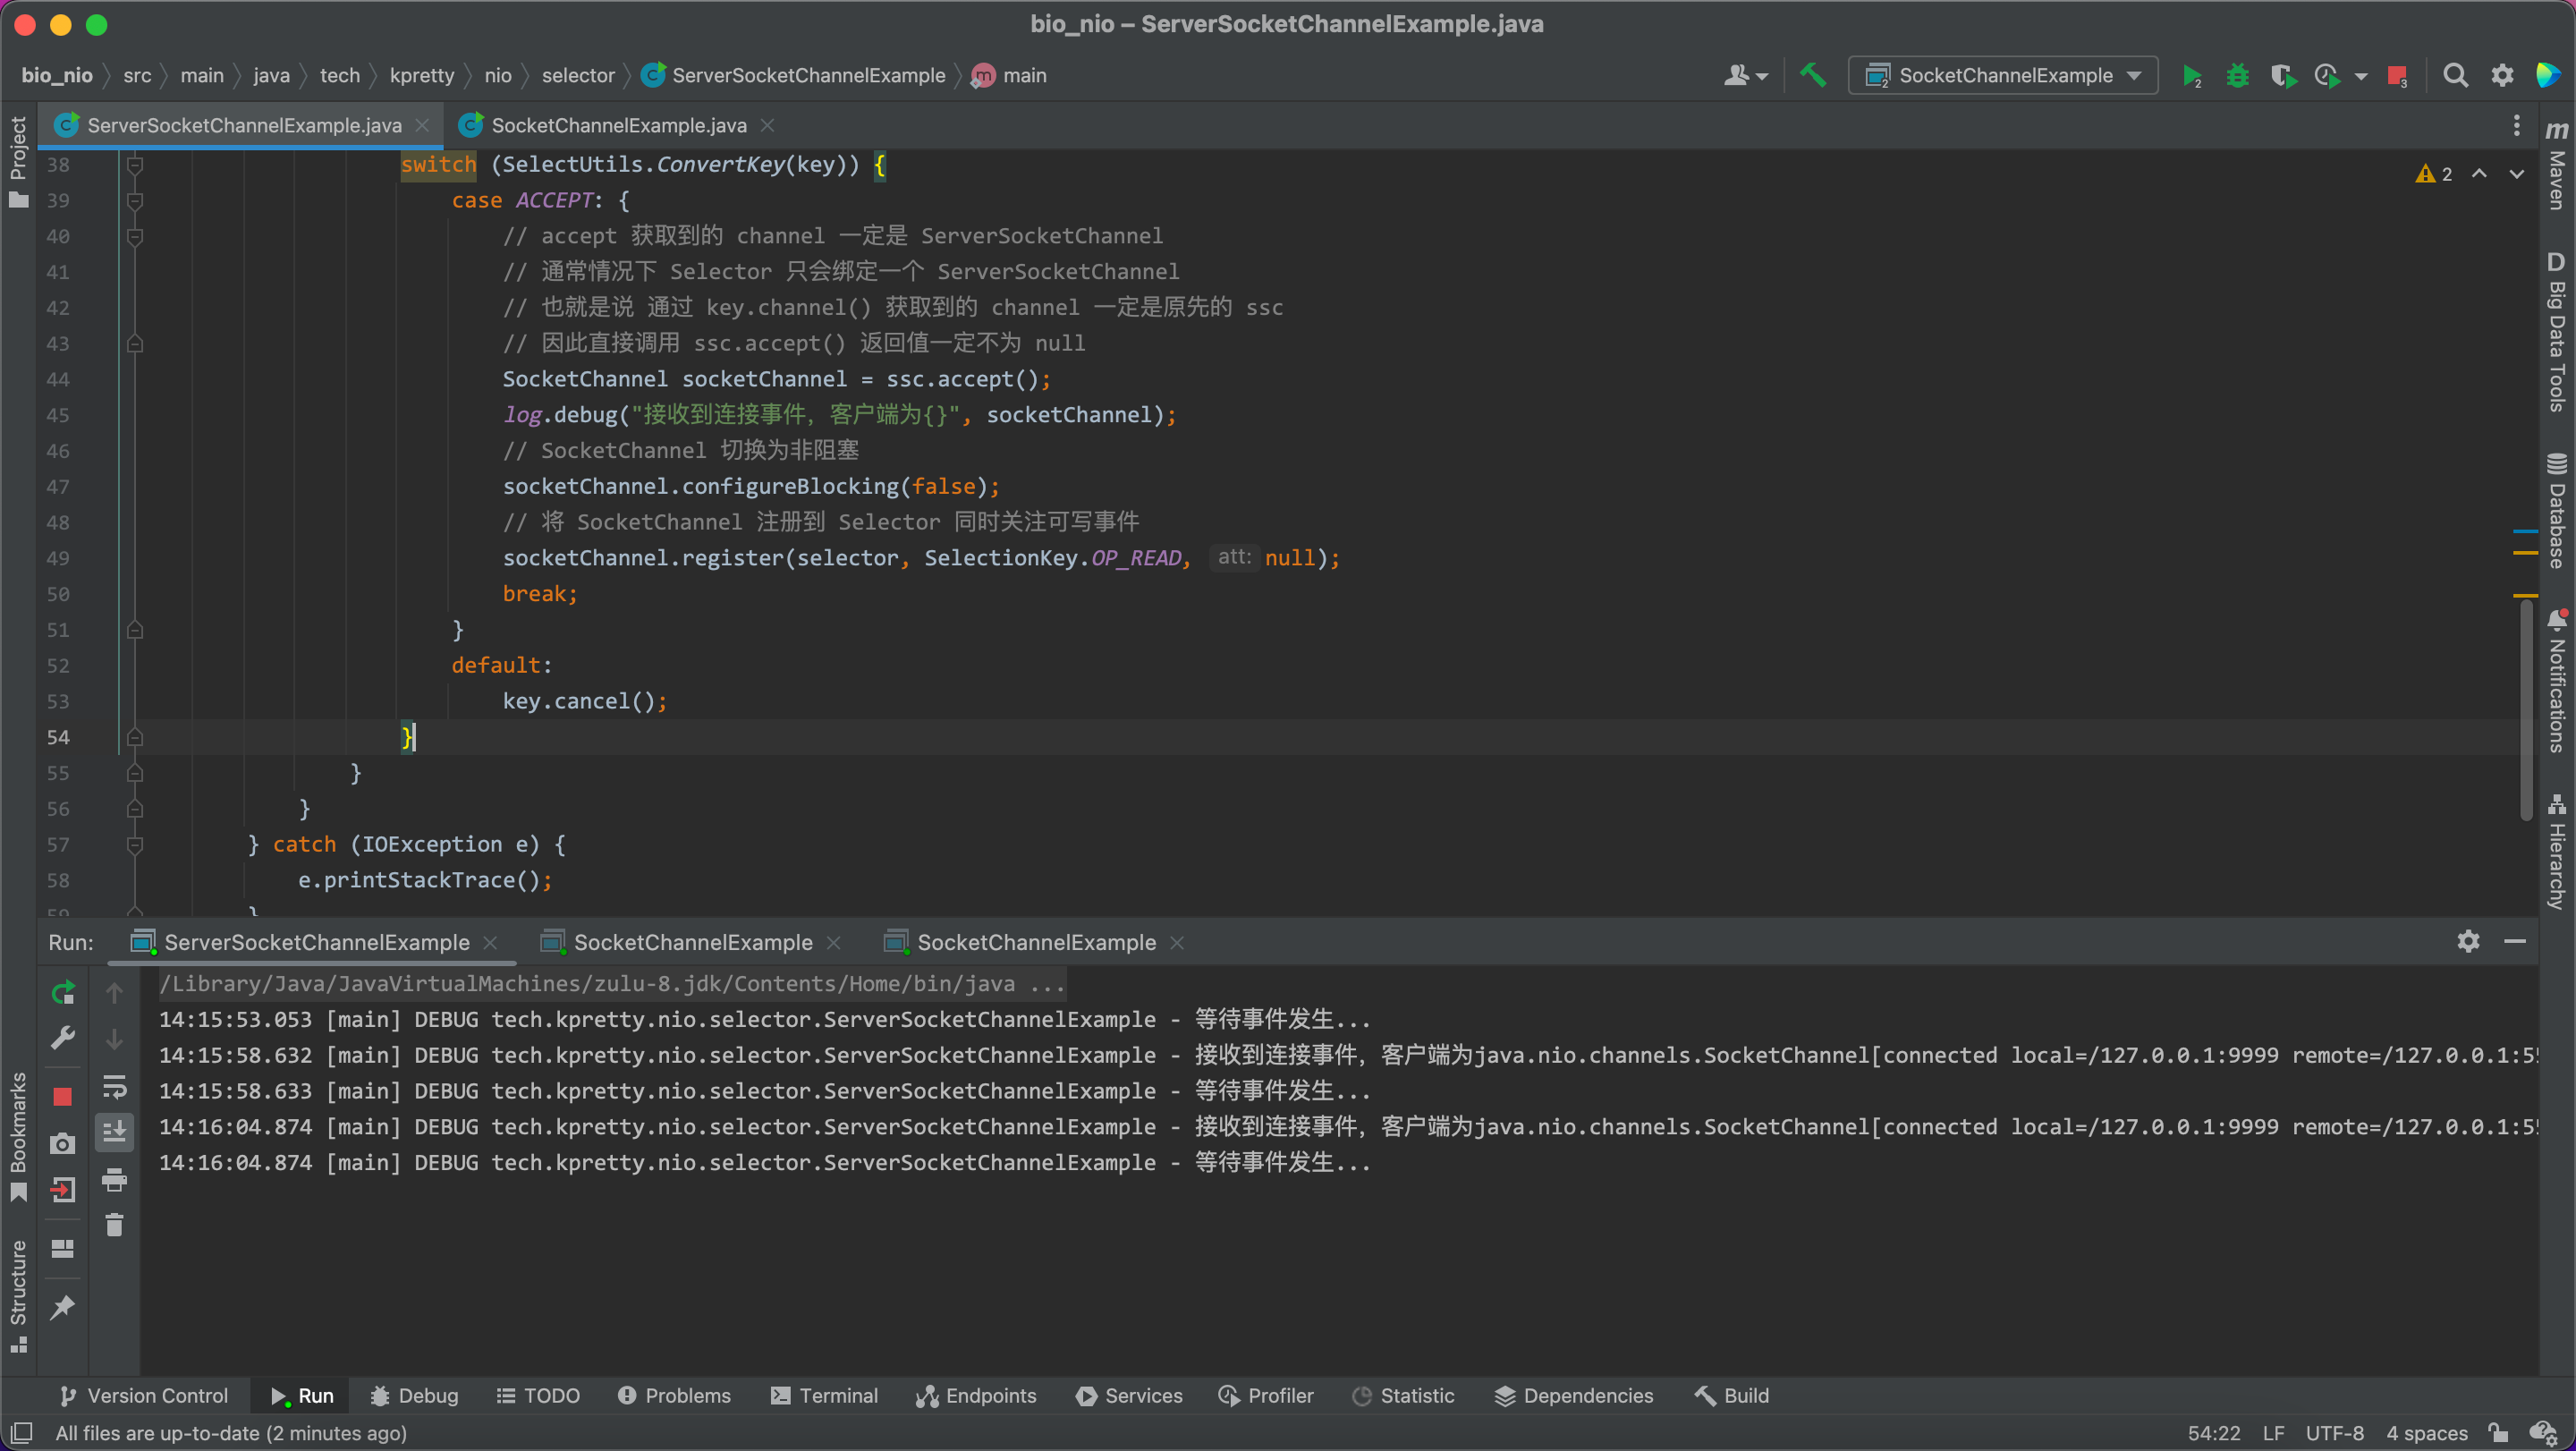
因为目前只处理 accept 事件,因此客户端我们测试的时候只测试连接,不发任何数据其结果如下:
3.3.1 remove
若是此时你将客户端停掉会发现服务端报错了

熟悉的空指针错误,报错信息显示再次触发了连接事件,原因如下(非常非常非常重要):
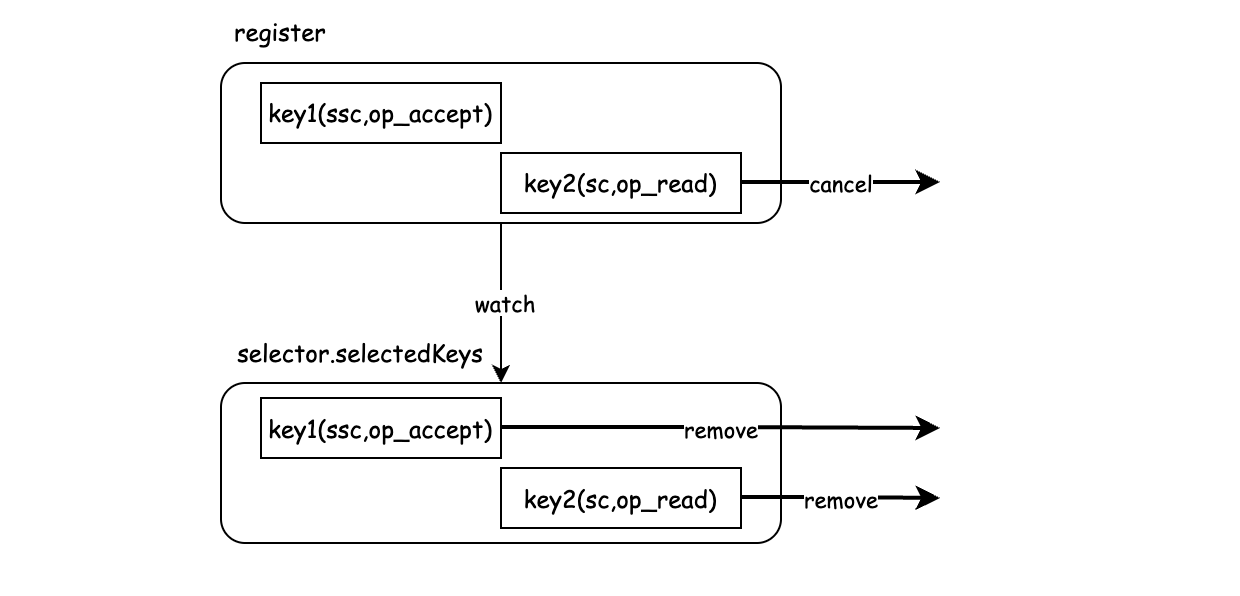
当我们将 Channel 注册到 Selector 上,会在 register 集合中存一个 key1,随之程序执行到 select 等待事件发生,这时候客户端开始连接,Selector 检测到有与 register 集合配对的事件开始执行 selectedKeys 获取事件,这时候 Selector 会把 register 中命中的 key 放到另一个集合中供我们遍历;随后我们又注册了一个可读事件。当客户端关闭后会自动触发一个可读事件,Selector 会把 key2 放到刚才我们遍历的集合,但是这个集合里面有上一次处理过的 accept 事件(Selector 不会帮我们移除处理过的),这时候再次执行 accept 事件逻辑,但此时根本没有客户端在连接,因此报了空指针。
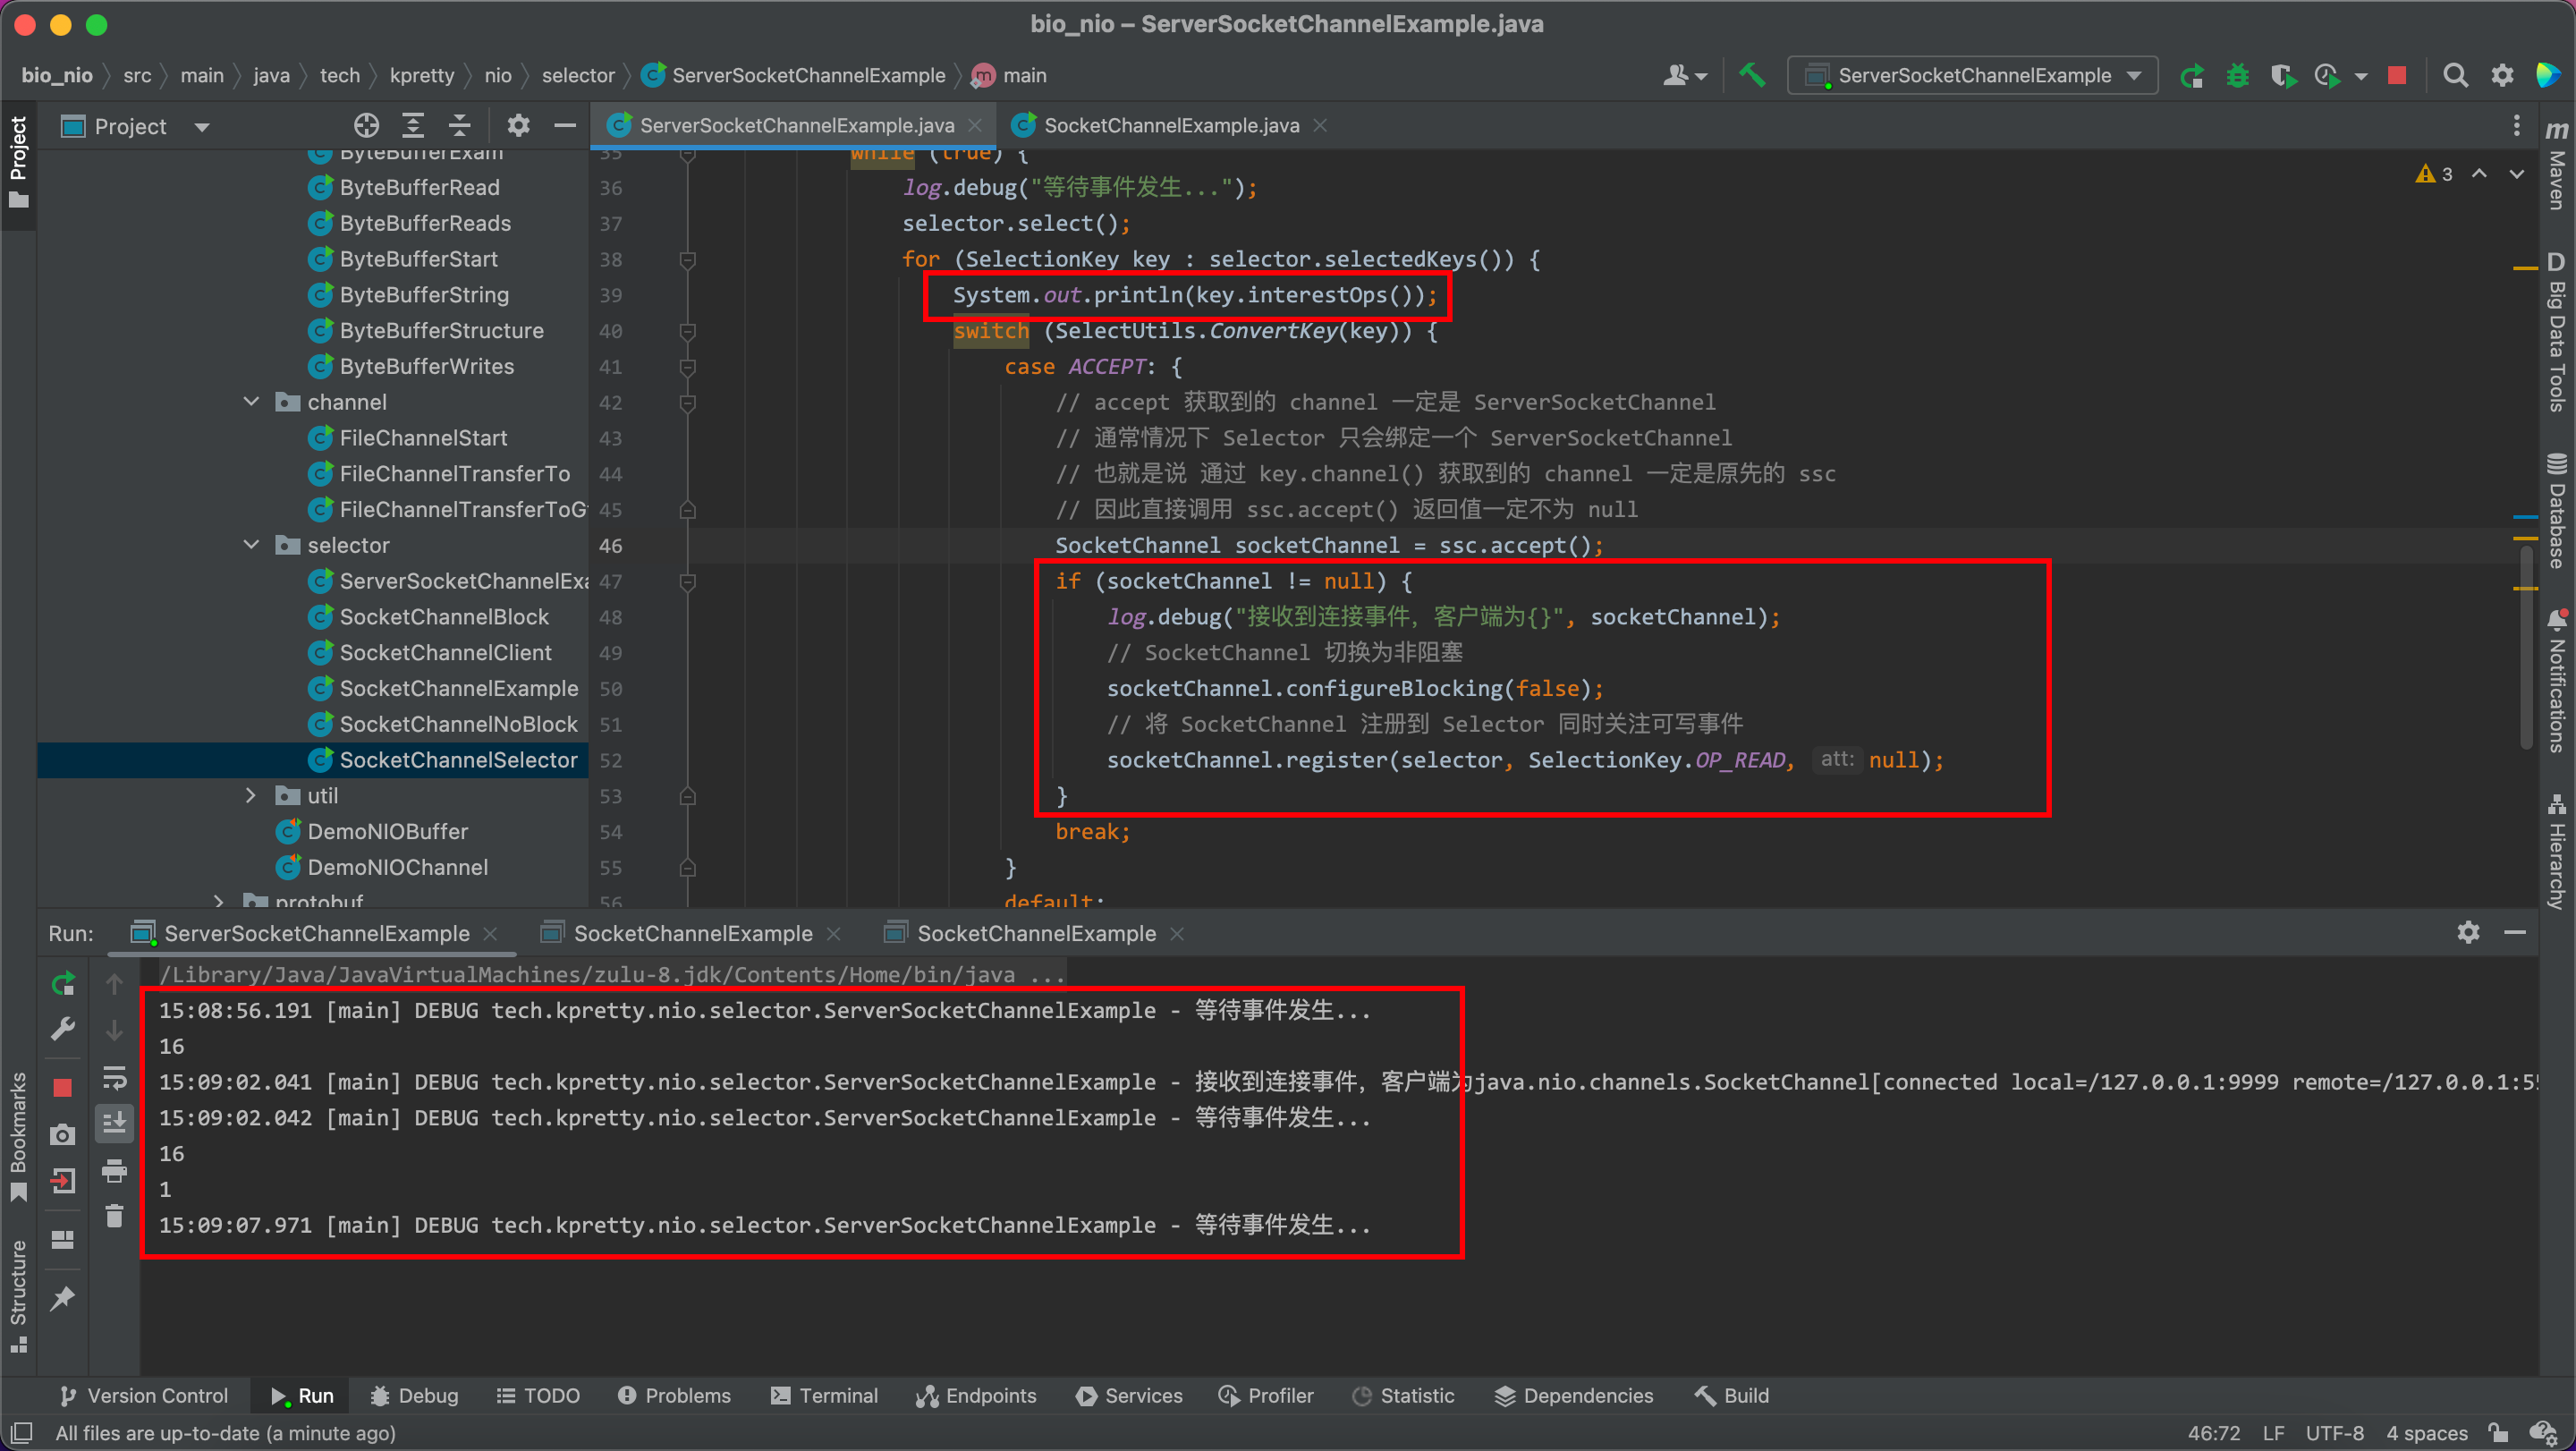
尝试判断一下非空,并打印每次处理的事件集合,发现客户端退出会触发可读事件,但 accept 事件依然在集合中
因此处理方案就是:key 处理完一定一定一定要手动移除集合
但是上面的代码用得是增强 for,如果直接移除一定会报并发修改异常,因此通常做法是使用迭代器遍历,改造代码:
package tech.kpretty.nio.selector;

import lombok.extern.slf4j.Slf4j;
import tech.kpretty.util.SelectUtils;

import java.io.IOException;
import java.net.InetSocketAddress;
import java.nio.ByteBuffer;
import java.nio.channels.SelectionKey;
import java.nio.channels.Selector;
import java.nio.channels.ServerSocketChannel;
import java.nio.channels.SocketChannel;
import java.util.Iterator;


/**
 * @author wjun
 * @date 2022/6/26 10:03
 * @email wjunjobs@outlook.com
 * @describe
 */
@Slf4j
public class ServerSocketChannelExample {
    public static void main(String[] args) {
        try (// 打开 Channel
             ServerSocketChannel ssc = ServerSocketChannel.open();
             // 打开 Selector
             Selector selector = Selector.open()) {
            // 绑定端口
            ssc.bind(new InetSocketAddress("localhost", 9999));
            // 修改 ServerSocketChannel 为非阻塞模式
            ssc.configureBlocking(false);
            // 将 Channel 注册到 Selector 上
            // TODO  对于 ServerSocketChannel 来说只对 accept 感兴趣
            ssc.register(selector, SelectionKey.OP_ACCEPT, null);
            while (true) {
                log.debug("等待事件发生...");
                selector.select();
                Iterator<SelectionKey> iterator = selector.selectedKeys().iterator();
                while (iterator.hasNext()) {
                    SelectionKey key = iterator.next();
                    switch (SelectUtils.ConvertKey(key)) {
                        case ACCEPT: {
                            // accept 获取到的 channel 一定是 ServerSocketChannel
                            // 通常情况下 Selector 只会绑定一个 ServerSocketChannel
                            // 也就是说 通过 key.channel() 获取到的 channel 一定是原先的 ssc
                            // 因此直接调用 ssc.accept() 返回值一定不为 null
                            SocketChannel socketChannel = ssc.accept();
                            log.debug("接收到连接事件,客户端为{}", socketChannel);
                            // SocketChannel 切换为非阻塞
                            socketChannel.configureBlocking(false);
                            // 将 SocketChannel 注册到 Selector 同时关注可写事件
                            socketChannel.register(selector, SelectionKey.OP_READ, null);
                            break;
                        }
                        default:
                            key.cancel();
                    }
                    // 处理完逻辑后从集合移除
                    iterator.remove();
                }
            }
        } catch (IOException e) {
            e.printStackTrace();
        }
    }
}
3.3.2 cancel
再次回到刚才的那个图和代码

我们在 switch 语句 default 中加入了 cancel,现在我们去掉试试,同样停掉客户端

发现服务端发生了死循环;这是因为当发生了我们感兴趣的事件(命中了 register 中的 key),但是我们不做任何处理,Selector 会任务我们可能是当前循环漏掉了,因此会在下一次循环中再次添加到 selectedKeys 中从而导致的死循环,因此当我们整的有特殊的业务场景不处理这个 key,则调用 cancel,此方法会将当前的 key 从 register 中永久移除,即使匹配的事件再次抵达服务端也不会触发。
一般用于客户端绑定的 SocketChannel 中,千万不要对 ServerSocketChannel 绑定的 key 调用 cancel,否则当前服务将不在接收任何客户端连接请求
3.4 处理 read 事件
在 accept 事件处理中,我们注册了当前 SocketChannel 并对可读事件添加了关注,当该客户端向服务器发送数据后,服务端就会收到可读事件,因此可读事件的处理逻辑就是:根据事件获取当时注册的 SocketChannel 直接进行读取,代码如下:
package tech.kpretty.nio.selector;

import lombok.extern.slf4j.Slf4j;
import tech.kpretty.nio.util.ByteBufferUtil;
import tech.kpretty.util.SelectUtils;

import java.io.IOException;
import java.net.InetSocketAddress;
import java.nio.ByteBuffer;
import java.nio.channels.SelectionKey;
import java.nio.channels.Selector;
import java.nio.channels.ServerSocketChannel;
import java.nio.channels.SocketChannel;
import java.util.Iterator;


/**
 * @author wjun
 * @date 2022/6/26 10:03
 * @email wjunjobs@outlook.com
 * @describe
 */
@Slf4j
public class ServerSocketChannelExample {
    public static void main(String[] args) {
        try (// 打开 Channel
             ServerSocketChannel ssc = ServerSocketChannel.open();
             // 打开 Selector
             Selector selector = Selector.open()) {
            // 绑定端口
            ssc.bind(new InetSocketAddress("localhost", 9999));
            // 修改 ServerSocketChannel 为非阻塞模式
            ssc.configureBlocking(false);
            // 将 Channel 注册到 Selector 上
            // TODO  对于 ServerSocketChannel 来说只对 accept 感兴趣
            ssc.register(selector, SelectionKey.OP_ACCEPT, null);
            while (true) {
                log.debug("等待事件发生...");
                selector.select();
                Iterator<SelectionKey> iterator = selector.selectedKeys().iterator();
                while (iterator.hasNext()) {
                    SelectionKey key = iterator.next();
                    switch (SelectUtils.ConvertKey(key)) {
                        case ACCEPT: {
                            // accept 获取到的 channel 一定是 ServerSocketChannel
                            // 通常情况下 Selector 只会绑定一个 ServerSocketChannel
                            // 也就是说 通过 key.channel() 获取到的 channel 一定是原先的 ssc
                            // 因此直接调用 ssc.accept() 返回值一定不为 null
                            SocketChannel socketChannel = ssc.accept();
                            log.debug("接收到连接事件,客户端为{}", socketChannel);
                            // SocketChannel 切换为非阻塞
                            socketChannel.configureBlocking(false);
                            // 将 SocketChannel 注册到 Selector 同时关注可写事件
                            socketChannel.register(selector, SelectionKey.OP_READ, null);
                            break;
                        }
                        case READ: {
                            // 当前场景,可读事件的 channel 一定是 SocketChannel
                            SocketChannel socketChannel = (SocketChannel) key.channel();
                            ByteBuffer buffer = ByteBuffer.allocate(16);
                            socketChannel.read(buffer);
                            buffer.flip();
                            ByteBufferUtil.debugRead(buffer);
                            break;
                        }
                        default:
                            key.cancel();
                    }
                    // 处理完逻辑后从集合移除
                    iterator.remove();
                }
            }
        } catch (IOException e) {
            e.printStackTrace();
        }
    }
}
启动客户端,发送一些数据到服务端

看起来一切正常,但当我们关闭客户端时候

再次发生可读事件的死循环,同时没有任何数据;这个问题原因就是上面所说的客户端关闭会自动触发一次可读事件,我们可以打印一下服务端读取到的数据量,寻求一下解决方法
int size = socketChannel.read(buffer);
log.debug("读取到的数据量 {}", size);
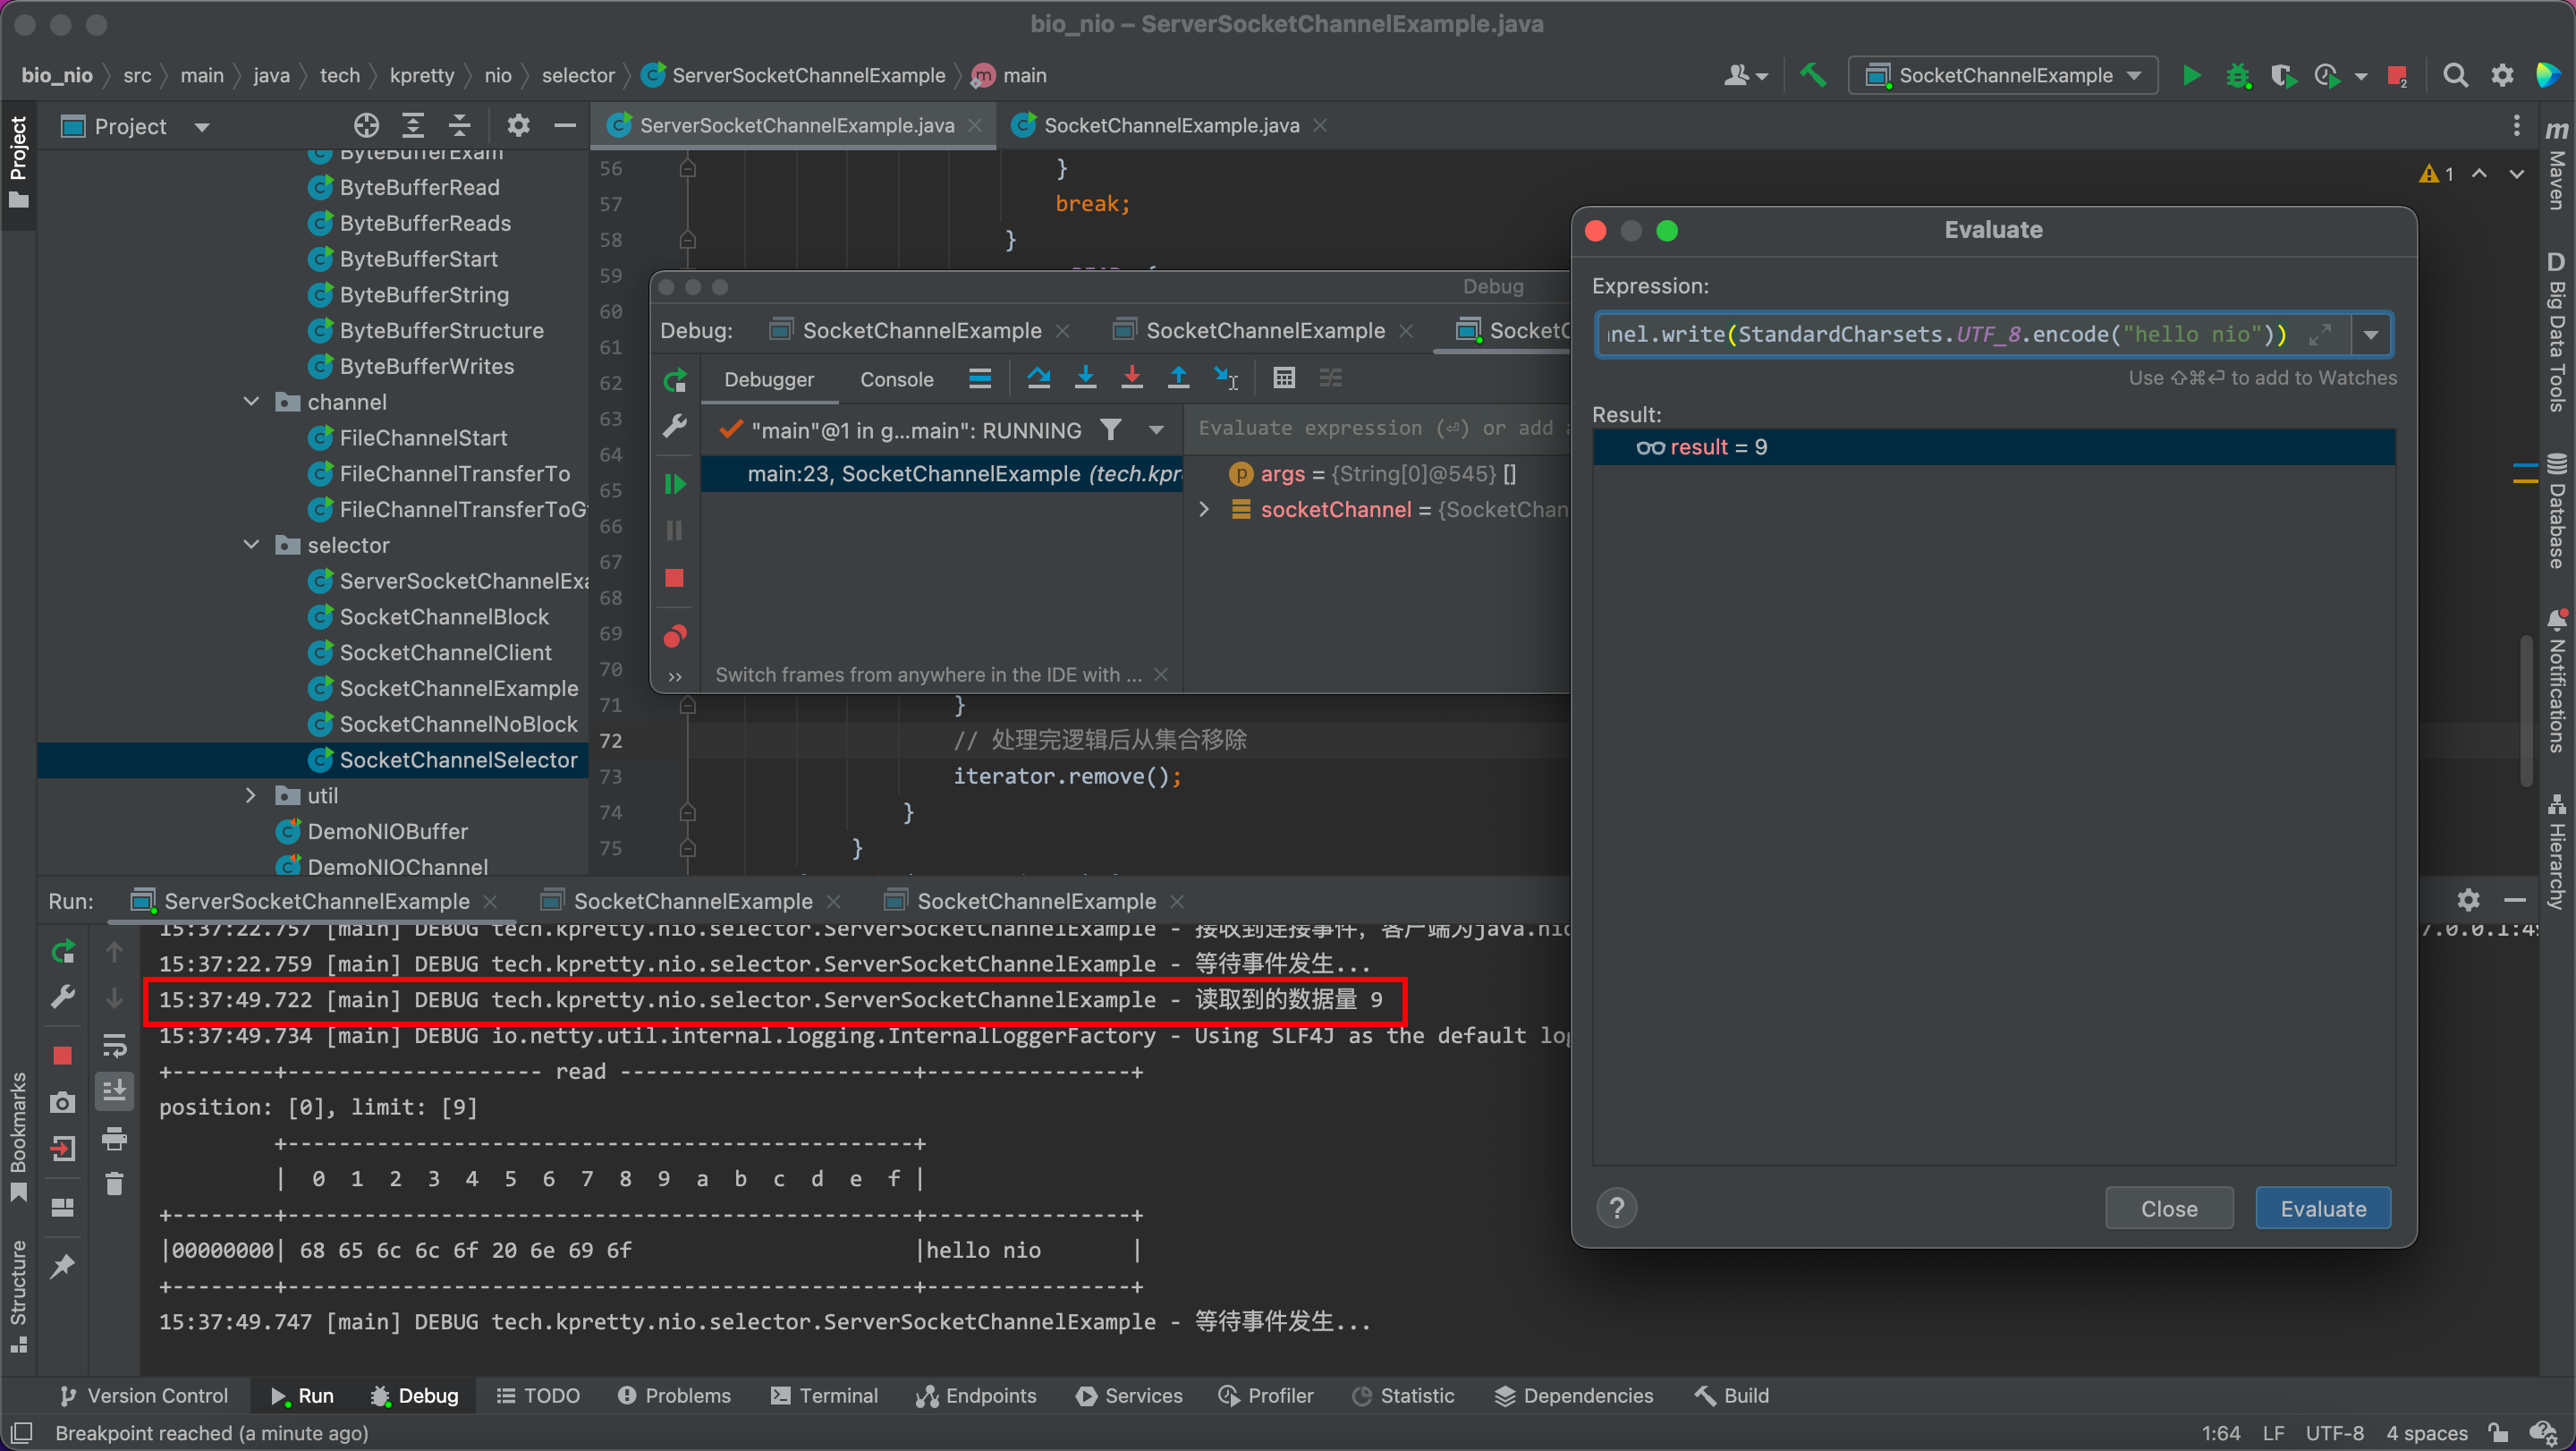
正常发送数据,服务端日志
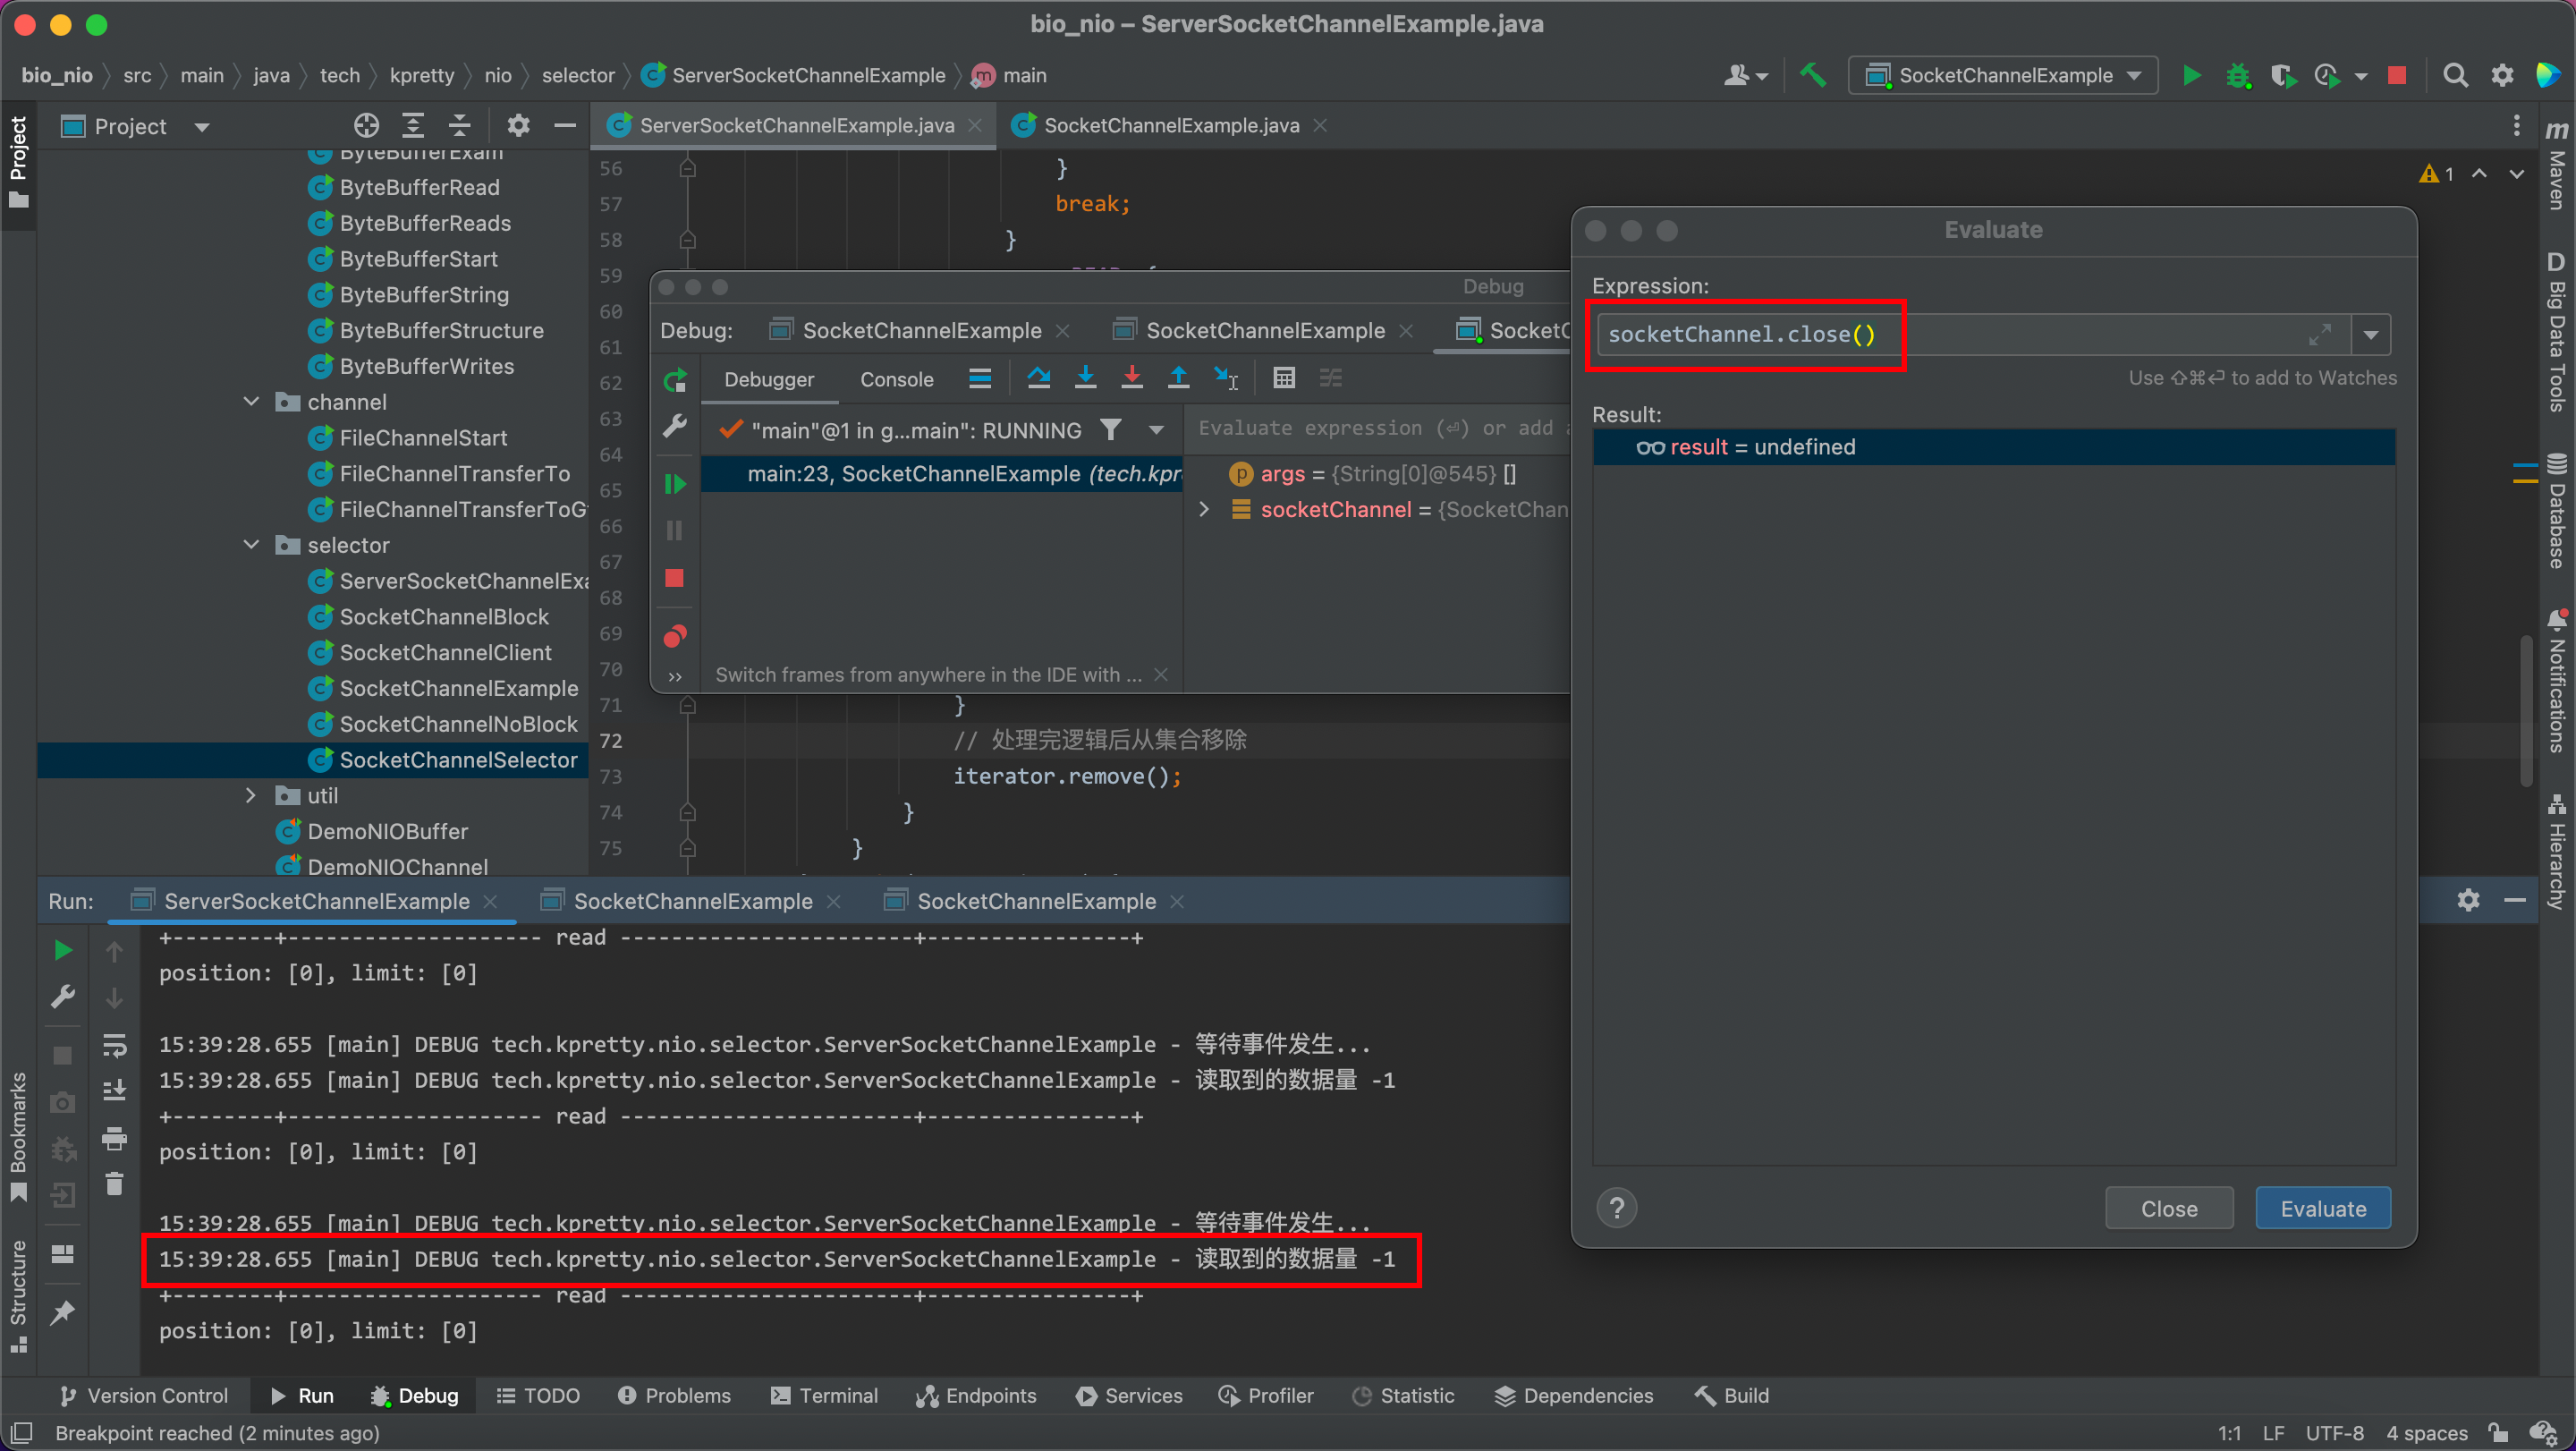
正常关闭,服务端日志
异常关闭,服务端日志(debug模式直接终止)
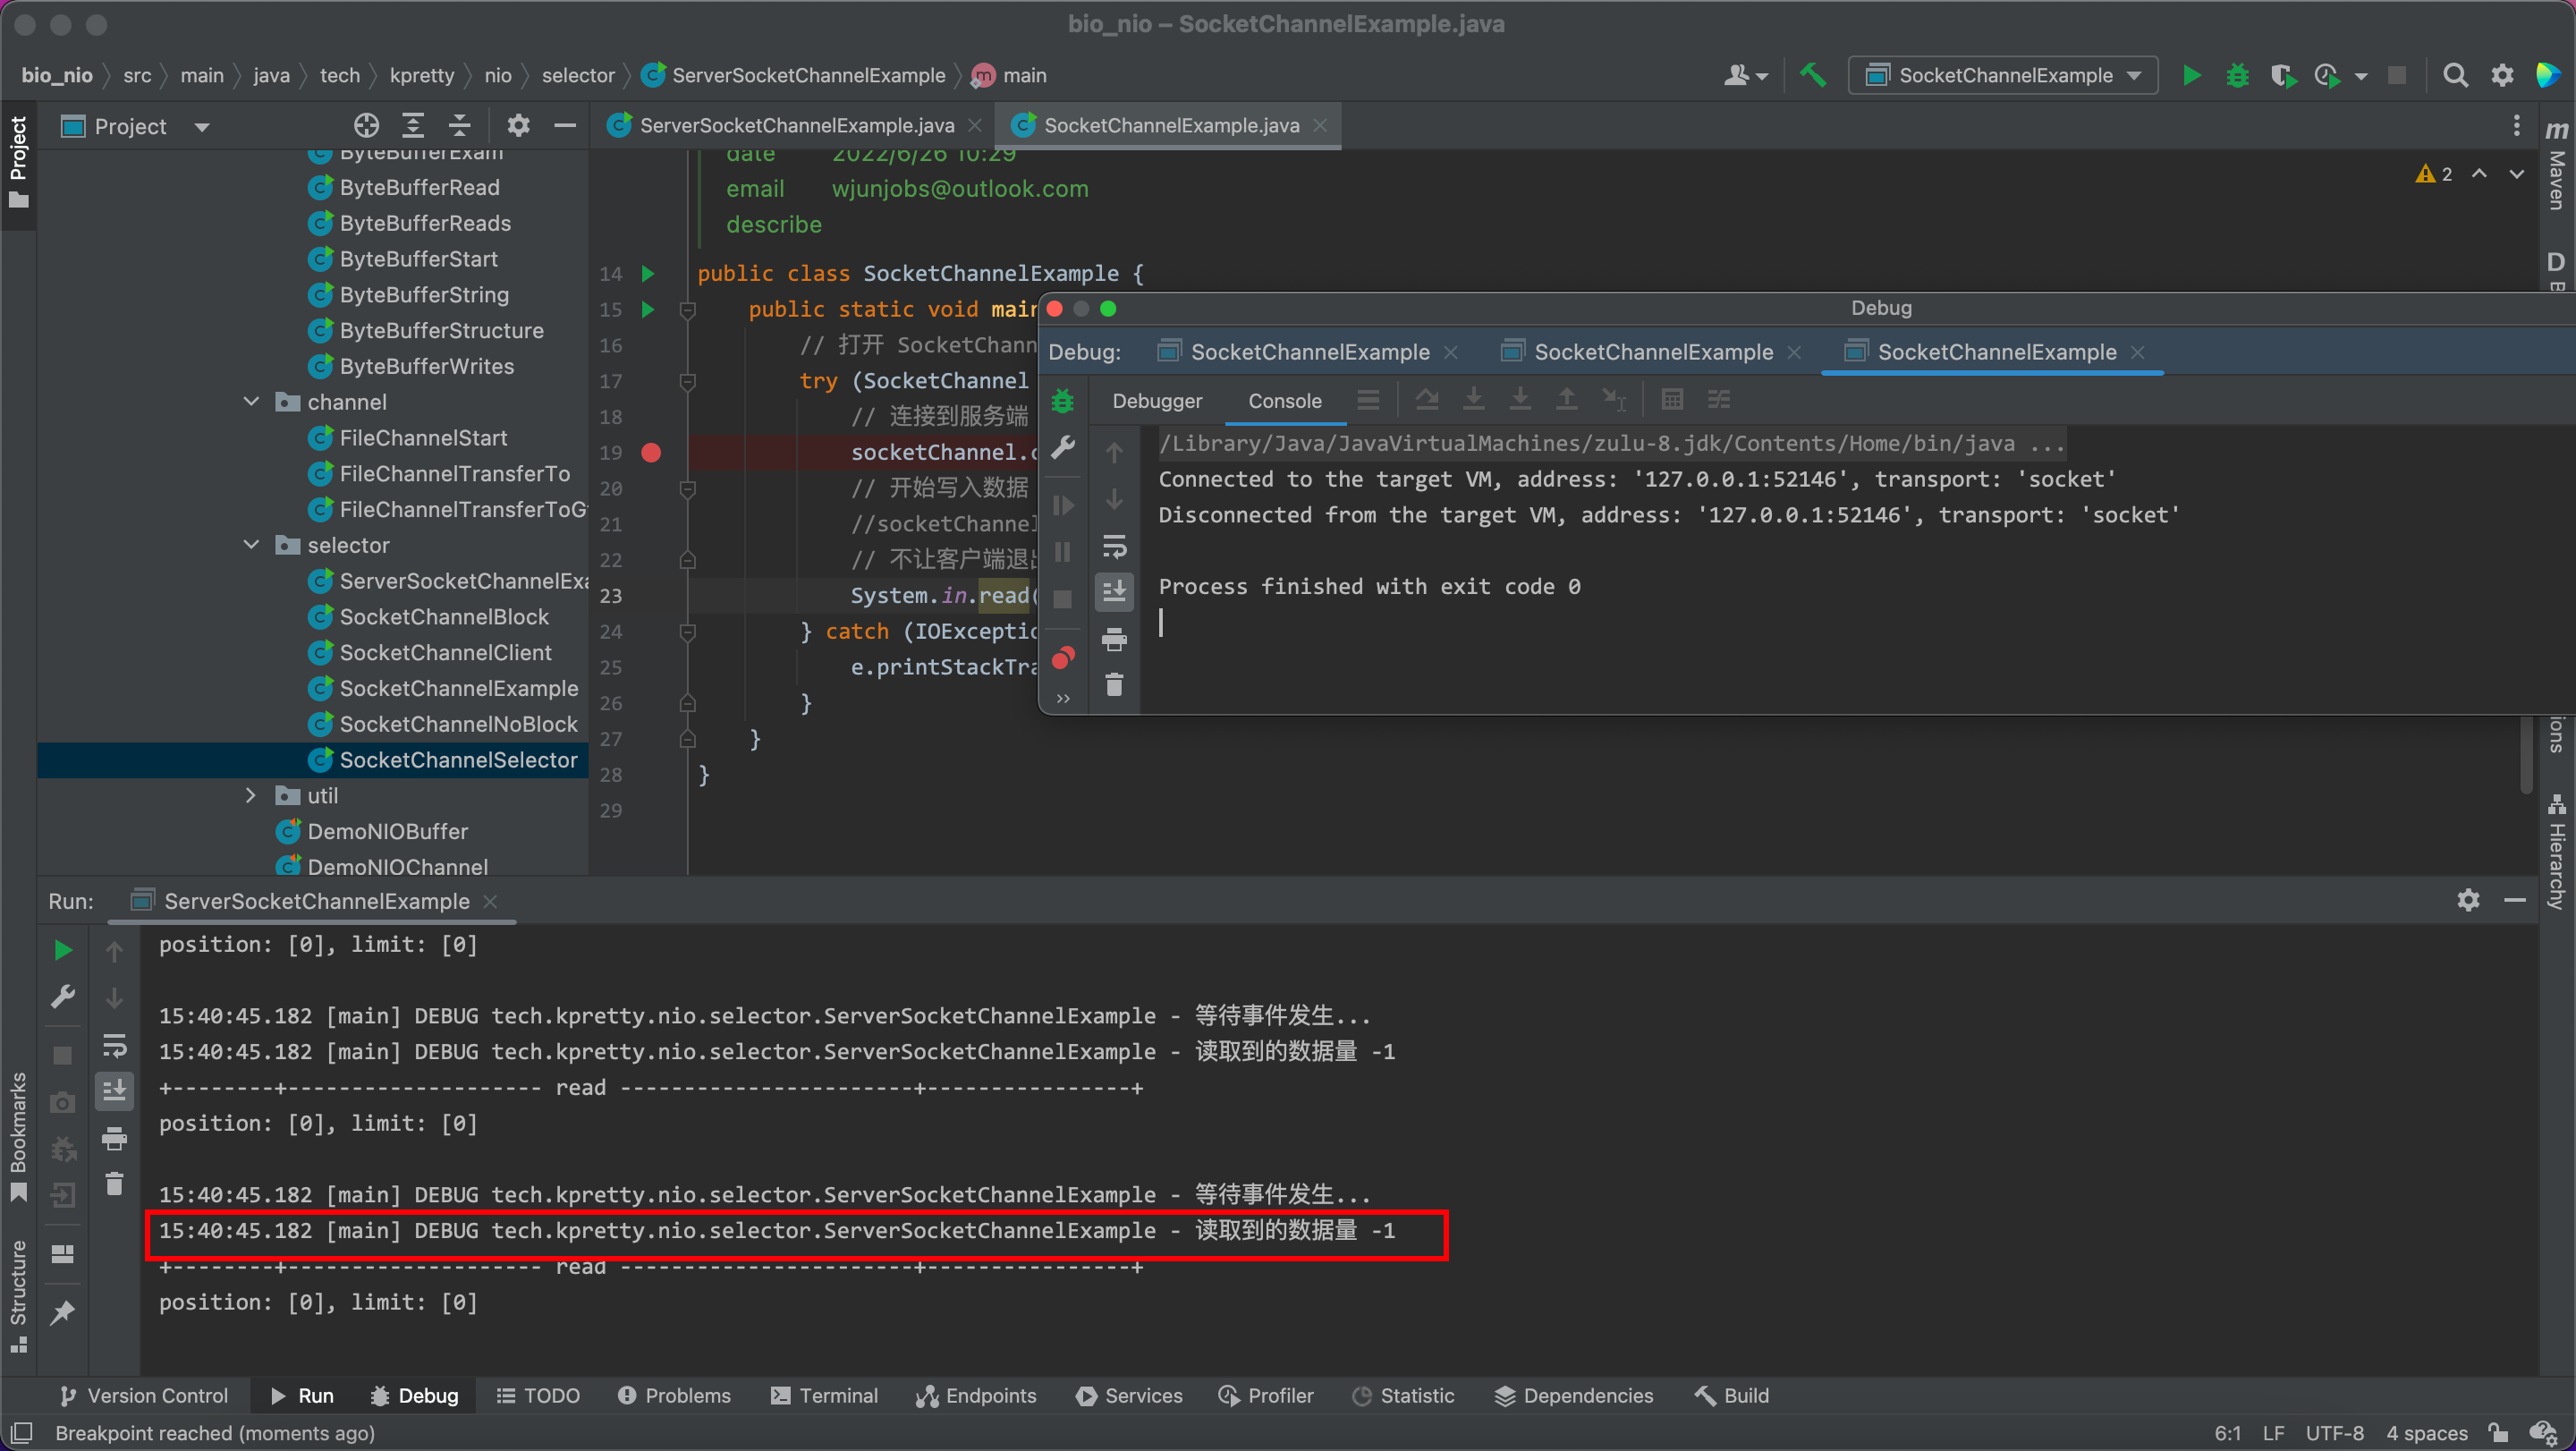
发现客户端关闭(不管正不正常关闭),服务端都会接收到一个看起来不太正常的读请求
解决方案:判断 size 长度,如果是 -1,调用 cancel,表示客户端关闭,且永远不会有数据发送
注:即使客户端再次连接对于服务端来说也是一个新的 SocketChannel,也就是会有一个全新的可读事件key
局部代码如下:
// 当前场景,可读事件的 channel 一定是 SocketChannel
SocketChannel socketChannel = (SocketChannel) key.channel();
ByteBuffer buffer = ByteBuffer.allocate(16);
int size = socketChannel.read(buffer);
if (size == -1) {
  key.cancel();
} else {
  log.debug("读取到的数据量 {}", size);
  buffer.flip();
  ByteBufferUtil.debugRead(buffer);
}
break;
3.4.1 处理粘包和半包
在 buffer 我们演示过粘包和半包的解决方案,将代码集成进来
private static void split(ByteBuffer buffer) {
  // 切换为读模式
  buffer.flip();
  for (int i = 0; i < buffer.limit(); i++) {
    if (buffer.get(i) == '\n') {
      // 获取一条消息的长度
      int length = i - buffer.position();
      // 创建一个消息长度一样的buffer
      ByteBuffer tmp = ByteBuffer.allocate(length);
      for (int j = 0; j < length; j++) {
        tmp.put(buffer.get());
      }
      ByteBufferUtil.debugAll(tmp);
      // 跳过分割符
      buffer.position(buffer.position() + 1);
    }
  }
  // 将没有读完的交给下次读
  buffer.compact();
}

// 修改可读事件逻辑
if (size == -1) {
  key.cancel();
} else {
  split(buffer);
}
客户端发送带有粘包和半包的消息进行测试
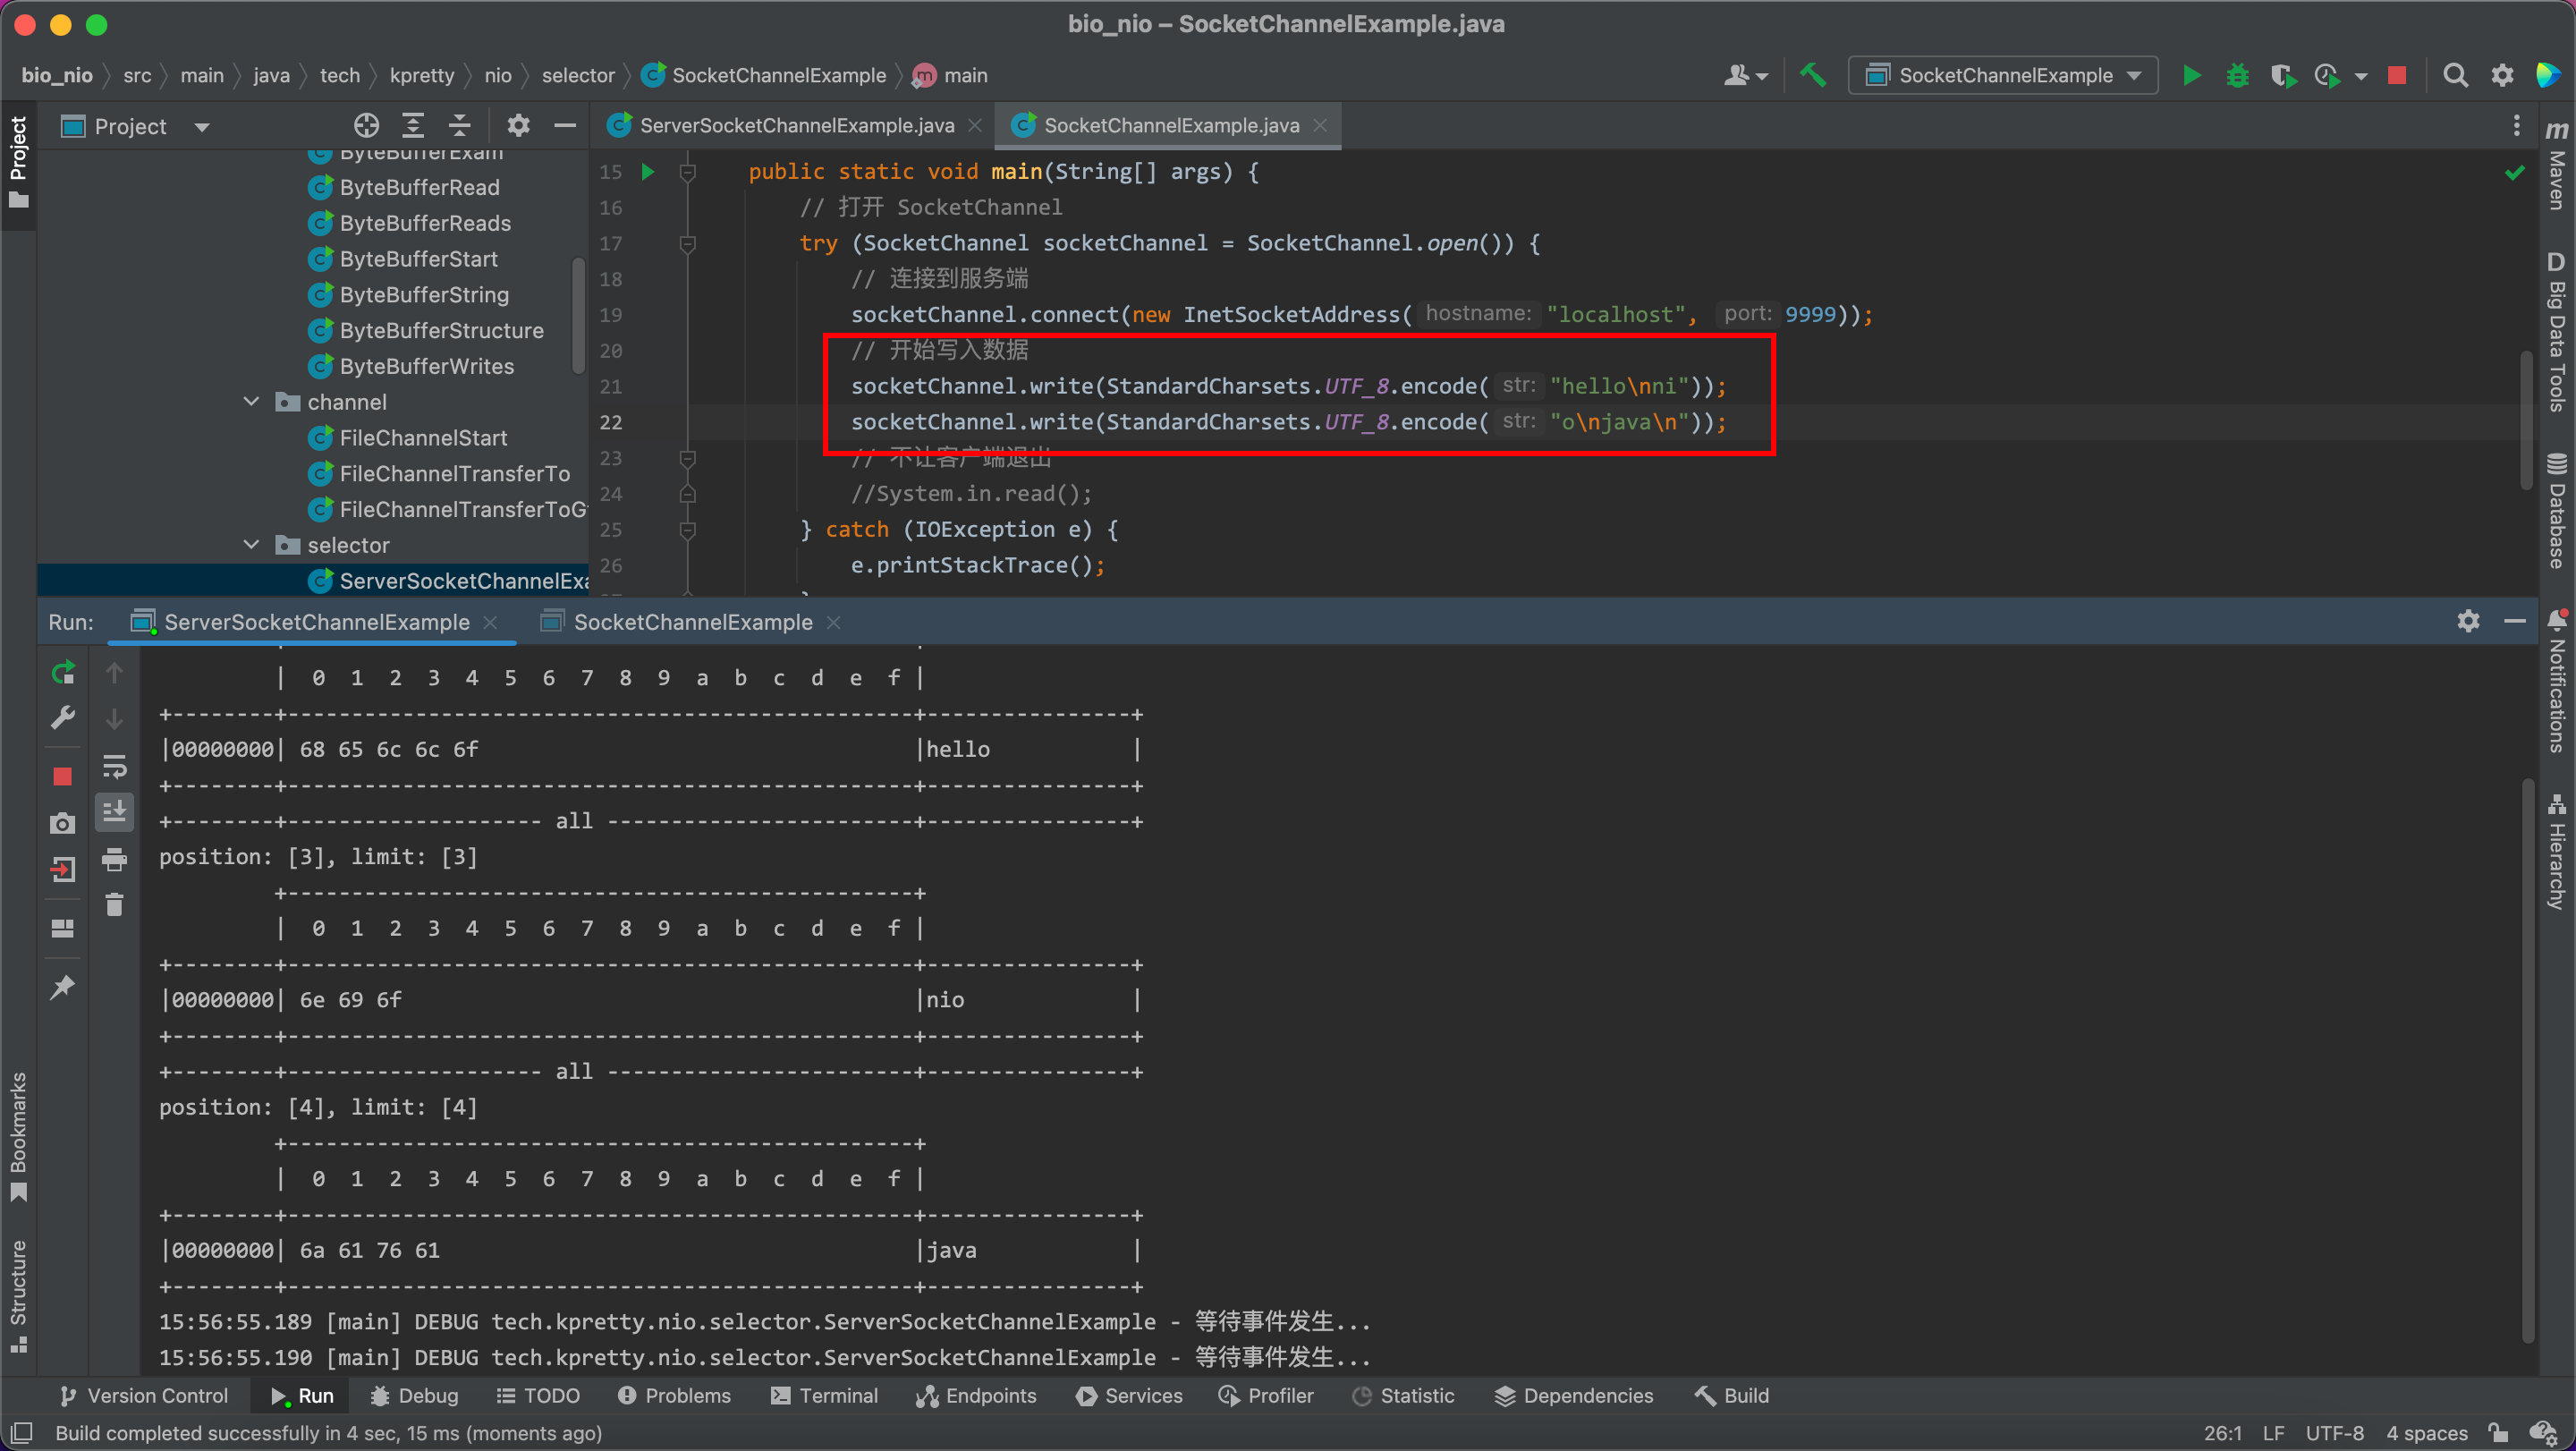
服务端可以正常处理
3.4.2 消息边界&attachment
可读事件处理逻辑依然存在一个问题:假如消息的长度超过了缓冲区大小会发生什么情况,例如客户端发送超过服务端缓冲区大小的消息会发生什么
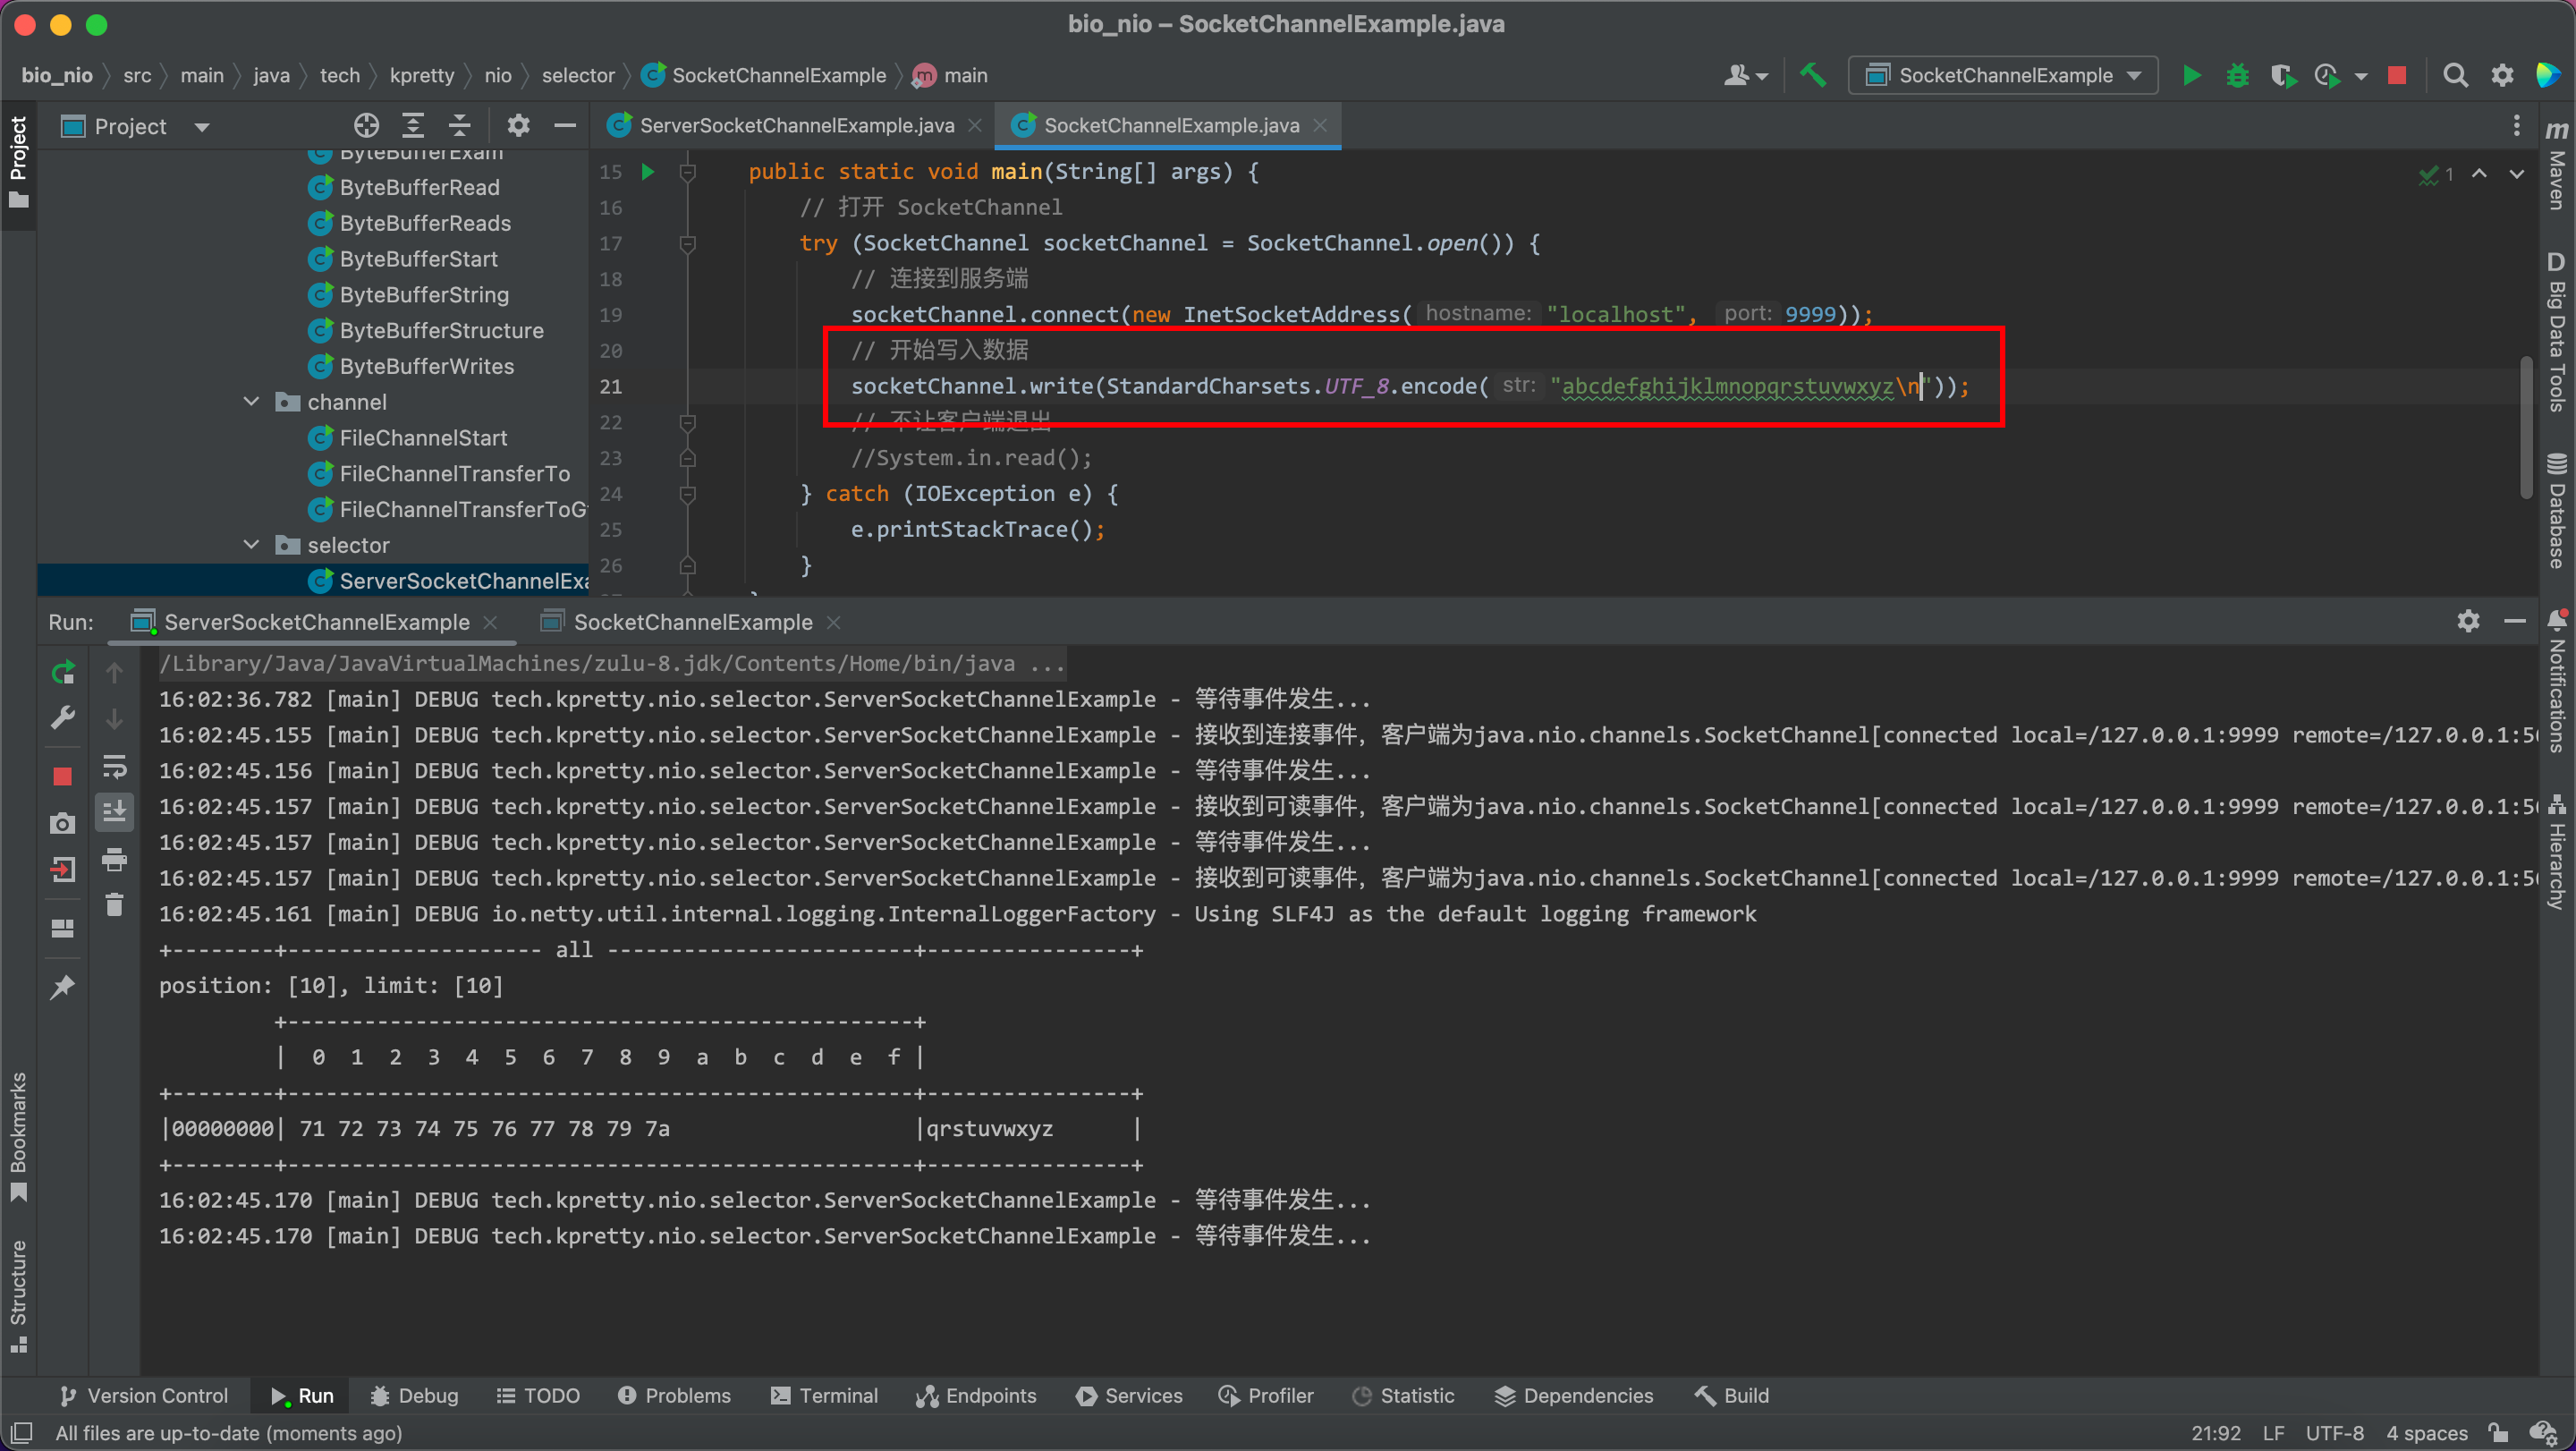
结果是消息丢失了,因为当服务端缓冲区一次性读不完时,Selector 会分成多次可读事件,本次案例缓冲区大小为 16,因此第一次读取 16 个字节,第二次读取 10 个字节,但是因为缓冲区 buffer 是局部变量因此第一次的 16 个字节数据就丢失了。
解决方案:缓冲区动态分配
这类消息边界解决方案有很多,比如:固定消息大小、按分隔符拆分、HTTP 协议的 TLV、LTV。有兴趣可以看看 Netty 是如何处理消息边界问题、Kafka 是如何处理消息边界问题的源码,这里只是给一个简单的处理方式,因为 Selector 还有一个知识点没有说到:attachment 附件
思路如下:这里最重要的问题是 buffer 为局部变量,因此我们需要提高它的作用于,当容量不够的时候进行扩容替换。但是又不能作为全局变量来使用,因此会有很多客户端一个超大 buffer 会造成数据混乱。所以比较好的方式就是用一个 Map,把事件对象作为 key 即可;碰巧的是 java 已经给我们实现好了,那就是 attachment,在我们注册时就可以传一个 Object 对象绑定到事件中,在处理当前事件时可以通过 attachment() 方法来获取到,基于这个特性来实现消息边界问题,代码如下:
package tech.kpretty.nio.selector;

import lombok.extern.slf4j.Slf4j;
import tech.kpretty.nio.util.ByteBufferUtil;
import tech.kpretty.util.SelectUtils;

import java.io.IOException;
import java.net.InetSocketAddress;
import java.nio.ByteBuffer;
import java.nio.channels.SelectionKey;
import java.nio.channels.Selector;
import java.nio.channels.ServerSocketChannel;
import java.nio.channels.SocketChannel;
import java.util.Iterator;


/**
 * @author wjun
 * @date 2022/6/26 10:03
 * @email wjunjobs@outlook.com
 * @describe
 */
@Slf4j
public class ServerSocketChannelExample {

    private static void split(ByteBuffer buffer) {
        // 切换为读模式
        buffer.flip();
        for (int i = 0; i < buffer.limit(); i++) {
            if (buffer.get(i) == '\n') {
                // 获取一条消息的长度
                int length = i - buffer.position();
                // 创建一个消息长度一样的buffer
                ByteBuffer tmp = ByteBuffer.allocate(length);
                for (int j = 0; j < length; j++) {
                    tmp.put(buffer.get());
                }
                ByteBufferUtil.debugAll(tmp);
                // 跳过分割符
                buffer.position(buffer.position() + 1);
            }
        }
        // 将没有读完的交给下次读
        buffer.compact();
    }

    public static void main(String[] args) {
        try (// 打开 Channel
             ServerSocketChannel ssc = ServerSocketChannel.open();
             // 打开 Selector
             Selector selector = Selector.open()) {
            // 绑定端口
            ssc.bind(new InetSocketAddress("localhost", 9999));
            // 修改 ServerSocketChannel 为非阻塞模式
            ssc.configureBlocking(false);
            // 将 Channel 注册到 Selector 上
            // TODO  对于 ServerSocketChannel 来说只对 accept 感兴趣
            ssc.register(selector, SelectionKey.OP_ACCEPT, null);
            while (true) {
                log.debug("等待事件发生...");
                selector.select();
                Iterator<SelectionKey> iterator = selector.selectedKeys().iterator();
                while (iterator.hasNext()) {
                    SelectionKey key = iterator.next();
                    switch (SelectUtils.ConvertKey(key)) {
                        case ACCEPT: {
                            // accept 获取到的 channel 一定是 ServerSocketChannel
                            // 通常情况下 Selector 只会绑定一个 ServerSocketChannel
                            // 也就是说 通过 key.channel() 获取到的 channel 一定是原先的 ssc
                            // 因此直接调用 ssc.accept() 返回值一定不为 null
                            SocketChannel socketChannel = ssc.accept();
                            log.debug("接收到连接事件,客户端为{}", socketChannel);
                            // SocketChannel 切换为非阻塞
                            socketChannel.configureBlocking(false);
                            // 将 SocketChannel 注册到 Selector 同时关注可写事件,并给一个16字节大小的buffer作为附件
                            socketChannel.register(selector, SelectionKey.OP_READ, ByteBuffer.allocate(16));

                            break;
                        }
                        case READ: {
                            // 当前场景,可读事件的 channel 一定是 SocketChannel
                            SocketChannel socketChannel = (SocketChannel) key.channel();
                            // 获取 attachment
                            ByteBuffer buffer = (ByteBuffer) key.attachment();
                            int size = socketChannel.read(buffer);
                            if (size == -1) {
                                key.cancel();
                            } else {
                                log.debug("接收到可读事件,客户端为{}", socketChannel);
                                split(buffer);
                                // 判断 buffer 是否满了
                                if (buffer.position() == buffer.limit()) {
                                    // 进行扩容
                                    ByteBuffer newBuffer = ByteBuffer.allocate(buffer.capacity() * 2);
                                    // 将 旧的buffer 数据拷贝到 新的buffer
                                    buffer.flip();// 切换到读模式,防止拷贝不全
                                    newBuffer.put(buffer);
                                    // 替换附件
                                    key.attach(newBuffer);
                                }
                            }
                            break;
                        }
                        default:
                            key.cancel();
                    }
                    // 处理完逻辑后从集合移除
                    iterator.remove();
                }
            }
        } catch (IOException e) {
            e.printStackTrace();
        }
    }
}
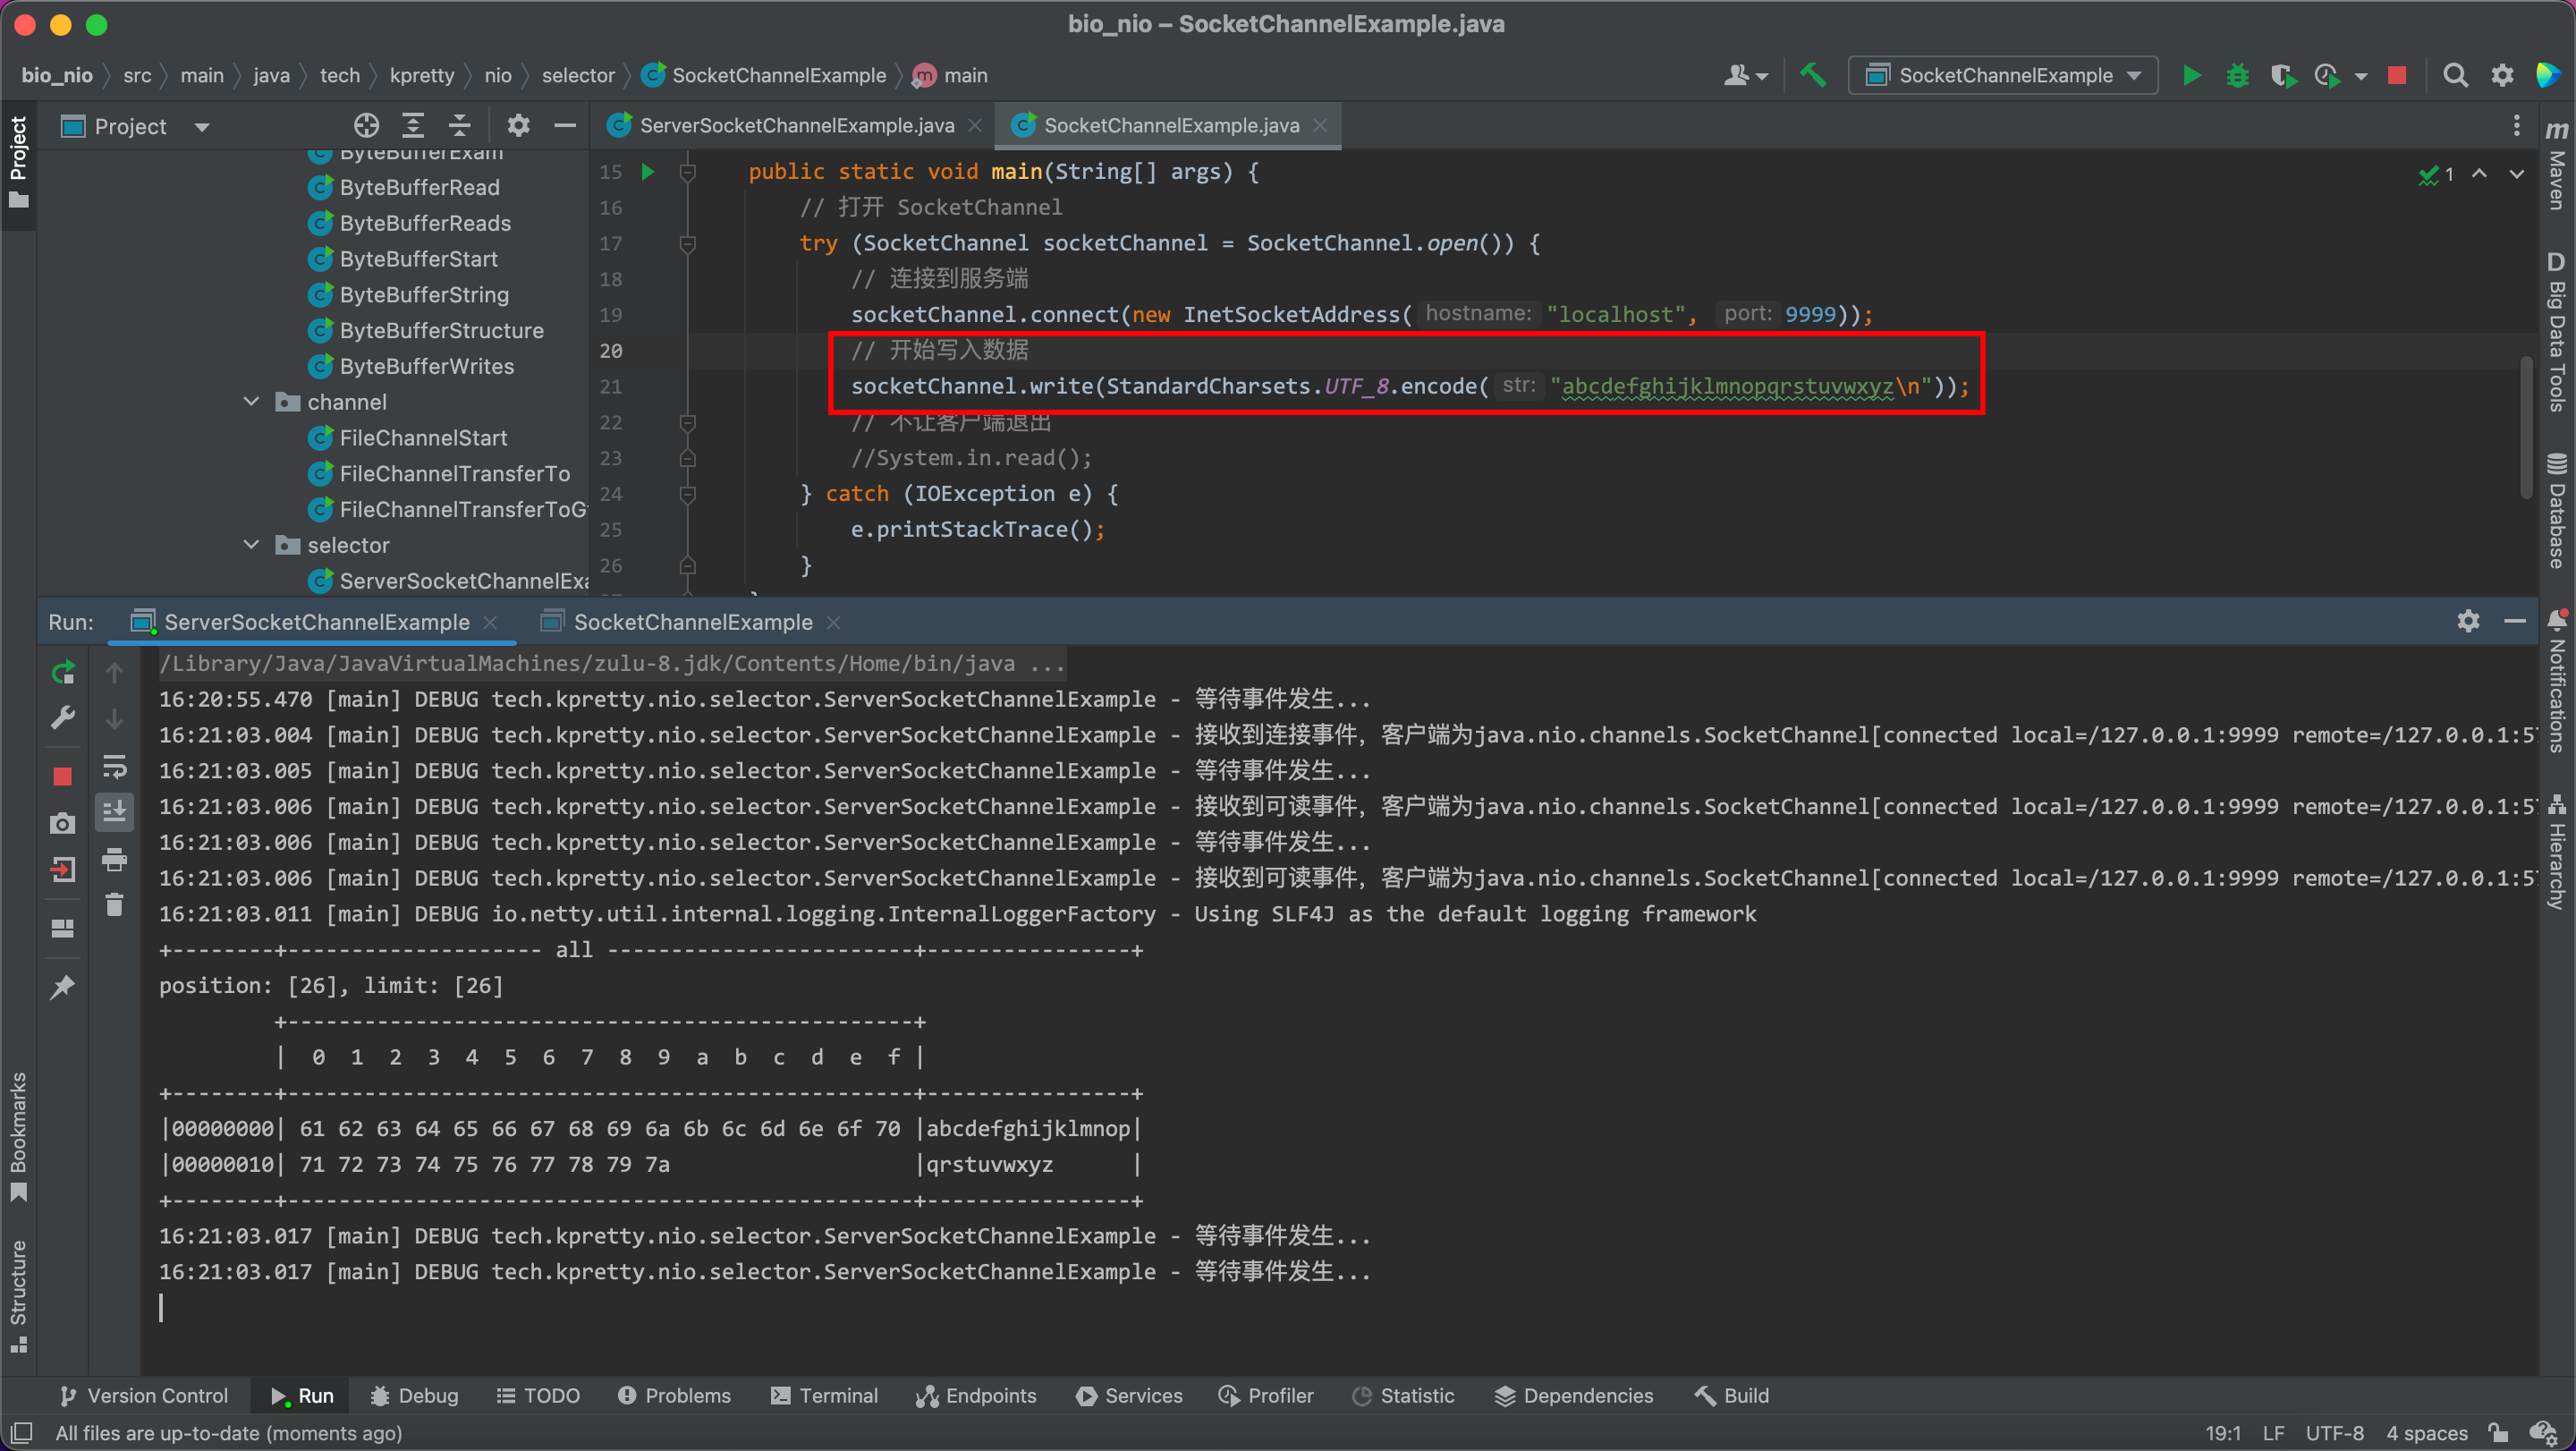
结果如下:
3.5 处理 write 事件
write 处要体现在服务端给客户端发送消息,但是受限于服务端 socket 字节数限制(内核级别不好控制),导致一次性发不过去的问题,例如:当客户端建立连接后服务端会给客户端发送一个超长的数据,在 accept 事件处理逻辑中加入
// TODO  服务端开始恶心客户端
StringBuilder message = new StringBuilder();
for (int i = 0; i < 10000000; i++) {
  message.append("1");
}
socketChannel.write(StandardCharsets.UTF_8.encode(message.toString()));
break;
客户端处理服务端的消息
package tech.kpretty.nio.selector;

import java.io.IOException;
import java.net.InetSocketAddress;
import java.nio.ByteBuffer;
import java.nio.channels.SocketChannel;
import java.nio.charset.StandardCharsets;

/**
 * @author wjun
 * @date 2022/6/26 10:29
 * @email wjunjobs@outlook.com
 * @describe
 */
public class SocketChannelExample {
    public static void main(String[] args) {
        // 打开 SocketChannel
        try (SocketChannel socketChannel = SocketChannel.open()) {
            // 连接到服务端
            socketChannel.connect(new InetSocketAddress("localhost", 9999));
            // 开始写入数据
            //socketChannel.write(StandardCharsets.UTF_8.encode("abcdefghijklmnopqrstuvwxyz\n"));
            // 客户端接收服务端消息
            ByteBuffer buffer = ByteBuffer.allocate(1024 * 1024);
            int size;
            while ((size = socketChannel.read(buffer)) > 0) {
                System.out.println(size);
            }
            // 不让客户端退出
            //System.in.read();
        } catch (IOException e) {
            e.printStackTrace();
        }
    }
}
最终发现,客户端只接受一部分数据
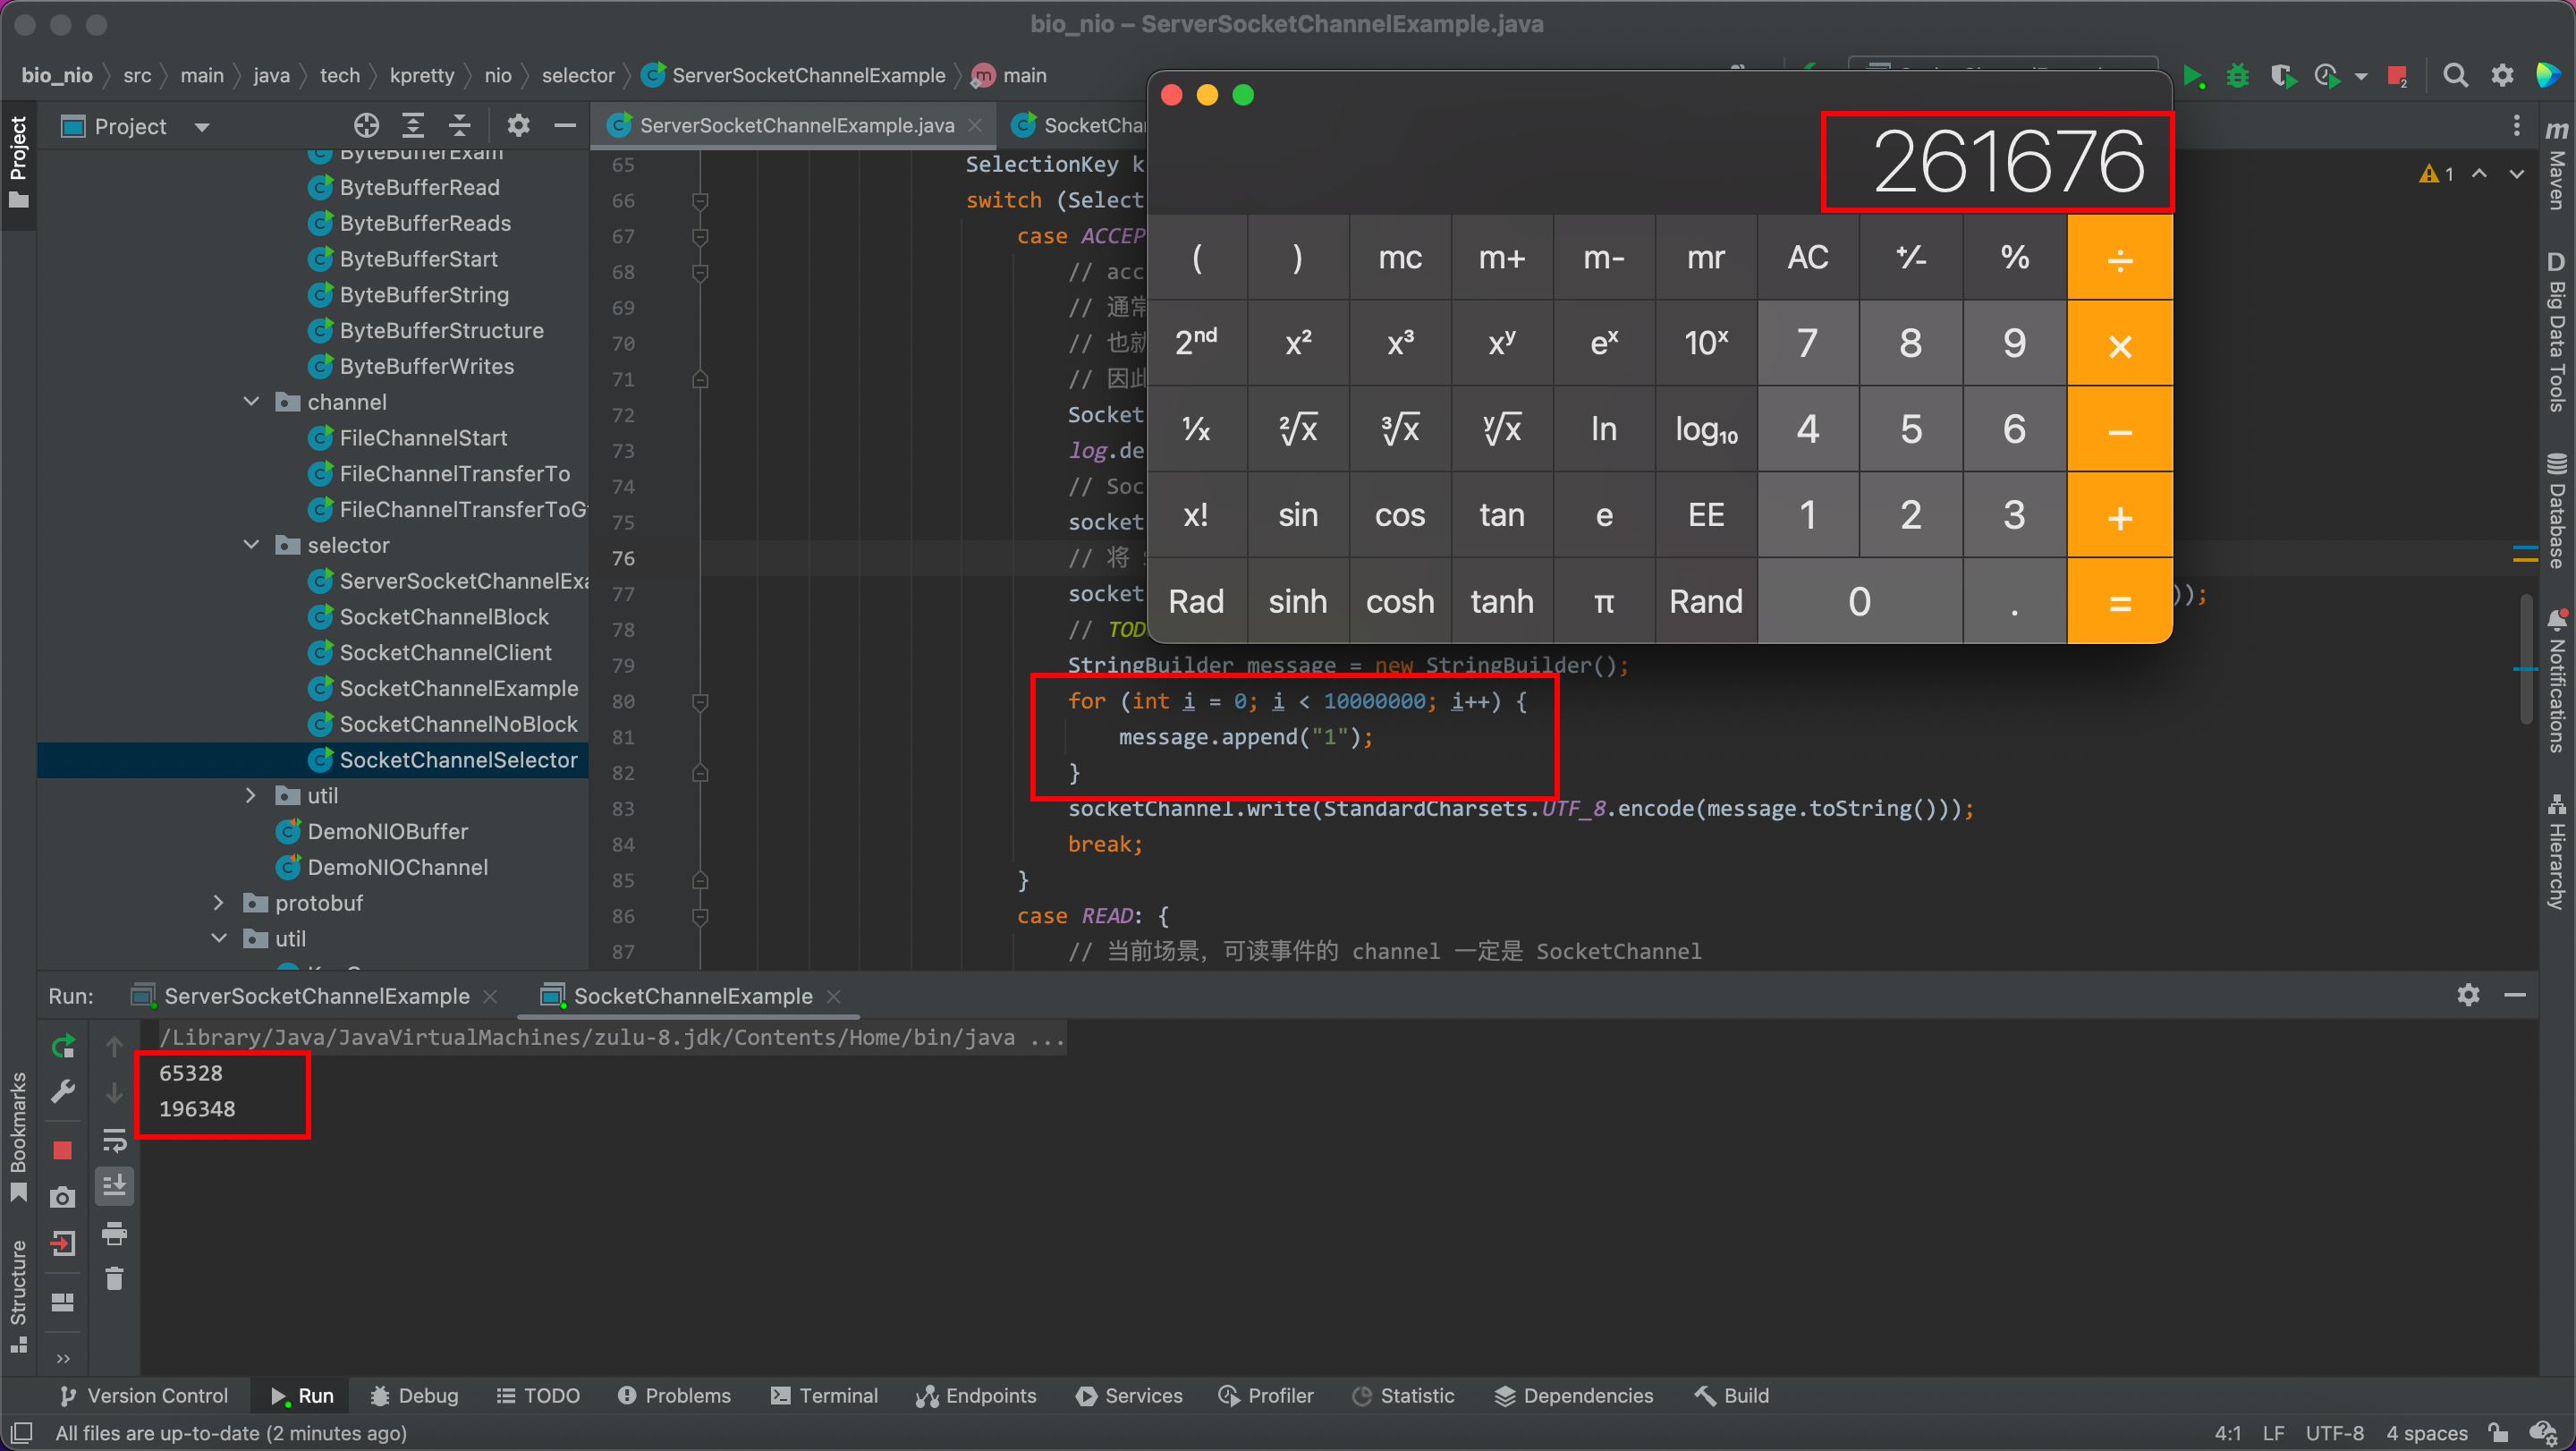
解决方案就是注册一个可写事件,当我们一次没有写完服务端会自动触发可写事件,我们在可写事件的逻辑中再尝试写出去,若还有剩余在继续触发,直到全部写完我们取消可写事件即可。
这里有个技巧,当我们需要关注多个事件时,不能多次调用 key.interestOps(),这样会覆盖之前的,但是 Selector 的事件机制和 Linux 权限一样通过十进制数字加减的方式进行赋值,例如:777(rwxrwxrwx)、755(rwxrw-rw-),因此当一个 Channel 同时关注可读可写事件可以使用
// 绑定时
SelectionKey.OP_READ + SelectionKey.OP_WRITE
// 增加事件
key.interestOps(key.interestOps() + SelectionKey.OP_WRITE);
// 减少事件
key.interestOps(key.interestOps() - SelectionKey.OP_WRITE);
修改代码逻辑:
- 在 accept 中尝试写入一次
- 如果写完结束,如果没写完注册可写事件,并将buffer作为附件
- 在可写事件中再次尝试写入,若写完取消可写事件并取消附件,否则会第二步
代码实现如下:
package tech.kpretty.nio.selector;

import lombok.extern.slf4j.Slf4j;
import tech.kpretty.nio.util.ByteBufferUtil;
import tech.kpretty.util.SelectUtils;

import java.io.IOException;
import java.net.InetSocketAddress;
import java.nio.ByteBuffer;
import java.nio.channels.SelectionKey;
import java.nio.channels.Selector;
import java.nio.channels.ServerSocketChannel;
import java.nio.channels.SocketChannel;
import java.nio.charset.StandardCharsets;
import java.util.Iterator;


/**
 * @author wjun
 * @date 2022/6/26 10:03
 * @email wjunjobs@outlook.com
 * @describe
 */
@Slf4j
public class ServerSocketChannelExample {

    private static void split(ByteBuffer buffer) {
        // 切换为读模式
        buffer.flip();
        for (int i = 0; i < buffer.limit(); i++) {
            if (buffer.get(i) == '\n') {
                // 获取一条消息的长度
                int length = i - buffer.position();
                // 创建一个消息长度一样的buffer
                ByteBuffer tmp = ByteBuffer.allocate(length);
                for (int j = 0; j < length; j++) {
                    tmp.put(buffer.get());
                }
                ByteBufferUtil.debugAll(tmp);
                // 跳过分割符
                buffer.position(buffer.position() + 1);
            }
        }
        // 将没有读完的交给下次读
        buffer.compact();
    }

    public static void main(String[] args) {
        try (// 打开 Channel
             ServerSocketChannel ssc = ServerSocketChannel.open();
             // 打开 Selector
             Selector selector = Selector.open()) {
            // 绑定端口
            ssc.bind(new InetSocketAddress("localhost", 9999));
            // 修改 ServerSocketChannel 为非阻塞模式
            ssc.configureBlocking(false);
            // 将 Channel 注册到 Selector 上
            // TODO  对于 ServerSocketChannel 来说只对 accept 感兴趣
            ssc.register(selector, SelectionKey.OP_ACCEPT, null);
            while (true) {
                log.debug("等待事件发生...");
                selector.select();
                Iterator<SelectionKey> iterator = selector.selectedKeys().iterator();
                while (iterator.hasNext()) {
                    SelectionKey key = iterator.next();
                    switch (SelectUtils.ConvertKey(key)) {
                        case ACCEPT: {
                            // accept 获取到的 channel 一定是 ServerSocketChannel
                            // 通常情况下 Selector 只会绑定一个 ServerSocketChannel
                            // 也就是说 通过 key.channel() 获取到的 channel 一定是原先的 ssc
                            // 因此直接调用 ssc.accept() 返回值一定不为 null
                            SocketChannel socketChannel = ssc.accept();
                            log.debug("接收到连接事件,客户端为{}", socketChannel);
                            // SocketChannel 切换为非阻塞
                            socketChannel.configureBlocking(false);
                            // 将 SocketChannel 注册到 Selector 同时关注可写事件,并给一个16字节大小的buffer作为附件
                            SelectionKey readKey = socketChannel.register(selector, SelectionKey.OP_READ, ByteBuffer.allocate(16));
                            // TODO  服务端开始恶心客户端
                            StringBuilder message = new StringBuilder();
                            for (int i = 0; i < 10000000; i++) {
                                message.append("1");
                            }
                            ByteBuffer buffer = StandardCharsets.UTF_8.encode(message.toString());
                            socketChannel.write(buffer);
                            // 判断是否写完
                            if (buffer.hasRemaining()) {
                                readKey.interestOps(readKey.interestOps() + SelectionKey.OP_WRITE);
                                readKey.attach(buffer);
                            }
                            break;
                        }
                        case READ: {
                            // 当前场景,可读事件的 channel 一定是 SocketChannel
                            SocketChannel socketChannel = (SocketChannel) key.channel();
                            // 获取 attachment
                            ByteBuffer buffer = (ByteBuffer) key.attachment();
                            int size = socketChannel.read(buffer);
                            if (size == -1) {
                                key.cancel();
                            } else {
                                log.debug("接收到可读事件,客户端为{}", socketChannel);
                                split(buffer);
                                // 判断 buffer 是否满了
                                if (buffer.position() == buffer.limit()) {
                                    // 进行扩容
                                    ByteBuffer newBuffer = ByteBuffer.allocate(buffer.capacity() * 2);
                                    // 将 旧的buffer 数据拷贝到 新的buffer
                                    buffer.flip();// 切换到读模式,防止拷贝不全
                                    newBuffer.put(buffer);
                                    // 替换附件
                                    key.attach(newBuffer);
                                }
                            }
                            break;
                        }
                        case WRITE: {
                            // 当前场景,可写事件的 channel 一定是 SocketChannel
                            SocketChannel socketChannel = (SocketChannel) key.channel();
                            // 获取 attachment
                            ByteBuffer buffer = (ByteBuffer) key.attachment();
                            // 尝试在写一次
                            socketChannel.write(buffer);
                            // 如果写完,取消附件和可写事件的关注
                            if (!buffer.hasRemaining()) {
                                key.interestOps(key.interestOps() - SelectionKey.OP_WRITE);
                                key.attach(null);
                            }
                        }
                        default:
                            key.cancel();
                    }
                    // 处理完逻辑后从集合移除
                    iterator.remove();
                }
            }
        } catch (IOException e) {
            e.printStackTrace();
        }
    }
}
最终结果如下:

至此:NIO 就算完了,作者学习 NIO 的目的主要是为了阅读 Kafka 服务端的源码,作为一个使用原生 NIO 来实现服务端通信还能保证这么高的吞吐量,这样的代码是值得研究的


评论区