


本文为 Hive 源码系列的第一节(共三节)客户端部分,本节主要内容是通过源码分析总结从 bin/hive 启动到 SQL 解析转换成 MR 再到提交任务打印结果的一个宏观流程;第二节则针对 HSQL 如何解析、转换成 MR 程序;第三节则针对 MR 的提交流程再加 Hive 的远程 DEBUG 模式。
这是 hive 的架构图
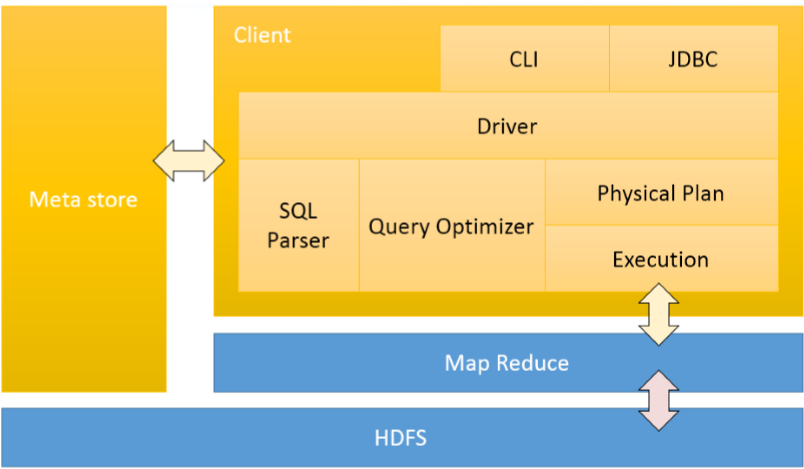
从架构图来看,黄颜色属于 Hive 范畴,蓝颜色属于 Hadoop 范畴,其中 MetaStore 可以说是独立 Hive 核心源码之外的,元数据信息会在编译器和优化器部分被使用。下面开始客户端也就是架构中 Driver 的部分,看启动 hive 时系统到底做了什么。
默认你下载编译好了源码(hive 的部分源码需要额外编译如:HiveParse),本系列源码 hive-3.1.2
CliDriver
看一个框架的源码个人习惯是:找到程序的入口、只看核心部分、跳过校验异常等。一切都要从hive这个脚本开始
首先可以看到在判断 hive 的客户端模式,是 cli 还是 beeline(80行左右)
if [ "$SERVICE" = "" ] ; then
  if [ "$HELP" = "_help" ] ; then
    SERVICE="help"
  else
    SERVICE="cli"
  fi
fi

if [[ "$SERVICE" == "cli" && "$USE_BEELINE_FOR_HIVE_CLI" == "true" ]] ; then
  SERVICE="beeline"
fi
之后在 314 行左右可以找到一段代码,执行 ./ext 目录下的脚本
for i in "$bin"/ext/*.sh ; do
  . $i
done
这个目录中有一个 cli.sh 的脚本
THISSERVICE=cli
export SERVICE_LIST="${SERVICE_LIST}${THISSERVICE} "

# Set old CLI as the default client
# if USE_DEPRECATED_CLI is not set or is not equal to false use old CLI
if [ -z "$USE_DEPRECATED_CLI" ] || [ "$USE_DEPRECATED_CLI" != "false" ]; then
  USE_DEPRECATED_CLI="true"
fi

updateCli() {
  if [ "$USE_DEPRECATED_CLI" == "true" ]; then
    export HADOOP_CLIENT_OPTS=" -Dproc_hivecli $HADOOP_CLIENT_OPTS "
    CLASS=org.apache.hadoop.hive.cli.CliDriver
    JAR=hive-cli-*.jar
  else
    export HADOOP_CLIENT_OPTS=" -Dproc_beeline $HADOOP_CLIENT_OPTS -Dlog4j.configurationFile=beeline-log4j2.properties"
    CLASS=org.apache.hive.beeline.cli.HiveCli
    JAR=hive-beeline-*.jar
  fi
}

cli () {
  updateCli
  execHiveCmd $CLASS $JAR "$@"
}

cli_help () {
  updateCli
  execHiveCmd $CLASS $JAR "--help"
}
因此 hivecli 的入口类是 hive-cli-*.jar 里面的 org.apache.hadoop.hive.cli.CliDriver,从这个类的 main 方法开始
main
public static void main(String[] args) throws Exception {
  // todo hive cli 程序入口
  int ret = new CliDriver().run(args);
  // todo ret 退出的代码 0 正常退出 5 用户取消 等
  System.exit(ret);
}
记住这个 ret,这个返回参数将贯穿始终,之后可以总结一下 ret 的各种返回值,或许在工作中可以根据退出的 code 先大致判断一下是什么类型的错误,如:0 正常退出,5 用户取消
run
OptionsProcessor oproc = new OptionsProcessor();
// todo 解析bin/hive 传入的系统参数是否正确
if (!oproc.process_stage1(args)) {
  // todo 1 系统参数异常
  return 1;
}
通过 process_stage1 这个方法进行参数校验,该方法主要是校验系统级别的参数,如:hiveconf、hive.root.logger、define、hivevar,若该类参数异常返回参数 ret = 1
之后会初始化日志类非重点
// todo SessionState 包含客户端的标准输入输出流。存储 sql、存储 sql 的查询结果等
CliSessionState ss = new CliSessionState(new HiveConf(SessionState.class));
// todo 定义输入流
ss.in = System.in;
try {
  // todo 定义输出、信息、错误流
  ss.out = new PrintStream(System.out, true, "UTF-8");
  ss.info = new PrintStream(System.err, true, "UTF-8");
  ss.err = new CachingPrintStream(System.err, true, "UTF-8");
} catch (UnsupportedEncodingException e) {
  // todo 3 字符编码异常
  return 3;
}
该部分首先创建了以客户端会话类 CliSessionState,该类会存储即为重要的数据,如我们输入的 sql,sql 执行结果都会封装在其中,之后基于这个类初始化标准输入、输出、错误流,这里如果环境不支持 UTF-8 字符编码会得到返回值 ret = 3
// todo 解析bin/hive 传入的用户参数是否正确
if (!oproc.process_stage2(ss)) {
  // todo 2 用户参数异常
  return 2;
}
通过 process_stage2 再次校验参数,注意入参的区别,process_stage1 入的是 args,其实在 process_stage1 的时候 OptionsProcessor 会保存所有的 args,并在 process_stage2 根据参数的 key 赋值给 CliSessionState 也就是 ss 对象(扯多了,不是很重要),process_stage2 负责解析用户参数如 -e、-f、-v、-database 等,这类参数异常得到返回值 ret = 2
// todo 是否设置静默模式
if (!ss.getIsSilent()) {
  if (logInitFailed) {
    System.err.println(logInitDetailMessage);
  } else {
    SessionState.getConsole().printInfo(logInitDetailMessage);
  }
}

HiveConf conf = ss.getConf();
for (Map.Entry<Object, Object> item : ss.cmdProperties.entrySet()) {
  conf.set((String) item.getKey(), (String) item.getValue());
  ss.getOverriddenConfigurations().put((String) item.getKey(), (String) item.getValue());
}

prompt = conf.getVar(HiveConf.ConfVars.CLIPROMPT);
prompt = new VariableSubstitution(new HiveVariableSource() {
  @Override
  public Map<String, String> getHiveVariable() {
    return SessionState.get().getHiveVariables();
  }
}).substitute(conf, prompt);
prompt2 = spacesForString(prompt);
判断是否需要设置静默模式,HiveConf 为 hive 的配置类,我们在命令行中通过 set 修改当前会话的配置就是通过这个 conf 对象,prompt 就是交互页面的 hive >可以通过配置修改,代码就是读取的HiveConf.ConfVars.CLIPROMPT可以点进去看看具体的配置项,做到这里代表着启动参数级别不存在问题,即将进入交互式页面
try {
  // todo 核心代码
  return executeDriver(ss, conf, oproc);
} finally {
  ss.resetThreadName();
  ss.close();
}
核心代码,携带 CliSessionState(会话信息),HiveConf(配置信息),OptionsProcessor(参数信息) 执行下一步操作
executeDriver
CliDriver cli = new CliDriver();
cli.setHiveVariables(oproc.getHiveVariables());

// use the specified database if specified
// todo 处理 hive --database default
cli.processSelectDatabase(ss);

// Execute -i init files (always in silent mode)
// todo 处理 hive -i initFile
cli.processInitFiles(ss);

// todo 处理 hive -e
if (ss.execString != null) {
  int cmdProcessStatus = cli.processLine(ss.execString);
  return cmdProcessStatus;
}

try {
  // todo 处理 hive -f
  if (ss.fileName != null) {
    return cli.processFile(ss.fileName);
  }
} catch (FileNotFoundException e) {
  System.err.println("Could not open input file for reading. (" + e.getMessage() + ")");
  // todo 3 -f 文件不存在
  return 3;
}
// todo 判断执行引擎是否是 mr,如果是 打印过时提示
if ("mr".equals(HiveConf.getVar(conf, ConfVars.HIVE_EXECUTION_ENGINE))) {
  console.printInfo(HiveConf.generateMrDeprecationWarning());
}
这部分主要做一些初始化的工作,若我们在启动 hive 的时候指定了数据库会交由 processSelectDatabase 来处理,这个方法的核心就是 processLine("use " + database + ";"),processLine 是一个很重要的方法先不说。processInitFiles 就是执行初始化文件对应命令是 hive -i initFile 这个下面可以稍微说一下
public void processInitFiles(CliSessionState ss) throws IOException {
  boolean saveSilent = ss.getIsSilent();
  // todo 开启静默模式
  ss.setIsSilent(true);
  for (String initFile : ss.initFiles) {
    int rc = processFile(initFile);
    if (rc != 0) {
      System.exit(rc);
    }
  }
  // todo 如果 initFile 没有指定,尝试获取 .hiverc 文件
  if (ss.initFiles.size() == 0) {

    if (System.getenv("HIVE_HOME") != null) {
      // todo $HIVE/bin/.hiverc
      String hivercDefault = System.getenv("HIVE_HOME") + File.separator +
        "bin" + File.separator + HIVERCFILE;
      if (new File(hivercDefault).exists()) {
        int rc = processFile(hivercDefault);
        if (rc != 0) {
          System.exit(rc);
        }
        console.printError("Putting the global hiverc in " +
                           "$HIVE_HOME/bin/.hiverc is deprecated. Please " +
                           "use $HIVE_CONF_DIR/.hiverc instead.");
      }
    }
    // todo $HIVE_CONF_DIR/.hiverc
    if (System.getenv("HIVE_CONF_DIR") != null) {
      String hivercDefault = System.getenv("HIVE_CONF_DIR") + File.separator
        + HIVERCFILE;
      if (new File(hivercDefault).exists()) {
        int rc = processFile(hivercDefault);
        if (rc != 0) {
          System.exit(rc);
        }
      }
    }
    // todo ~/.hiverc
    if (System.getProperty("user.home") != null) {
      String hivercUser = System.getProperty("user.home") + File.separator +
        HIVERCFILE;
      if (new File(hivercUser).exists()) {
        int rc = processFile(hivercUser);
        if (rc != 0) {
          System.exit(rc);
        }
      }
    }
  }
  // todo 恢复最开始的静默模式状态
  ss.setIsSilent(saveSilent);
}
如果我们指定了初始化文件,则通过 processFile 执行文件里面的 SQL,processFile 其实就是多了一步文件内容的处理,找出文件里一个个独立的 SQL 交给 processLine 执行,之后会继续加载三个地方的默认初始化文件:$HIVE/bin/.hiverc(过时)、$HIVE_CONF_DIR/.hiverc、~/.hiverc,因此对于一些通用的又不方便放在配置文件的参数可以放在上面三个路径的文件中;之后就是处理 -e、-f这类操作,-f 文件不存在得到返回值 ret = 3
执行完上述这些就进入了命令行交互界面,开始检测我们的输入 SQL 了
String line;
// 默认返回
int ret = 0;
String prefix = "";
String curDB = getFormattedDb(conf, ss);
// hive (default) >
String curPrompt = prompt + curDB;
String dbSpaces = spacesForString(curDB);
// 循环读取控制台内容
while ((line = reader.readLine(curPrompt + "> ")) != null) {
  // todo 处理回车
  if (!prefix.equals("")) {
    prefix += '\n';
  }
  // todo 读取到 -- 即注释,继续舍弃读取
  if (line.trim().startsWith("--")) {
    continue;
  }
  if (line.trim().endsWith(";") && !line.trim().endsWith("\\;")) {
    line = prefix + line;
    // todo 读取到;结尾,这里开始执行一行sql
    ret = cli.processLine(line, true);
    // todo 执行完,重置 prefix
    prefix = "";
    curDB = getFormattedDb(conf, ss);
    curPrompt = prompt + curDB;
    dbSpaces = dbSpaces.length() == curDB.length() ? dbSpaces : spacesForString(curDB);
  } else {
    // todo 如果不是;结尾,进行追加,直到读取到;
    prefix = prefix + line;
    curPrompt = prompt2 + dbSpaces;
    continue;
  }
}
原来高大上的黑窗口交互页面其实就是 while true 实现的,首先处理回车;处理 -- 即 hive 的注释直接 continue 忽略这一行;直到读取到以;结尾且不是\\;的输入,如果不是则继续输入同时把当前行的输入拼接到上次输入之后。最后通过 processLine 来执行,执行完重置 prefix 再次循环接受;的输入。
processLine
上面进入的方法是 processLine(line, true),true 代表允许打断,可以理解为用户 ctrl c 操作,因此 processLine 最开始是处理打断的逻辑,这类操作本质就是注册一个 JVM 的 hook 程序,检测信号量在 JVM 退出时执行一段退出逻辑,我们可以手写一个类似的程序
import java.util.concurrent.TimeUnit;

public class Test {
  public static void main(String[] args) throws InterruptedException {
    Runtime.getRuntime().addShutdownHook(new Thread(() -> {
      System.out.println("程序异常终止...执行首尾工作");
    }, "hook线程"));

    while (true) {
      System.out.println("消费数据");
      TimeUnit.SECONDS.sleep(1);
    }
  }
}
手动终止程序
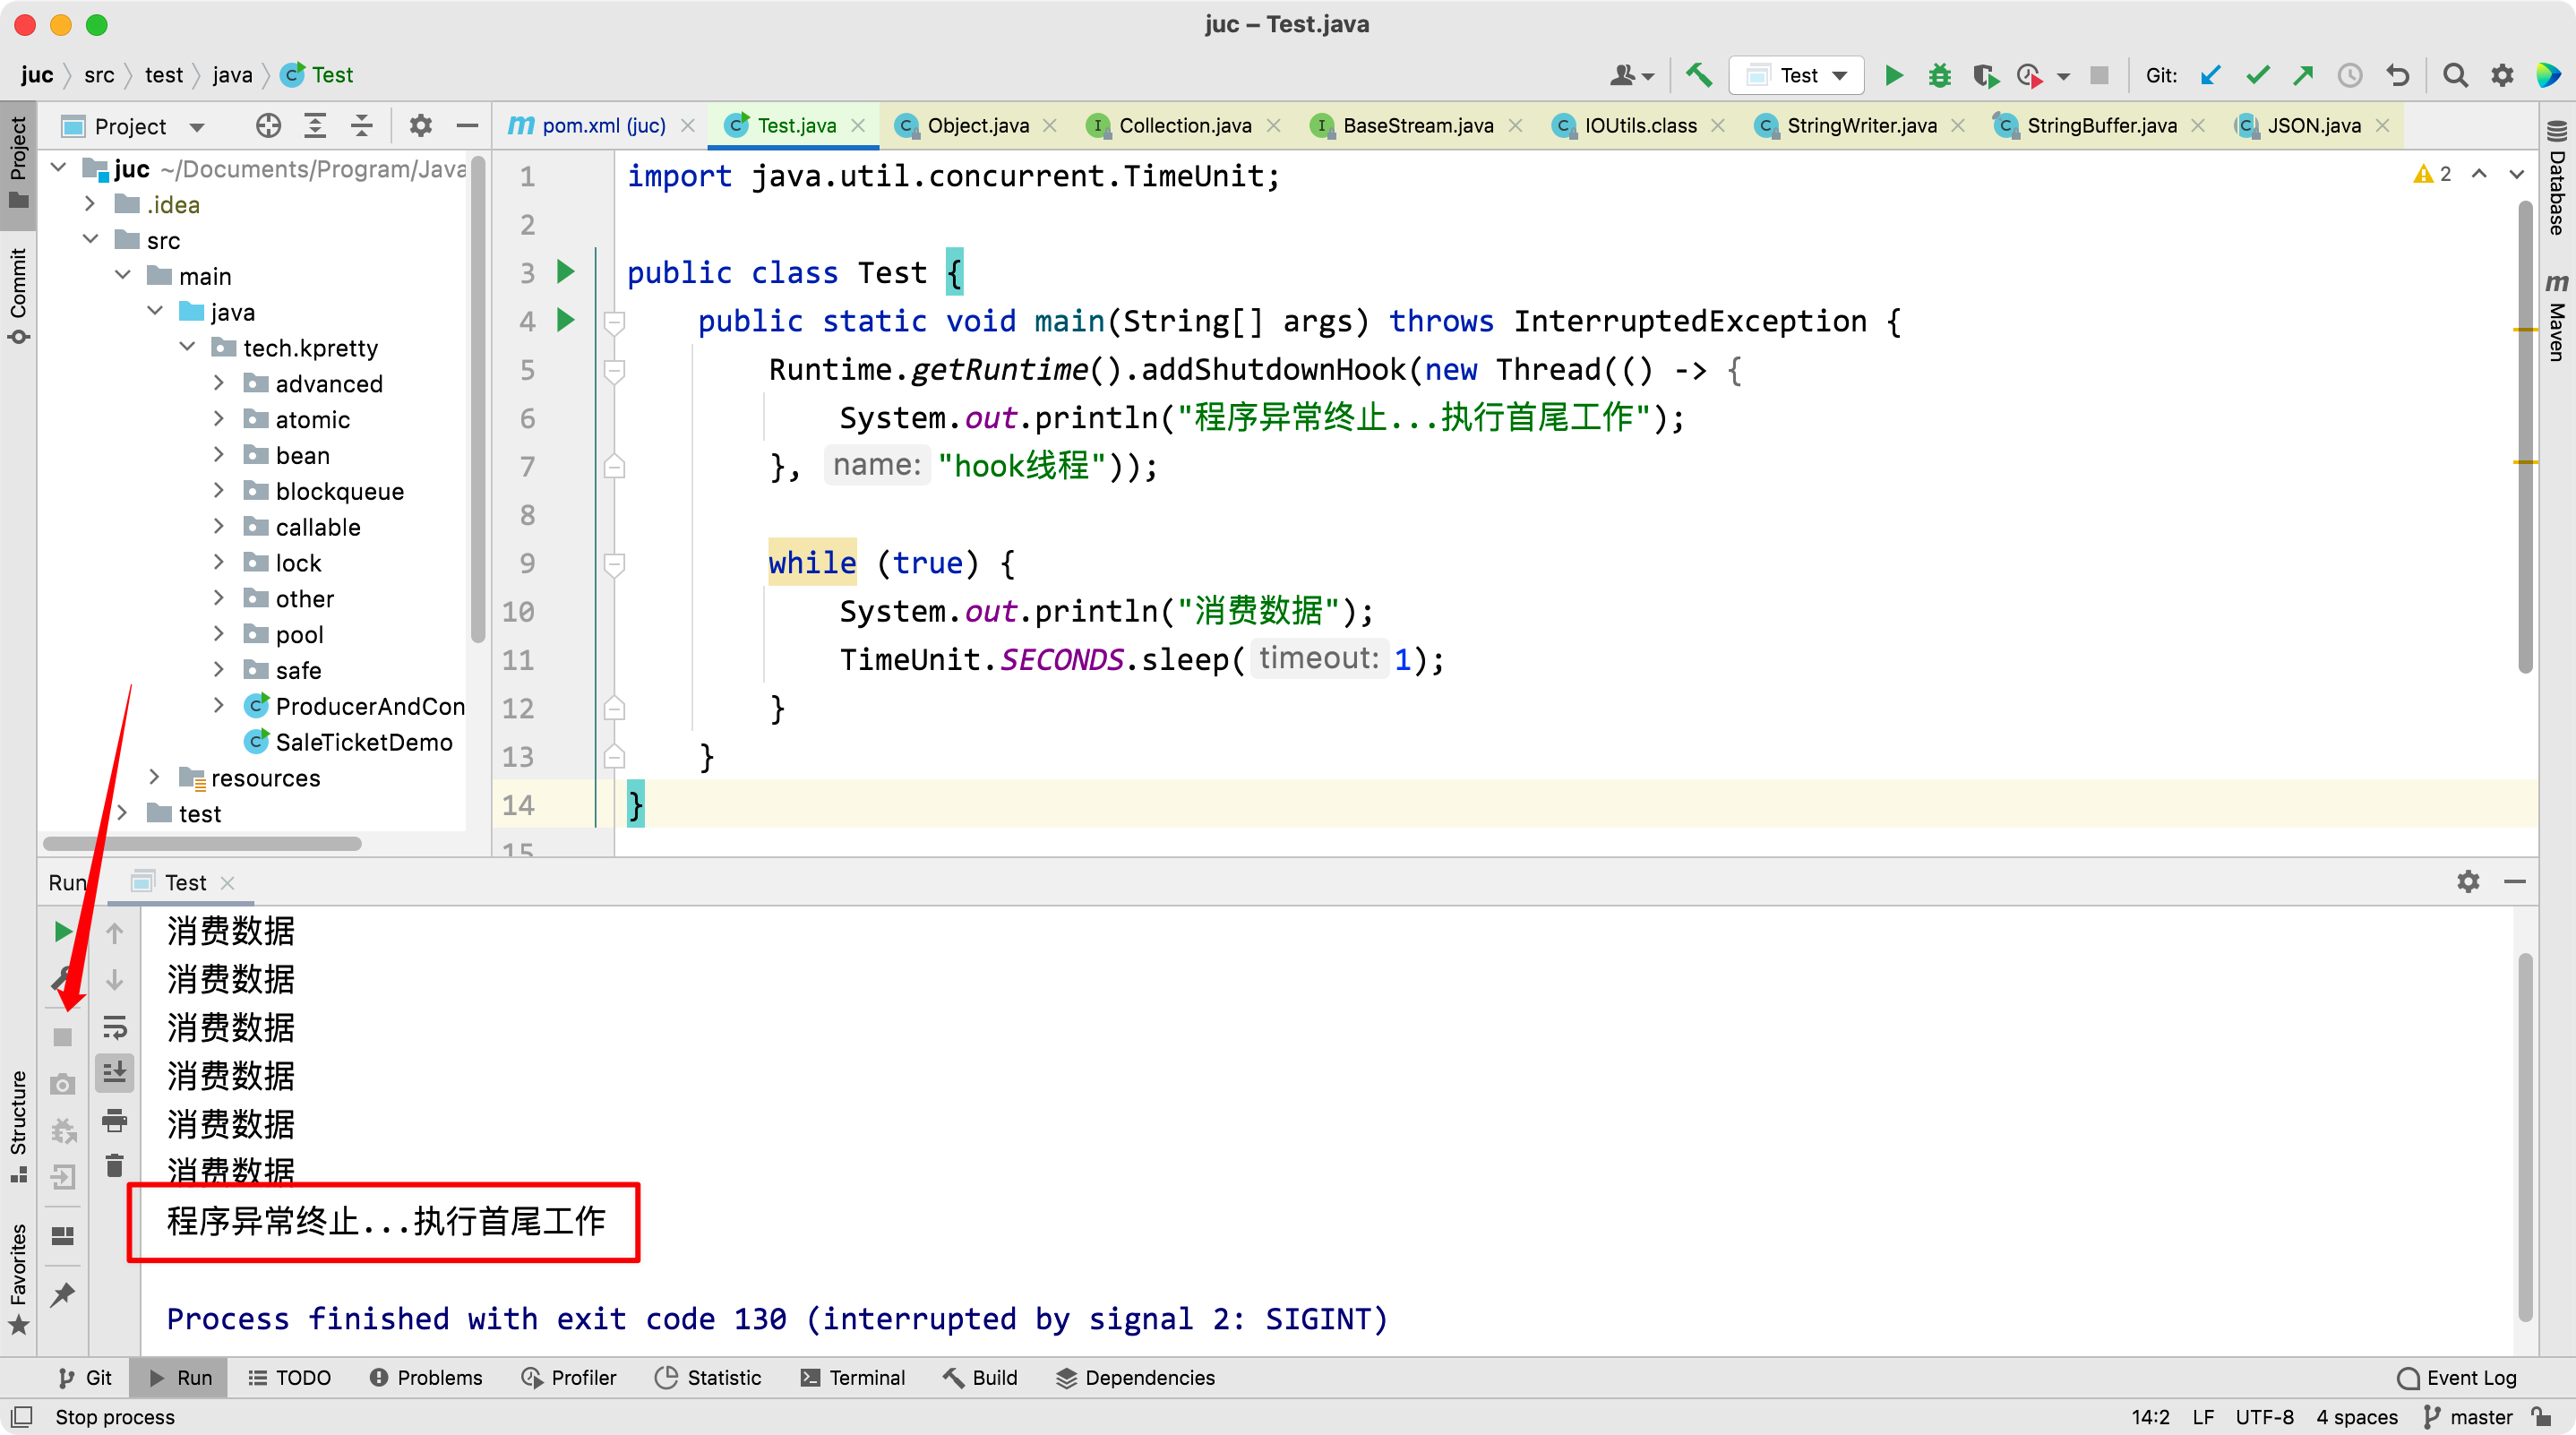
而当前的 hook 程序,我们在 ctrl c 时控制台打印的信息就是这里的
Exiting the JVM
Interrupting... Be patient, this might take some time.
Press Ctrl+C again to kill JVM
上面作为一个饭后谈资,不是 hive 的重点,看下面的核心逻辑
// todo 分割 SQL,处理一行多条 SQL 的情况
List<String> commands = splitSemiColon(line);
这行代码是非常细节的,因为上面判断是否是以;结尾并发送到这里,但存在一行有好几个 SQL
hive > use hive; select * from t1;
这行在 hive 是可行的,且从打印信息来看是有两条记录,也就是说 hive 一次只会执行一个独立的 SQL,这也是模块化的思路,设计执行模块的时候肯定是针对单个 SQL,那问题是既然处理多个 SQL,为什么要整一个方法,而且这个方法实现还不简单,直接 line.split(";")不就好了吗?考虑下面的 SQL
hive > use hive; select split(t1.c1,';') from t1
真是细节到家了,最后拿个分割后的 SQL 调用 processCmd 方法,这个方法就是执行单个 SQL
processCmd
// todo 再次见到 SessionState
CliSessionState ss = (CliSessionState) SessionState.get();
ss.setLastCommand(cmd);

ss.updateThreadName();

// Flush the print stream, so it doesn't include output from the last command
ss.err.flush();
String cmd_trimmed = HiveStringUtils.removeComments(cmd).trim();
// todo 将一个 SQL 按照任意多个空格分割成一个个 token
String[] tokens = tokenizeCmd(cmd_trimmed);
int ret = 0;
再次见到 SessionState,同时将 SQL 做一些格式上的处理,去除前后空格,按空格分割成一个个 token等操作,之后对 SQL 或 token 做一些判断
if (cmd_trimmed.toLowerCase().equals("quit") || cmd_trimmed.toLowerCase().equals("exit")) {
  // if we have come this far - either the previous commands
  // are all successful or this is command line. in either case
  // this counts as a successful run
  ss.close();
  System.exit(0);

}
如果 SQL 是 quit、exit 直接正常退出
else if (tokens[0].equalsIgnoreCase("source")) {
  // todo 处理 使用 source 执行 sql 文件
  String cmd_1 = getFirstCmd(cmd_trimmed, tokens[0].length());
  cmd_1 = new VariableSubstitution(new HiveVariableSource() {
    @Override
    public Map<String, String> getHiveVariable() {
      return SessionState.get().getHiveVariables();
    }
  }).substitute(ss.getConf(), cmd_1);

  File sourceFile = new File(cmd_1);
  if (!sourceFile.isFile()) {
    console.printError("File: " + cmd_1 + " is not a file.");
    ret = 1;
  } else {
    try {
      // todo 执行SQL文件
      ret = processFile(cmd_1);
    } catch (IOException e) {
      console.printError("Failed processing file " + cmd_1 + " " + e.getLocalizedMessage(),
                         stringifyException(e));
      ret = 1;
    }
  }
}
取第一个 token 判断是否是 source,source 就是在命令行执行一个 SQL 文件,因此这段逻辑就是 executeDriver 里 -f 的操作,source 的文件不存在得到返回值 ret = 1
else if (cmd_trimmed.startsWith("!")) {
  // todo ! 执行 shell 命令
  // for shell commands, use unstripped command
  String shell_cmd = cmd.trim().substring(1);
  shell_cmd = new VariableSubstitution(new HiveVariableSource() {
    @Override
    public Map<String, String> getHiveVariable() {
      return SessionState.get().getHiveVariables();
    }
  }).substitute(ss.getConf(), shell_cmd);

  // shell_cmd = "/bin/bash -c \'" + shell_cmd + "\'";
  try {
    ShellCmdExecutor executor = new ShellCmdExecutor(shell_cmd, ss.out, ss.err);
    ret = executor.execute();
    if (ret != 0) {
      console.printError("Command failed with exit code = " + ret);
    }
  } catch (Exception e) {
    console.printError("Exception raised from Shell command " + e.getLocalizedMessage(),
                       stringifyException(e));
    ret = 1;
  }
}
判断是否是!开头的,这段是处理在 hive 中执行 shell 命令的操作,如果上面的都不是那就是普通 SQL
if (proc instanceof IDriver) {
  // Let Driver strip comments using sql parser
  ret = processLocalCmd(cmd, proc, ss);
} else {
  ret = processLocalCmd(cmd_trimmed, proc, ss);
}
不用管是哪个 Driver,最终走的都是 processLocalCmd
processLocalCmd
这个方法做的是全流程宏观上的事情,从 SQL 的解析,到 SQL 执行,再到结果打印。
// todo 获取开始时间
long start = System.currentTimeMillis();
if (ss.getIsVerbose()) {
  out.println(cmd);
}
// todo 执行 sql
ret = qp.run(cmd).getResponseCode();
if (ret != 0) {
  qp.close();
  return ret;
}

// query has run capture the time
// todo 获取结束时间
long end = System.currentTimeMillis();
double timeTaken = (end - start) / 1000.0;
qp.run 是真正开始执行本次 SQL,先不看具体的细节是下一节的内容,同时记录执行的时间,作为后面的输出打印
// todo 打印头信息
printHeader(qp, out);
这个方法会根据配置信息hive.cli.print.header判断是否要打印头信息,之后从 qp 中获取执行结果并按行循环打印
console.printInfo("Time taken: " + timeTaken + " seconds" + (counter == 0 ? "" : ", Fetched: " + counter + " row(s)"));
超熟悉是不是,如
hive (default)> select split('123;123',';');
OK
_c0
["123","123"]
Time taken: 1.941 seconds, Fetched: 1 row(s)
就是在这里面打印的,如果后面公司需要修改源码,可以在这里加一些公司信息用来 ZB 😁😁😁
回到核心的 qp.run(cmd) 方法,看 hive 如何执行 SQL,明确一下这个是一种多态写法,需要看具体的实现类

因此 CliDriver 的代码就结束了,开始进入 Driver 类,这个类完成了SQL的解析、编译、优化、执行
Driver
run
public CommandProcessorResponse run() {
  return run(null, true);
}
进入重载方法,最后到 runInternal,这是一种常见的写法很多源码都喜欢这么写,提供一个内部的方法
runInternal
这里面做了很多事情,也注册了类似的 hook,感兴趣的可以研究一下,这个方法重点是
if (!alreadyCompiled) {
  // compile internal will automatically reset the perf logger
  compileInternal(command, true);
  // then we continue to use this perf logger
  perfLogger = SessionState.getPerfLogger();
}
开始编译 SQL 了,编译完直接执行,这部分是第三节的内容
try {
  execute();
} catch (CommandProcessorResponse cpr) {
  rollback(cpr);
  throw cpr;
}
compileInternal
try {
	// todo 编译
  compile(command, true, deferClose);
} catch (CommandProcessorResponse cpr) {
  try {
    releaseLocksAndCommitOrRollback(false);
  } catch (LockException e) {
    LOG.warn("Exception in releasing locks. " + org.apache.hadoop.util.StringUtils.stringifyException(e));
  }
  throw cpr;
} finally {
  compileLock.unlock();
}
这里体现出 hive 的源码其实是有点乱的,至少从命名规范来看,不管了继续进入 compile(command, true, deferClose)
compile
重点来了,这个方法有近 300 行,但我们只需要关注 3 行即可,建议直接搜方法名,肉眼不太容易能找到这三行
// todo:解析器。将 SQL -> AST
tree = ParseUtils.parse(command, ctx);
解析器,将我们的 SQL 转换成 AST(抽象语法书),基于 Antlr 框架直接生成。
// todo:编译器、优化器
sem.analyze(tree, ctx);
- AST 编译成 QueryBlock(QB,查询块)
- QB 转换成 OperatorTree(操作树,也称逻辑执行计划)
- 重写逻辑执行计划
- OperatorTree 转换成 TaskTree(执行树,也称物理执行计划)
- 优化物理执行计划
因此这部分是 Hive 最核心的部分没有之一,到这里本节就结束了。下面是本节的类方法调用关系图
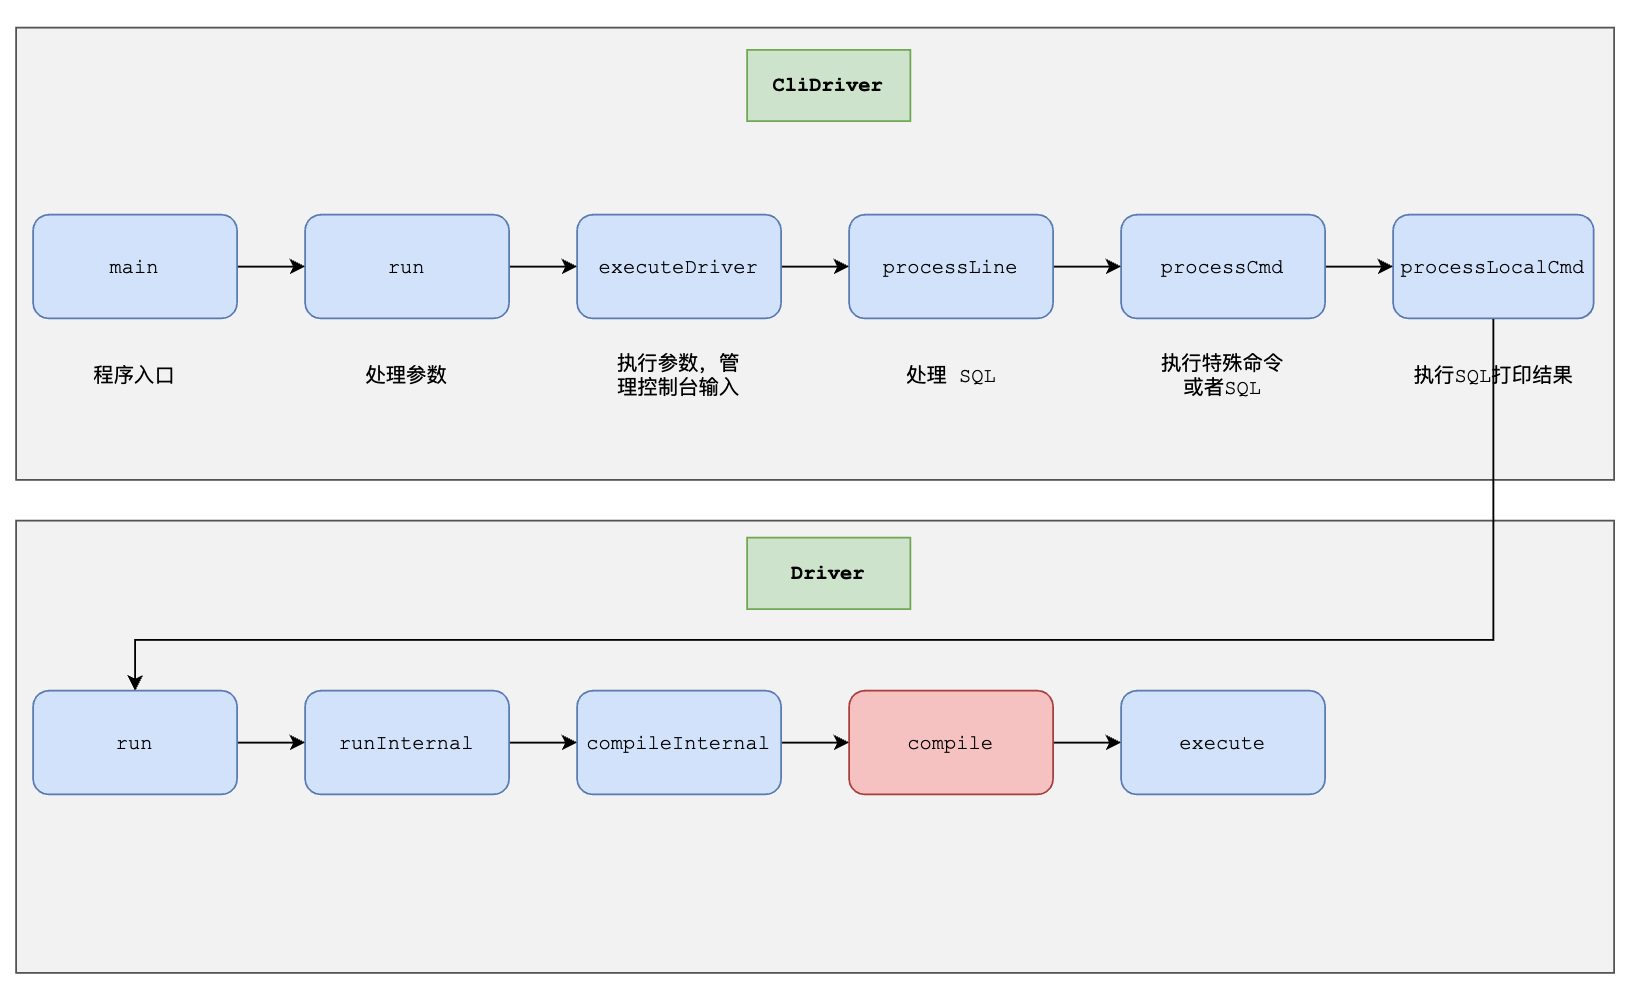
下一节将从 compile 开始
评论区